Hello everyone,. I updated the original firmware that came with the S1 and the truth is that it has improved the machine a lot.
Now I have a question, because I couldn’t find a tutorial that explains it (if anyone has it or knows where to find it, could you please give me the link?)
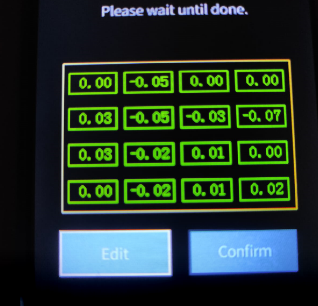
The issue is about self-leveling. Now the calibration values appear on the screen (first I do the manual calibration with the springs adjusting the plate and the head) and then I start the autolevel.
When finished, it shows me a mesh with different values and there are two options, EDIT or ACCEPT.
I have seen that using EDIT I can move around the mesh and change those values, but I DON’T UNDERSTAND what value I should put there.
In the figure, in my opinion I have the bed calibrated quite well (I use a glass plate) but I am intrigued by the possibility of modifying the values (and with what criteria to do so) to improve this calibration even more.
Is there a tutorial that explains it? I found all the information that Creality gives very basic. Even the “manual” that accompanies the machine is ridiculously brief and lacking in information, especially for those of us just starting out.
I wouldn’t edit any of the values, those values are a mesh of how far the bed is from level and the printer will compensate using those values. If the edit allows for a bigger number of check points it would make the mesh more accurate.
Thanks for answering, but I still have a doubt. I don’t understand why someone would modify any value of the mesh taking into account the precision of the autolevel, and therefore I understand even less why Creality offers the possibility of modifying those values?.. is the autocalibration supposed to give the value “closer to ideal” therefore makes no sense to allow changing them… I couldn’t find any answer that satisfies me until now.
Marlin standard allows you to edit. Would take a lot to remove it. It was more useful in the early days of abl as they were less accurate and sometimes small adjustments are needed. Also without an probe you are able to create and edit a mesh using probe points but with a bit of paper old school way use the same system but you just move the nozzle lower down until you have resistance at multiple points to create the mesh