Hello, I have had the K2 Plus for a month and am very satisfied with it. I only have one problem: when I print ASA, the first layers come out perfectly, but when I print the third layer, it starts to scrape against the 3D print. I suspect it is likely a software issue, but I cannot find it. Hopefully, you can help me. Thank you
I had the similar problems with ASA.
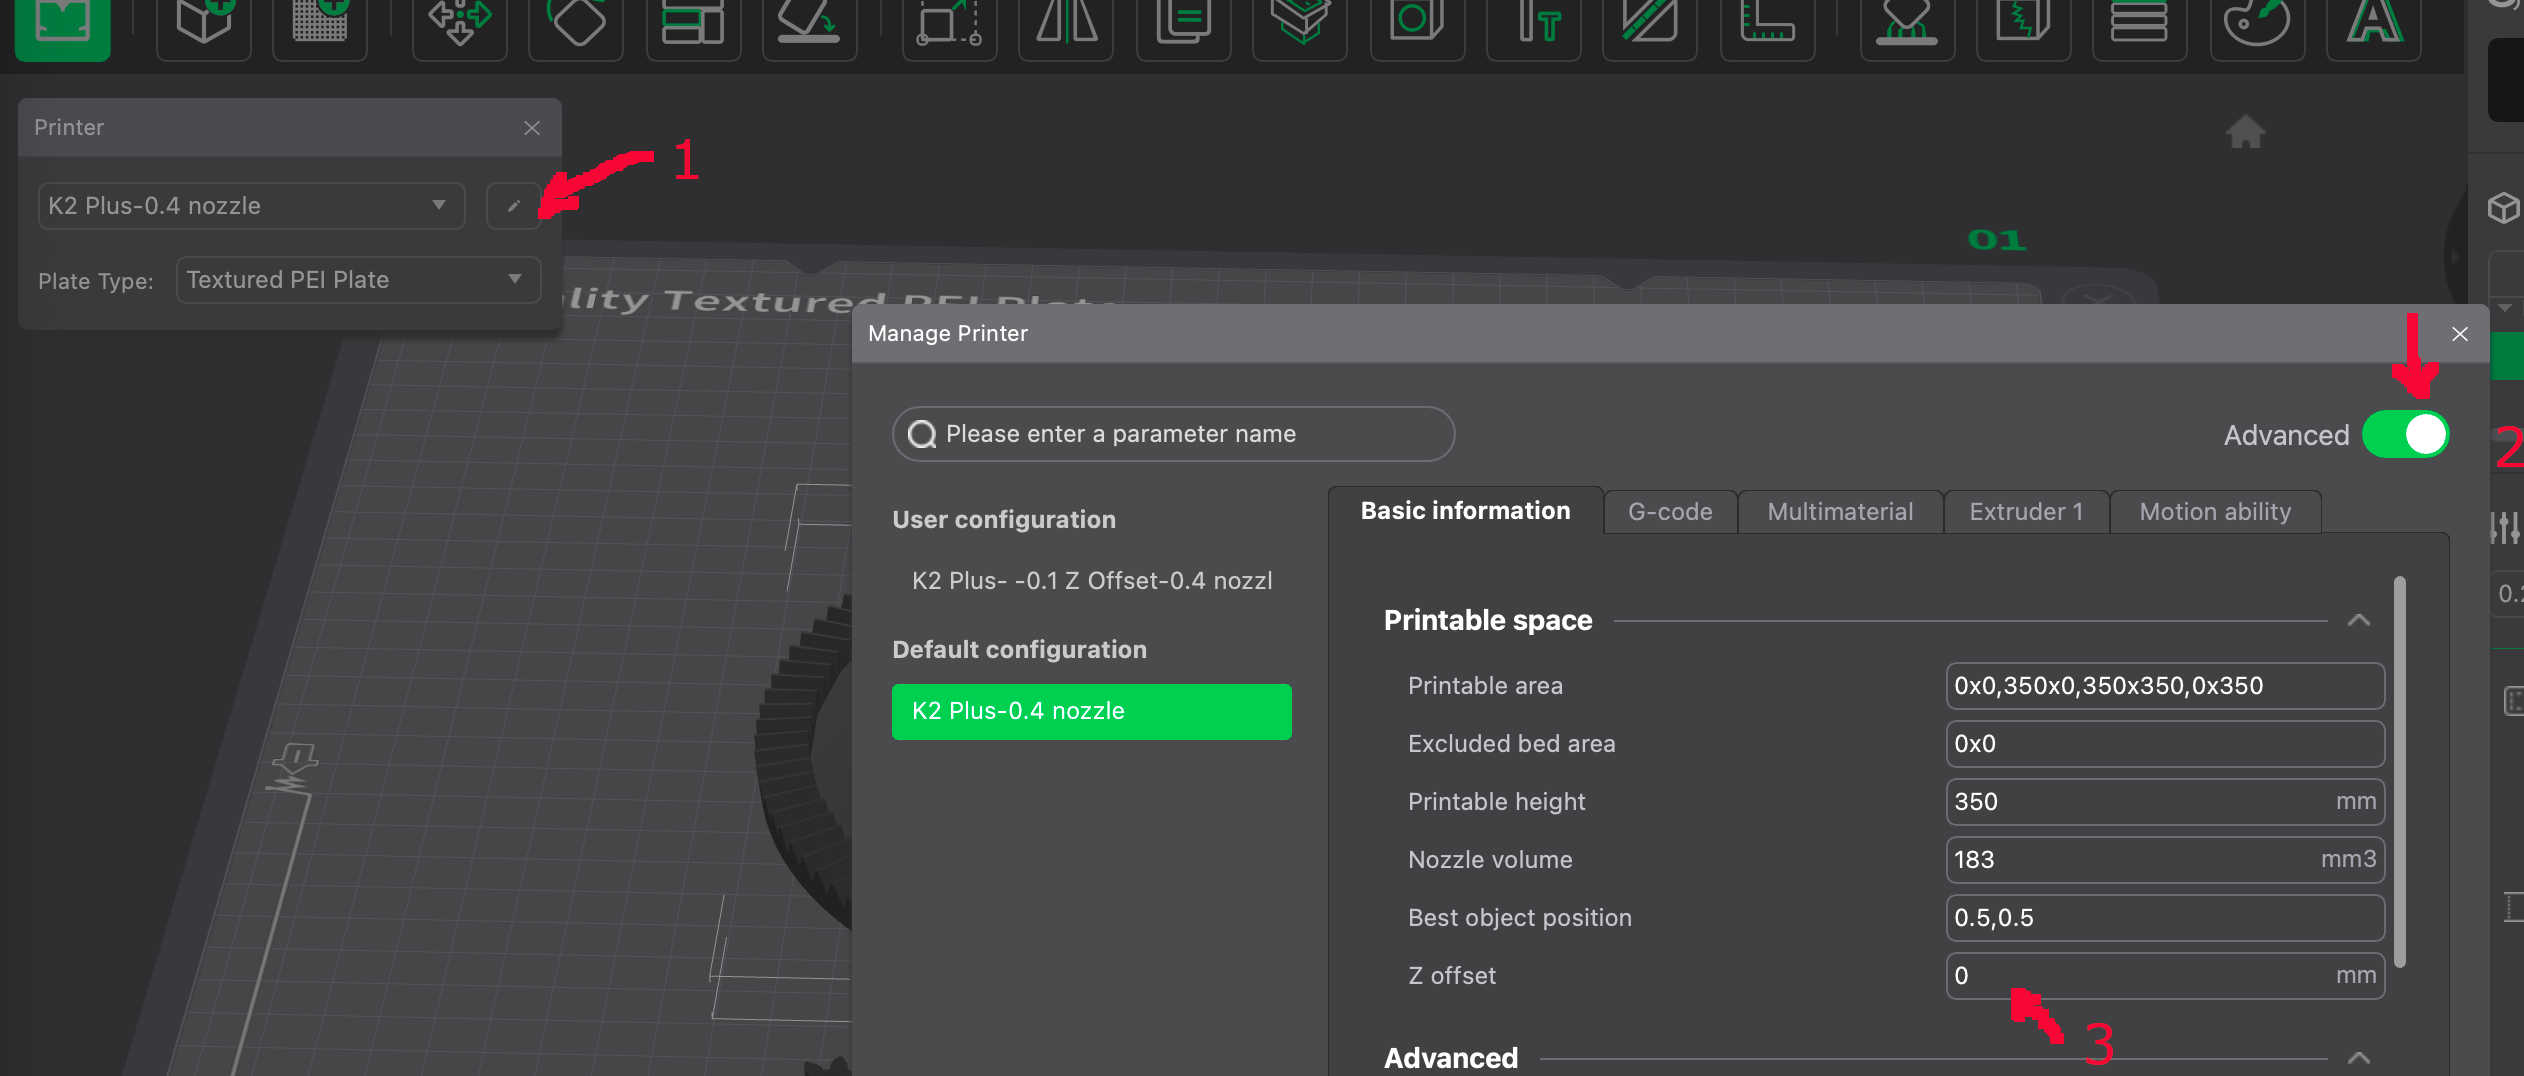
Try adjusting your printer’s “Z offset”
-
Go to the Printer box on LHS of Creality Print
-
inside the popped up box click on advanced
-
adjust the Z offset.
Some people say you should use negative values ie -0.1 or -0.05 but I found +0.05 fixed mine.
You might also have to adjust your first layer height.
1 Like
Hello Bob
the problem is that the first layer perfect is the second layer scraped this on the 3d print i set to 0.100 and this is i thinck ok but i think it print to fast kan you let me see your settings plzz on a picture thx
Except for the “Z Offset” I use all the standard “K2 Plus-0.4 nozzle printer settings.
For Filament settings I use the standard “Generic ASA” filament settings. The only things I usually change are the Number of wall loops - usually increase to 4 or 5 and the sparse infill density.
If you think its printing too fast you can try slowing it down.
I have only tried ASA once (at the moment too busy to try again) but mine didnt extrude at all nor did it stop saying it wasnt extruding, like it does sometimes.
hello bob can you say m how to slow down the k2 plus plzz i dont find the settings thx for the great help
Try 25% slower to start with and work up and down from there. Sometimes even a 10% slowdown will make enough of a difference.
I had very similar issues…here is my goto workflow when it happened to me and what I’ve learned to do to have great, complete, ASA prints.
- Dry the filament. Absolutely a must otherwise the inner filament on the spool microscopically bubbles when going through the hot end, etc. Drying the filament - ASA is 175F for 4-6 hours. I use a repurposed air fryer with a piece of parchment between the rack and spool to keep the spool from warping. This also solved a lot of initial problems with ASA’S first few layers looking ugly.
- Bake the Plate at 90C for 20-30 minutes before starting the print. Ensures its not going to change shape by 3rd or 4th layer. This solved issues where some part of the bed printed well while others didn’t.
- Calibrate - Autolevel at the start. After baking the bed, this new mesh will reflect the current shape (not some stored 60C bed mesh). At 90C, the bed will warp more than at 60C.
- (Maybe 3a) If you’re using an off brand of filament add the flow and pressure advance to the calibration as they will override the default setting for a Generic filament and use the settings derived from the just-printed quick calibration.
- When running the print, check in Fluid what the mesh looks like. If it looks like a taco or saddle and greater than a .4 deviation you may need to adjust z offset when the print is running. Autoleveling won’t be able to handle it all. I used aluminum foil as shims to level my K2 Plus bed. Eliminated needing to adjust z offset on that 3rd and 4th layer.
The head is probably plowing into the print because of the warped bed where the autoleveling cant handle it completely. As that print is running, listen and watch for the scraping…if it is, lower the z (its the down arrow z - which lowers the bed and effectively raises the nozzle). I use the 0.010 increment. Push it once, listen and watch for scraping. Push it again if still doing it. And again…etc. Ive had to go as much as .035 when it was really bad especiallyif I didn’t go through the above workflow.
One more thing….if you look at the bed mesh and find common height areas (mine is a saddle with a high middle and very low front and rear edges without the shims) and if your print allows it, place your parts on those common height areas. The plowing occurs for me on long parts that run from front edge to back edge. Sometime I can, and still do, re-orient to run left to right or print mostly in the center, etc. Its all part of using a machine to make stuff (drill press, table saws, cnc, etc.). But once you have your workflow, you’ll be cranking out those ASA parts.
Hope this helps.
1 Like
I’m seeing the same thing too. Only on ASA using the 0.4mm nozzle. I think switching to the 0.6mm nozzle resolves the issue but it’s a pain to switch nozzles all the time.
This definitely seems like a software issue because it’s definitely not a bed leveling/calibration issue. The first layer looks absolutely beautiful but on about the third layer up to about 2 or 3mm, the layers scrape like crazy.
I’ve tried several prints with different models, all have the same issue with the 0.4mm nozzle and my last print used
- 0.4mm nozzle
- Filament was brand-new and dried for a few hours
- Stock “Generic ASA” profile
- Stock 0.2mm layer-height profile
- Slowed down to “Stable” print speed
- 13x13 bed mesh grid
- 1st layer - good
- 3rd layer + several after - trash
- By the time it gets past ~3mm or so, the issue seems to clear up
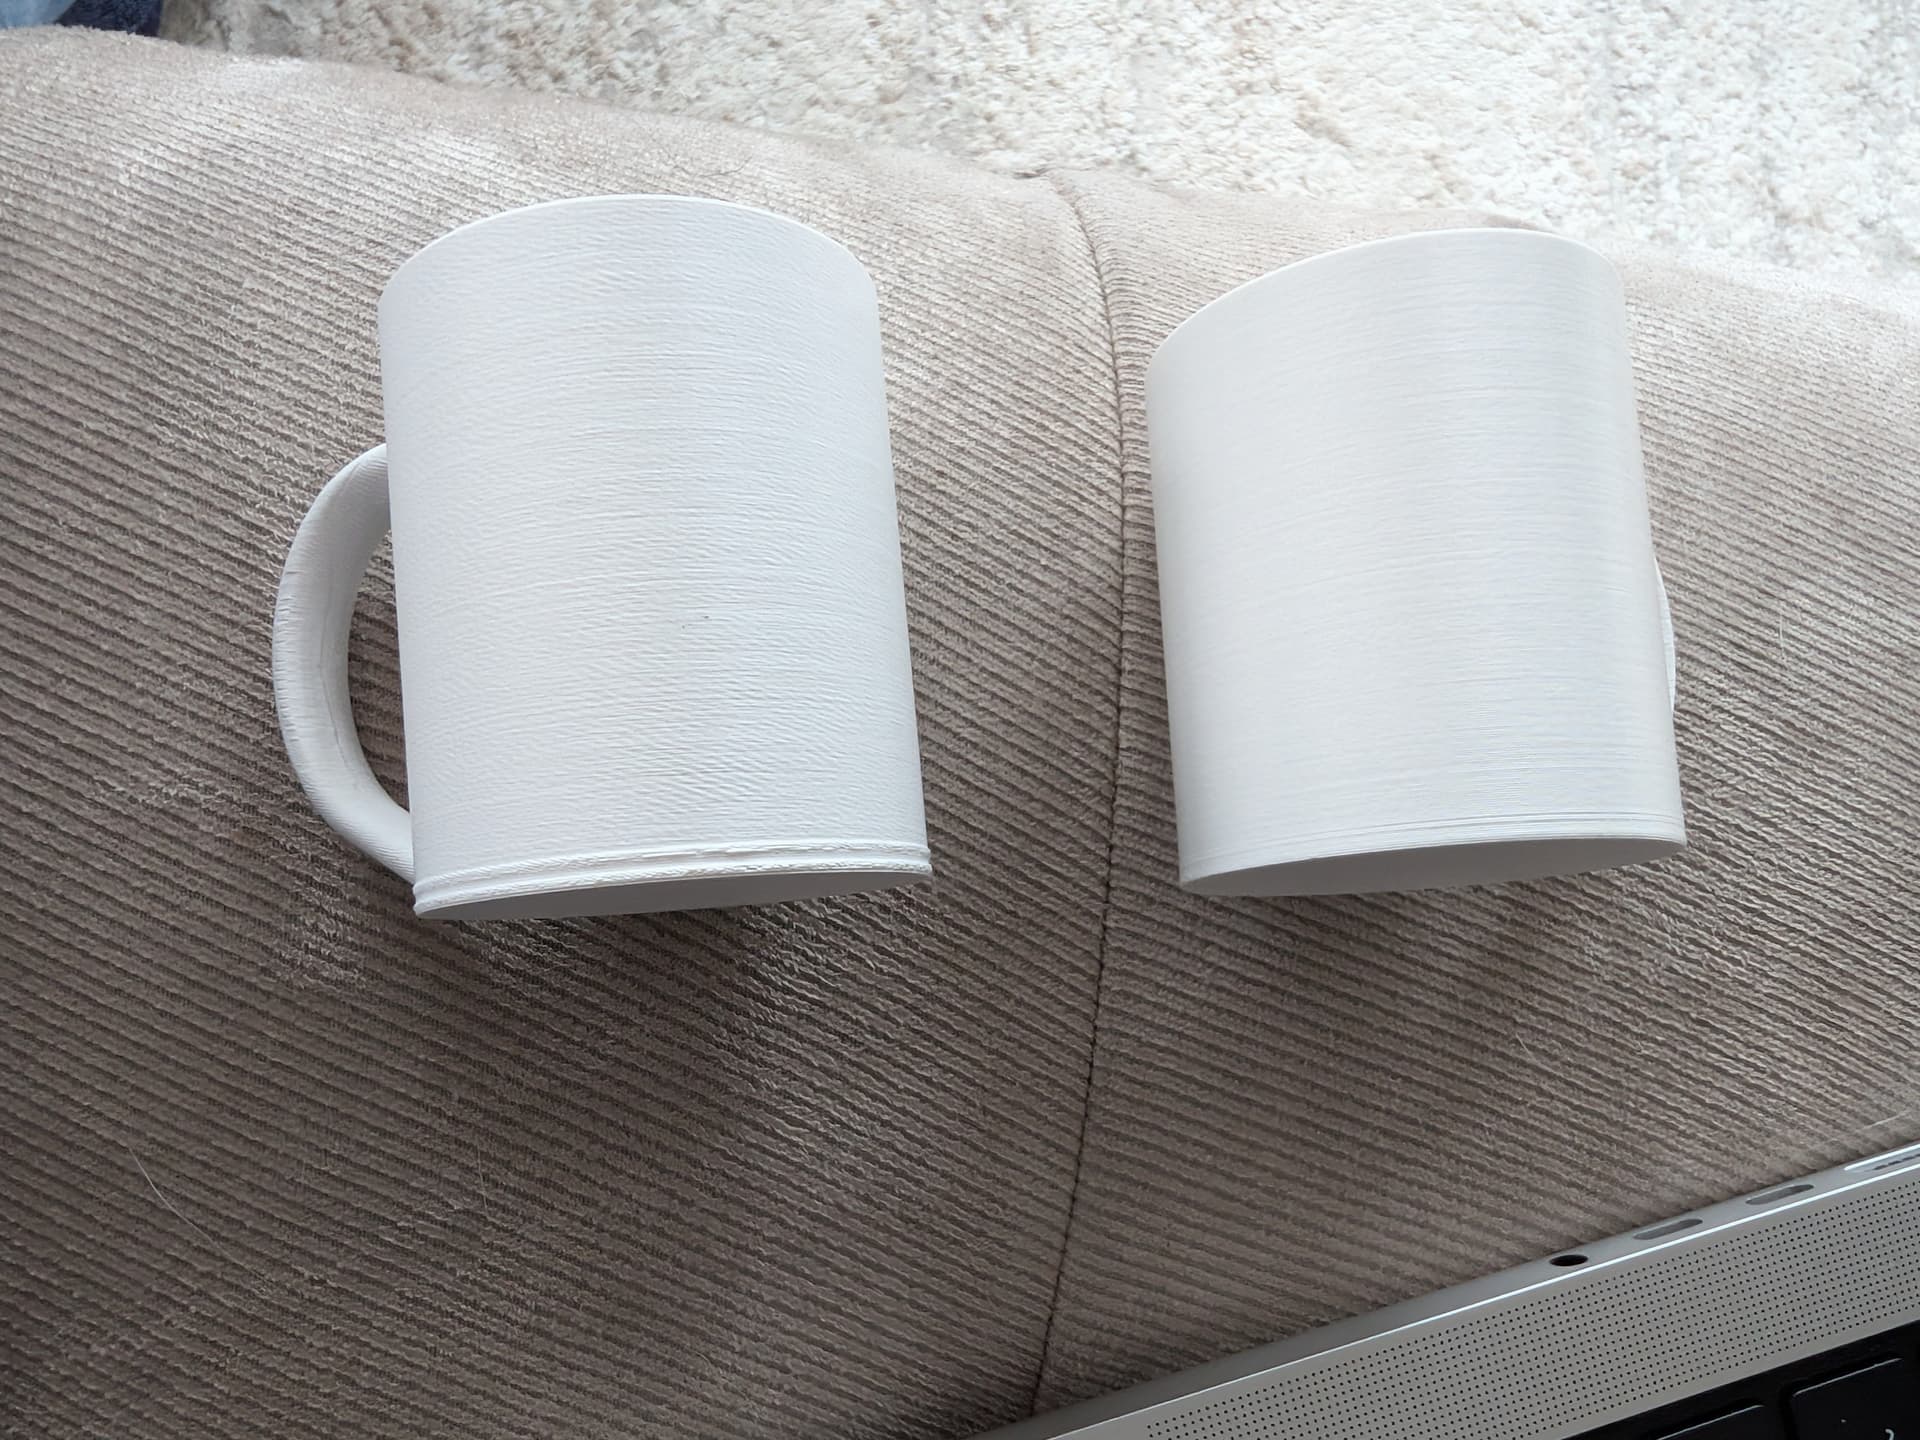
Here is a 0.4 (left) vs 0.6 (right) nozzle comparison. 0.6 isn’t perfect either but it’s waaaay better.