Bad dimensional accuracy, first layer over-extruded and other layers under-extruded on K1C, a nightmare

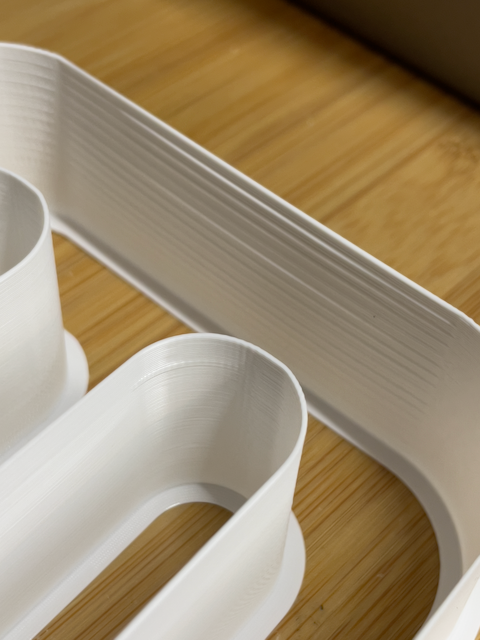
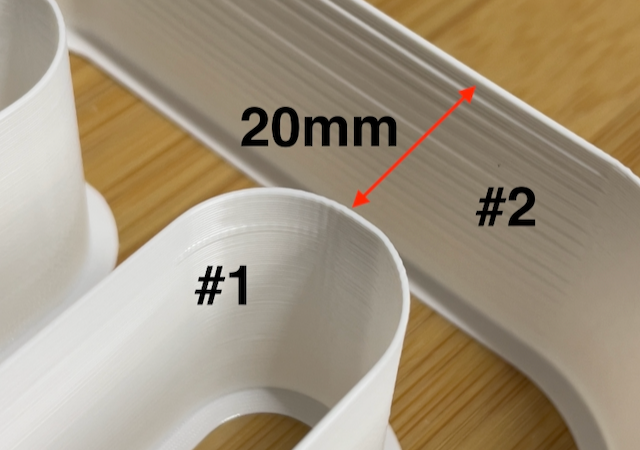
Hello. I need help with my K1C. Ever since I got it, I’ve only printed models that didn’t require much dimensional accuracy or that fit together properly since their dimensions were always under 100 mm. At the beginning of December, I started printing a cabinet I designed, made up of 38 pieces (the project can be downloaded for free here ), with overall dimensions of 650x430x200 mm. The largest pieces have sides measuring about 200 mm. That’s when the problems started: the pieces don’t fit together, the sides aren’t parallel, and as the piece approaches the back of the build plate, the horizontal dimensions shrink by up to 2 mm.

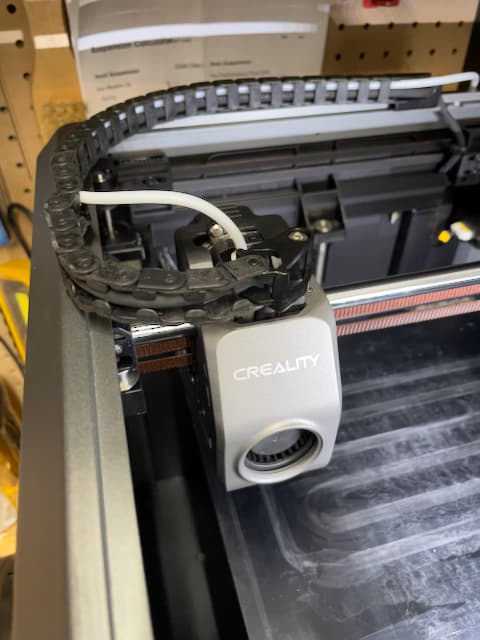
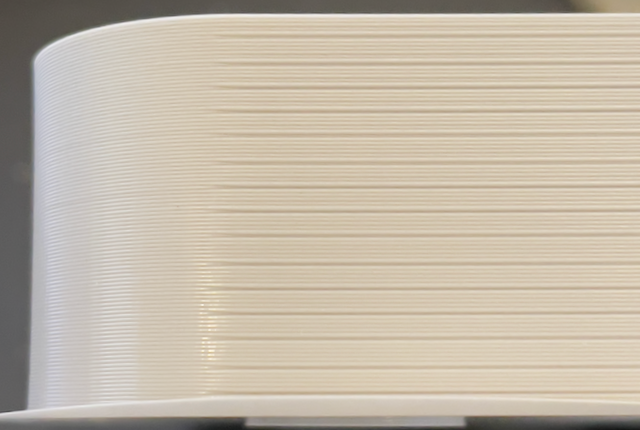
In addition to this, I’ve had issues with over-extrusion on the first layer and under-extrusion on the top layer. I’ve spent hours calibrating temperature, flow rate, pressure advance, Z-offset, skew, and retraction. I’ve changed filaments (Creality Hyper PLA, Anycubic Hi-Speed PLA, Sunlu Hi-Speed PLA, Creality Ender regular PLA, and Anycubic regular PLA). I’ve replaced the nozzle (0.4 mm) with a new original Creality one for the K1C. I’ve lubricated all the axes, cleaned the extruder, calibrated and recalibrated the belt tension, and even bought a Biqu belt tensioner. I printed a 0.1 mm spacer to adjust the print bed leveling since there was a 0.27 mm difference between the higher left side and the lower right side. I’ve also updated the firmware and done two factory resets with initial auto-calibrations. Nothing worked.

Apart from printing squares as trapezoids, calibrating the flow rate has been impossible. Tests suggest I should set the flow to 107–110%, but of course, when I set this flow, the first layer prints well, while all other layers are heavily over-extruded. When I keep the flow between 98% and 102%, the top layer ends up being severely under-extruded, to the point where I had to apply a significant amount of acrylic filler to the surface of parts like the cabinet doors because they are full of gaps between filament lines. Assembling the cabinet was a nightmare—I had to use four tubes of acrylic filler to close the gaps between the pieces (as I mentioned earlier, they aren’t squared but trapezoidal).

I don’t know what else to do. I’ve contacted Creality support hoping they’ll replace the printer. Ironically, my Kobra 2 Neo, which I paid €150 for, after few tweaks is far more reliable than my K1C. Help!

Forgot to write that yesterday I’ve tried for the n time to tension the belts following the Creality instructions, but at the end of the procedure the measured tension is 19/19,2N for the x and y belt (supposed that moving the printhead around with tensioners loose, and retensioned them after having placed the print head at the x rods center, stick to the middle of the front frame, should bring to a correct and equal belts tension) :confused:

+1 on having issues and trying to solve them. I also have spent outrageous amount of time on calibrations only to find out that this likely an issue with the printer itself. All this time I thought I just didn’t know how to 3D print and was going to need to find a school to teach me how to do so.

Now I am trying to learn how to tension the belts (not having much luck on K1C instructions so far, lots for K1 which is different). Levelling the print bed is next and that includes buying some springs and a decent level.

Had I known how much this would take I would have bought a more expensive printer and saved a tone of time. I was going to say a more reputable company, but that is what I thought I was getting with Creality.

Hi. For sure purchasing a more expensive printer could not solve the problems but eventually reduce them. I spent a lot of time on Bambulab’ forums too to see and understand how a workhorse could work better than my k1C. I have learned that much of the print quality is slicer settings dependent even with expensive and reliable machines, and if you don’t know what are you doing when tweaking the slicer settings you’ll never achieve good results. The issues that I’m facing with my printer are unfortunately hardware related and I still haven’t such knowledge to solve them by myself. I’m supposed to disassemble all the motors, the gantry, and perform an in depth check of the components like the pulleys. The problem is that I can’t wait long time with a disassembled and not working machine, since I’ve really a lot of work to do - my job and some hundred hours of printing (I should print two butsudans designed by me that two guys wants to purchase, only these two cabs employ 140 hours to be printed plus the assembly, postproduction and painting). Said that, waiting for the creality support’s answer, I’ve purchased a Bambu x1c, a lot of money that I hope to pay off as soon as possible :wink:

I hear you. The slicer setting are crazy and it isn’t any easier when it keeps crashing when you try to print. I am now back to OrcaSlicer and think that is where I will stay. It is a significantly better setup and it just appears to work. Printing a model right now that appears to be working way better (hope I didn’t just jinx it).

In the end I did retention the belts simply by:

  1. Pulled the printer head to the middle in the front (closest to the door).
  2. Loosen the 4 screws on the belt adjustments (2 on the left side and 2 on the right side.
  3. Move the print head all around on its operating area.
  4. Return the print head to the middle in the front (closest to the door).
  5. Tighten the screws again.

From there I checked that the rest of the bed screws were fine. Then I printed the maximum flow test calibration print again. This is where at first I was frustrated again because I got all this ribbing on the one side, but the rest of the print was really good.

My son and I started thinking about it and then realized something. The Drag Chain hits up against the left side (when looking straight on at the front side where the door is) of the printer top lid when the extruder head goes to the left side oft he build plate.

Here is what happens when the lid is not on the top of the printer, the Drag Chain goes past the top of the printer!

Given that the maximum flow test calibration is not at the total extreme left of the build plate this is definitely an issue. When the extruder assembly goes to the one side it gets bumped (and it is noisy) which is more than any vibration would cause.

I have to wonder how many others are having this issue. This is something that I think should be able to be fixed by either coming up with another Drag Chain approach or by creating a new top lid that has room for the Drag Chain to move around.

The amount of filament I have waisted trying to get the printer working correctly is insane. The only benefit is that I have learned a lot about Slicers and filament calibration. Just not the “out of the box” experience you expect. Creality would do well to have someone create good tutorials on getting up and running, and putting them into the instructions (or a link to them in the instruction). I know there is a YouTube series that has several different instructions but I never got that from the startup instructions. The user manual is also rather cryptic in that it appears to be written by someone that already knows things, not with the point of view that the reader is new to this all.

I did the tensioning in the same way but the result was a tension of 19N, too much if you see the creality wiki, because they say that the optimal tension should be in the range of 5.5/6.5 N, too much tension of the belts could damage the motors because they have to work harder. It would be good to have an answer from the support, a definitive answer about how much should be the belt tension…

I have no idea how I would test the amount of tension on my belt. Something else for me to go learn.

Yeppers about the drag chain links. My already broke into pieces. I may just remove the leftovers.

I think the remaining links that are intact, seem okay. I just do not like the fact that the drag chain hits the inner sections of the printer (K1C).

Seth

P.S. Outside of that idea, if you can configure it once and make it work for your filament, save the build. You will need it again and again and again. I forgot to save my wanted-to-be-saved data during an awesome print and when prompted to save, I refused not thinking. I got the old data back by testing and testing and testing and…

Now, the printer works at 100mm/s if that but that is maybe my fault so far. I am still learning its intricacies and saved setting methods.

Wow, broken links definitely is not good. Have you reported it to Creality?

Saving all the config changes to the profile and the configuration is something that I do now by habit. Thanks for the heads up though.

1 Like

I’ve solved the chain hitting the lid by printing a riser. When I don’t need to close the chamber - said I almost never print abs asa etc - I remove the left riser.

1 Like

No, I do not care. I have not reported anything to them recently outside of looking up errors.

Seth

P.S. No issue about the saving of the conf. And yes, instead of it being done automatically, I am now in the habit of saving every time I get a good build adjusted. At first, I would not read or even care why it did not work. I just kept not understanding. Now, I know!

I have been doing a little more research into this. Interestingly enough, the K1 Max enclose is higher than the K1C so the Drag Chain sits completely inside. No issue as a result and the design that should have existed for the K1C (and I suspect the K1 but cannot confirm).

Another finding was the link: K1 Max Bowden Tube Clips

I am currently printing the clips and will move the tube out from the chain and see if it solves the problem. If it doe not then I will look at modifying this Creality K1C Minimalistic Cover Lift to make room on the left side.

Fingers crossed and I will post the results.

1 Like

https://www.printables.com/model/891102-k1c-max-bowden-tube-guide-for-nu-k-riser-et-simili here is a remix made by me for the nu-k riser. That riser works well for me. Here the link to the riser.

Thanks @Topolynx for the riser link. Apologies for the dumb questions I have. What is the value of the riser in your situation? What problem did you solve with it?

Going down rabbit holes based off links that came from Topolynx I found this model: Creality K1 / K1C Unibody Riser Frame. It solves the problems exactly in the way I was looking to. Love the model sharing spirit and will now take on this new project (may need to buy some new filament).

It solves the problem of the chain hitting the lid. When I make large prints that doesn’t need closed chamber I put off the left side, still maintaining the lid on to avoid too much dust infiltrations

1 Like

My advice is to print a ptfe guide for the extruder in order to have it entering in the extruder vertically. The filament will flow with less friction into the extruder

1 Like

Thanks @Topolynx, did that this afternoon and have it installed now. Will see if that helps. At this point I am looking for any hints. I had the lid off and printed another maximum flow test calibration with the lid off. Unfortunately it still caused ribbing on the one side. Not as much, but pretty close. Not sure what is happening unless it is an Y axis thing.

Look that video. It’s possible that the ribbing you’re experiencing is normal and indicates the step of the volumetric flow increase

I have already set the max volumetric flow as it came up in my prior searches, and the print I posted earlier (and now below) is that model that he demonstrates. If fixed a lot of my earlier quality. The issue I have though is that it is only the one side of the plate that has this issue. If you look at the marked up image here you see surface #1 and #2 which are 20mm apart. #1 is relatively nice (though it is a curved surface so I may need to consider that) but #2 has ribs that repeat themselves consistently. With the max volumetric flow you should not see this type of consistency.

I took a photo of the PLA calibration that I did yesterday and it shows the same issue. These images may help to further demonstrate what I mean by consistency.


Why it staggers every 6th or 7th layer by such a small amount, and the pattern of doing so is also repeated, is a mystery to me. Perhaps it is a slicer thing, but then I would think others would have the same issue. Perhaps the model, but that doesn’t make any sense to me either. Real head scratcher for a newbie.