If you’ve ever removed supports and felt like you were performing emergency surgery on your print, welcome to the club.
Supports can be one of the most frustrating parts of 3D printing. Too close, and they fuse to the model. Too far away, and suddenly they’re just decorative spaghetti growing under your part doing absolutely nothing useful.
What Are Supports & When Do You Need Them?
Supports are temporary 3D printed structures that your slicer adds underneath parts of a model that would otherwise print in midair. Since an FDM printer builds layer by layer, each new layer needs something underneath it to rest on. If a section of your print sticks out too far, hangs over empty space, bridges too wide, or includes steep angles and floating details, supports help hold those areas up while the print is being made.
You typically want to use supports for overhangs, undersides, arches, complex decorative shapes, miniatures, figurines, cosplay parts, and any model with parts that don’t have enough material beneath them to print cleanly. The trick is using enough support to prevent sagging, drooping, or failed prints without adding so much that removal becomes a battle afterward.
Most slicer programs default to less than ideal settings for supports often designed to play it safe – which ends up fusing your supports to the model most of the time and wasting a lot of material.
My Recommended Support Settings
After a lot of trial and error, these are the support settings I use most often for normal or tree supports when I want cleaner support removal and less damage to the print surface.
These settings are especially helpful when you’re printing pieces with overhangs, decorative detail, long flat undersides, or fragile shapes where you need support but don’t want the supports welded to the model. Please note that I am using the most recent version of Creality Print so your slicer may use slightly different names for some of these settings. All should be found within your support settings tab – make sure “Advanced” settings is turned on so you see them all.
Support Top/Bottom Z Distance
Use: .025 added to your layer height
This one matters the most. Just adjusting this can often solve your support issues.
Your Top/Bottom Z Distance controls the vertical gap between the support and your print (Bottom supports are only relevant if you do not use “on build plate only” and affect the gap between your print under a support). That tiny gap is what allows the support to do its job without permanently attaching itself to your part. Getting this right will let the support just pull away like it was meant to do. Most slicers default to your layer height for this value which will provide NO gap and make them impossible to remove cleanly. The only way you will be able to get them off is to cut them off usually scaring the surface in the process.
Example:
-
If your layer height is .20
-
Set your Top/Bottom Z Distance to .225
This gives you enough separation to make support removal much easier while still supporting the print properly. Too big of a gap might cause your support to fall mid-print. You will need to adjust this a bit depending on the size of your model, the filament you are using, temperatures and other factors, but this is a good place to start, and I find works most of the time.
If your supports are leaving scars or taking chunks out of the print, or constantly falling over before the print is finished, this is the first settings I’d adjust.
Support Wall Loops
Set to: 1 for small objects, 2 for tall ones
I use 2 wall loops for supports on anything tall – say over 100mm – because it gives them a little more structure without going overboard. If your supports are too thin, they can be easily broken by your print head as it moves past them rendering your supports useless. If they are too thick, you are just wasting filament and increasing print time.
Think of this as giving the supports enough backbone to actually hold up your print, especially with tree supports where some branches can get a little too thin.
If your supports are collapsing or falling over, this can help stabilize them.
First Layer Expansion
Set to: 2-8 mm
First layer expansion adds a brim to the base of your supports (some slicers call it support brim). Just like a brim helps hold your part to the build plate, this setting does the same for your supports. My rule of thumb is the taller the support is, the wider the first layer expansion needs to be. Tree supports can easily become top heavy as they are forming, even before they actually meet your model’s overhang. This results in them falling over creating a build plate full of spaghetti. I’ve used as much as 8mm for a 300 mm print.
Base Pattern
Set to: Honeycomb
I like Honeycomb for the support base because it gives a good balance of strength, stability, and material efficiency. It’s sturdy without becoming a solid brick of filament under your print.
Some patterns can either be too sparse and weak or too dense and wasteful. Honeycomb tends to behave well and gives supports a nice reliable foundation, but you can really use whatever your favorite infill pattern is here.
Pattern Angle
Set it at a right angle to the part being supported
This one gets overlooked a lot, but it can make a difference. Your Pattern Angle should usually be set so it runs perpendicular to the surface you’re supporting. This one is a bit harder to explain but I’ll try.
-
If the supported surface is running at 0 degrees
-
Set your Pattern Angle to 90 degrees
Why? Because you want the support pattern to cross under the part in a way that actually gives it something to sit on, but does NOT run the same way as your model layers. If you have ever built a tower out of toothpicks, think about what happens if you run every layer the same direction – they tend to fill in the gaps and create an uneven surface. However, if you run the first layer left to right (0 degrees), then the second at 90 degrees (top to bottom), it creates a flatter surface as the layer below gives the layer above enough support to rest on without the layer above sinking into it’s gaps.
This is especially useful for large flat spans or undersides where support direction can affect how well the print holds shape.
Top Interface Layers
Set to: 3
This is another important one.
The Top Interface Layers are the thin “buffer” layers between the support and the actual model – what the model actually sits on. These layers help create a more even surface under the print while still keeping support removal manageable. I have found 3 layers makes the interface sturdier giving better support to the model.
If your supported surfaces are sagging badly, increasing interface layers can help. If support removal is getting too aggressive, you may need to adjust this along with your Z distance.
Top/Bottom Interface Spacing
Set to: 0 or .1
This controls the spacing in those interface layers. At .1, I get a good support surface without making it too dense and hard to remove. Setting it to 0 for large flat areas can make them smoother. Some slicers now have interface ironing settings, though I have found using it adds a lot of extra time to the print while using 0 will achieve pretty much the same effect.
This is one of those “sweet spot” settings that helps supports actually support instead of just existing nearby.
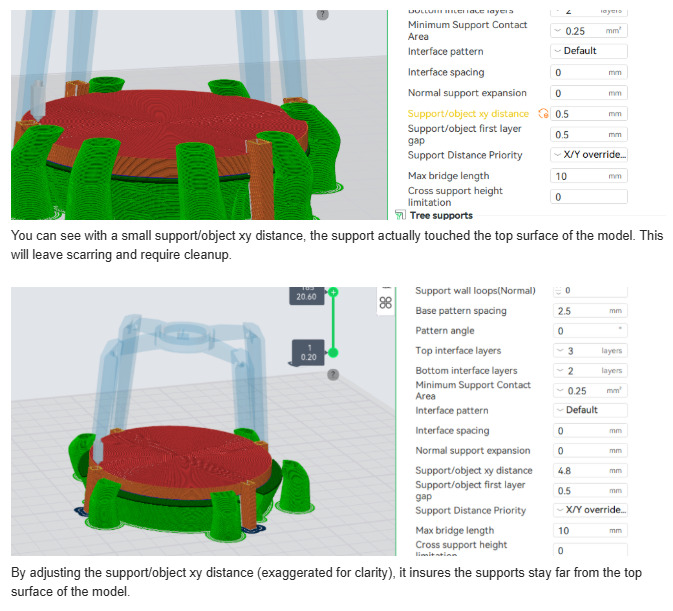
Support/Object First Layer Gap amd Support/Object XY Distance
Set both to: 1mm or more
These two are the ones that can save you from a lot of ugly support damage. Because if the supports are touching the actual model in places they shouldn’t, they are going to leave marks, fuse, or just make your life difficult later. And they can really only be checked after slicing.
XY distance controls the horizontal gap between the supports and your model. First layer gap controls how much space is between your model and where the supports start. These two settings help control how your supports are formed and are especially important for tree supports that can twist into areas you do not want them. I usually start a 1mm and have gone as much as 8mm for some models.
CAREFULLY watch the preview after you slice the file.
If any support is touching the model where it shouldn’t, increase the distance until it doesn’t. You want to make sure the supports are close enough to support the print, but not touching side walls or details. Tree supports especially have a habit of overlapping something beneath them as they build up and if it touches your model surface, it will scar it. You can often remove it with a light sanding, but I hate doing post-processing when I don’t have to. Pay attention to this spacing and you will end up with a cleaner model surface.
My Biggest Tip: Check the PREVIEW
This is the part people skip, and it’s usually where the trouble starts. You can copy someone’s settings exactly and still get bad results if your specific model needs something slightly different.
So when you slice your print, look at the preview. Use the layer slider on the right to step thru your layers and pay attention to:
-
Are the supports actually under the areas that need help? Make sure NOTHING is starting to print in thin air! While auto support generation usually works, the slicer does not always catch a small overhang or area that should be supported or tries to support tiny overhangs when it doesn’t need to. This is why support blockers and enforcers exist as well as having the ability to manually paint on supports.
-
Are they touching side walls or details of your model? You don’t want a nasty scar on a print that could have been avoided – especially on those extra long prints!
-
Are there too many branches cluttering the print? Auto supports are not always perfect and you might find it generates 20 tiny branches when it only maybe needs 5. Adjusting support density, tree support branch distance, or tree support branch angle can fix this.
-
Is there a better orientation you can use? Sometimes I find rotating a part a bit can cause better supports, or even eliminate the need for some of them. While generally you will want to put your largest, flattest surface against the build plate, tipping it up, rotating it back, or standing it up might give a better result.
The preview will tell on your settings immediately if something looks off, so use it! I’ve been guilty of this too many times myself as getting the print started can be much more exciting than looking at the preview. But taking that extra minute especially if it is something you haven’t printed before, can save you a lot of grief.
I will add some example photos to this thread as I get a chance to create them, but since I know so many people struggle with supports, I wanted to go ahead and post it for you.