At present you can:-
1 Manually set chamber temperature before print (from K2 screen)
2 Setting Print off (from CP V6 or other)
3 Set chamber temperature after print (from K2 screen)
4 Manually switch off chamber temperature. (from K2 screen)
The marketing suggested users had control of chamber temperature in order to improve print quality but at present with active chamber temperature it takes ages to reach desired temperature therefore making this feature less than advertised. The only remedy is to action the above manually at present.
I recognise the chamber heater is not that powerful and therefore automating the above would allow better control day or night.
I suggest the ability to automate this within the active chamber control on the filament page.
for example:-
Partially related the Qidi Plus 4 printer had a problem with the Solid State Relay (SSR) where it would burn out in 115V countries, was fine in 230V (half the current). To fix it there was a new firmware written to lower the current draw as a temporary fix. Since then a new uprated SSR has been used to return to the correct output. Wondering if an upgraded SSR for the K2 would allow the higher temperature.
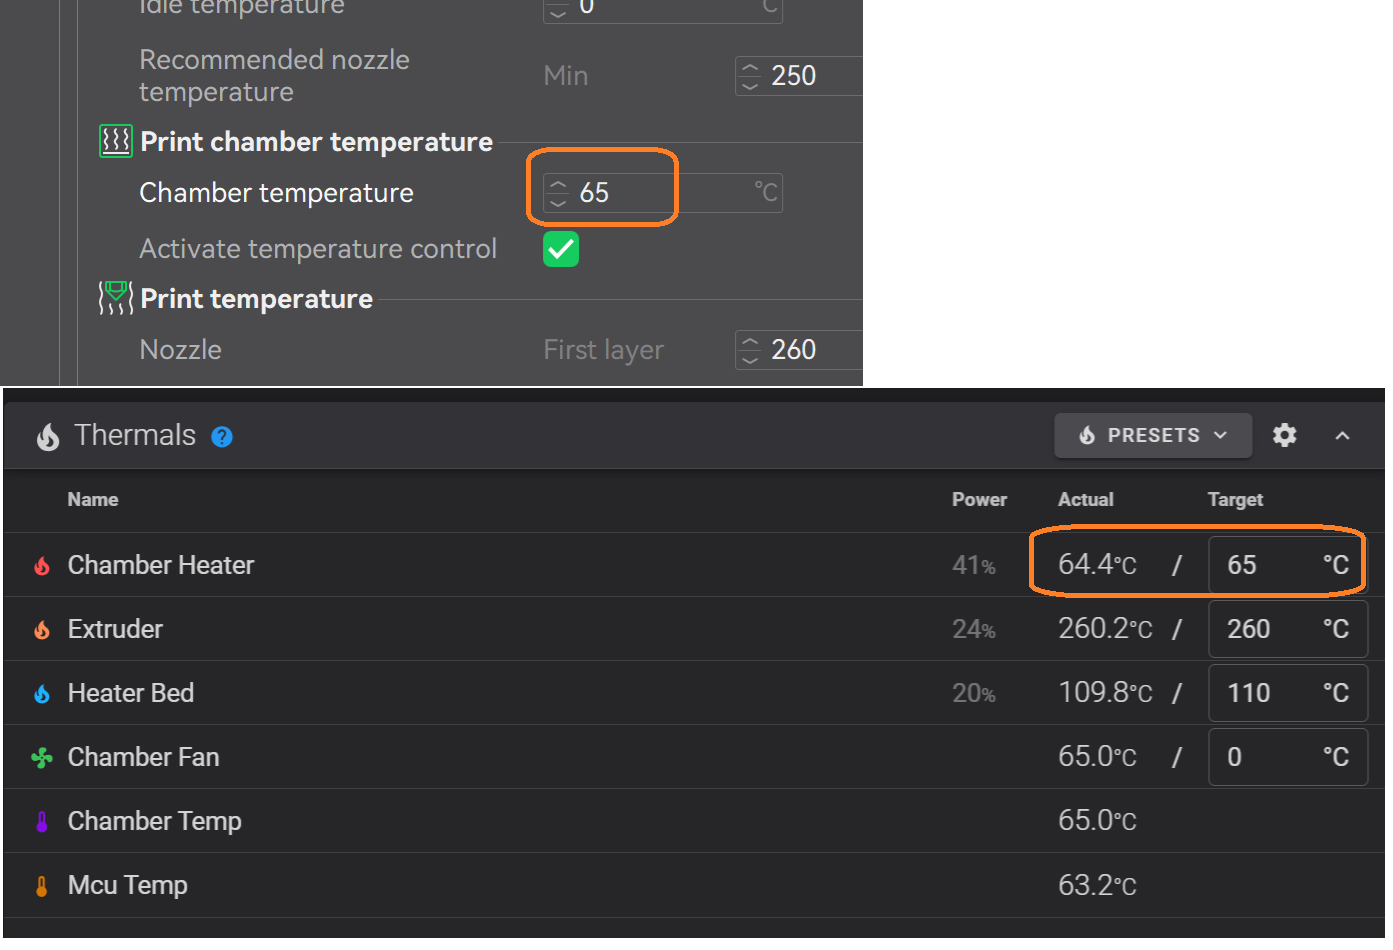
My experience is setting chamber temp either from the printer screen, Creality Print V6, or in a slice file it will only accept 41°c to 60°c. From the fluidd interface you set it anywhere from 0°c to 60°C. I’m guessing it’s a limit set in the firmware. Anyone suggest a fix? No good help from Creality Support.
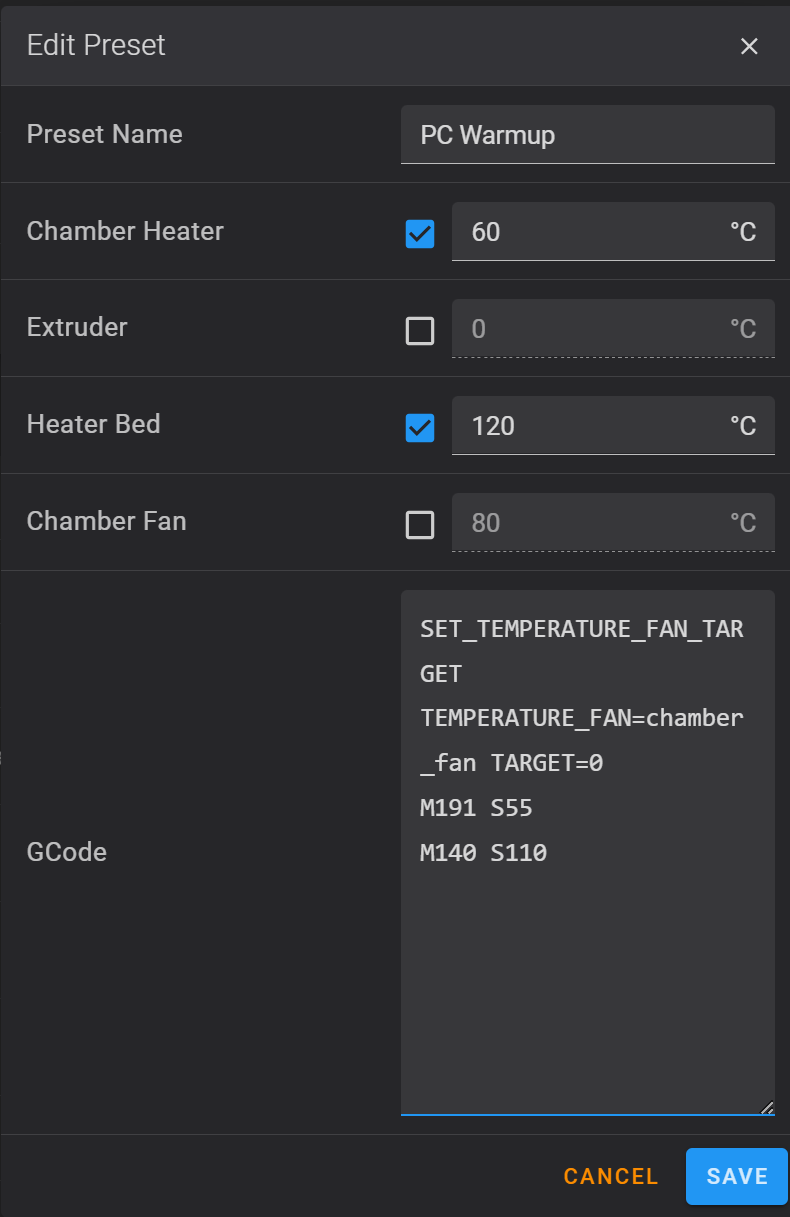
The Chamber temp probably doesn’t need to be set, since the G-Code takes care of that. I took the first one from the console. The preset won’t accept 0 as a preset and it won’t do anything if it’s not selected.
M191 S55 sets the chamber heater to 55, and waits for it to reach it. The bed is cranked to the max while it waits. Once the chamber hits 55 (or whatever you set yours to) M190 R110 makes it wait for the bed to cool down to 110.
On these set and wait commands, S before the temp means it waits for it to heat up to temperature but it doesn’t wait if it’s already above the temperature. R before the temp makes it wait to cool or heat.
The Creality slicer also has various places for custom G-Code before and after prints. If I remember correctly, the main settings, filament settings, and slicer settings all have custom G-Code options. I have not messed with those to see what kind of order or priority they have.
Yes, they work so well that I had to turn it off and back on again to get it to do anything else before reaching the temp. It was very annoying when I was trying to fix a problem and have it warm up at the same time. Make sure you really mean it before executing the code.
I did not explicitly test if sending a print from the slicer overrode the wait code, but I think it did. I sent a print and let it go. The print didn’t start for quite a while, but it kind of does that anyway sometimes. I didn’t sit and watch for when it actually started the leveling procedure.
I have not tried any of the other places I mentioned where you can put custom code in the slicer. I’ve used similar customizations in a different slicer/printer years ago. The trick was figuring out which custom code ran in what order, under which circumstance.
The image and code I used are Fluidd “Thermal Presets.” I use them for preheating/heat-soaking. I just recently started using the custom code part, using PC filament that needs a high chamber temp. That’s how I got here on this forum.
The other custom code places I mentioned but haven’t used yet are in Creality Print 6. I really want to try them out now, but this print won’t be finished until about bedtime. Maybe in the morning.
If you edit the config file using fluidd, it won’t default to cooling it to 35 when it’s first started. Unfortunately, CP6 G-Code will set it to 35 when it’s finished no matter what.
The filament custom G-Code does not add the custom code at the beginning, but it does add it at the end. If you go that route, be sure to start it with “END_PRINT” or set the hot end to 0 and park it or it will sit there and melt your print the whole time you let it cook.
The Printer Settings do run the beginning code, but it still runs after the auto leveling. I am going to stick with the Thermal Presets or manual code entry for preheating and heat soaking.
If you set the config file parameter above, and just nuke the whole thing with “FIRMWARE_RESET” it will restart without chamber cooling, but it will retain emergency cooling. If you nuke it with “M112” it will emergency stop with protections. Both will prevent time lapse from saving. Maybe there’s a code for that.