So why is it such a problem to get adhesion to the bed? I have tried cleaning it. I have tried wiping it with Iso alcohol. I have leveled the bed more times than I care to admit. At this point my brand new machine is a very expensive paper weight. Anything I have tried to print has been nozzle at 200 bed at 60. Also level this thing is a nightmare that just goes on a loop like groundhog day. Open to suggestions.
1 Like
Try bed temp70and add 10 degrees to max recomm3nded nozzle temp for the filament, assuming its pla, if petg then try an enclosure, also is your z height correct.? Mine prints too close by .05 mill. Also print something with a small round base ie no corners and see how you go with those first few layers, slow your print down to 50mm for first few layers. Also add a brim. Lastly try a new filament.
1 Like
Also try hair spray (must contain pva) a light spray to the build plate lasts months and improves adhesion wiith PETG and PLA.
As said, first layer height is crucial to the whole print. To high and it will just float off the bed with subsiquent layers, to low and it will tear off or you may damage the bed. (Also elephant foot prints).
You can adjust nozzle height during first layer via the touch screen by 0.3mm up or down.
1 Like
Firstly Thank you for your reply. Second I ran a small file last night and it made it all the way to 70% and then got hung up and ruined the whole thing. I will try to adjust the Z axis a tad more and see what happens.
1 Like
ooooh this hairspray idea sounds exactly like what I may be needing Thank you so much for the idea, I guess I will be heading to town to find some hair spray now…lol Seriously though Thank you I hope this is my solution. Baby steps eliminating one issues at a time.
hey thanks again for the advice adjusted m z axis a bit. Kept the temps the same though. I was able to print at these temps.
1 Like
Ok let me just say HAIRSPRAY!!! game changer!!! adjusted my z axis sprayed the bed and volia! I was able to print the file that had previously mess up

1 Like
Great news !
1 Like
With my S1 I found without the hairspray, I adjusted the z axis down until the bottom layer stuck. Very tight, plastic not flat but getting there. After it goes to two second layer, raise the nozzle 5 to 10 points. Found this worked most times. Only trouble I had was programs that held faults and locked up the print half finished.
Try 3M scotch glue stick. It works very well for me (with 50 deg bed). It easily goes away with hot water afterwards. Also be careful of hairspray. It may dissolve the PLA apparently.
My experience with the original Ender 3 (purchased it 5 years ago approx.) was terrible and I almost returned it. But when I installed upgraded PTFE tubing and replaced pneumatic fittings, result was noticeably better. Then I replaced the heating bed leveling springs and lastly I installed Ender 3 tempered glass bed (self adhesive, (not with the clips).
I also had issue with certain filaments colors. Matter Hacker silver was printing best, but some other colors from the same manufacturer didn’t. After installing these flat wire springs, I never leveled the bed again! I moved from California 1,700 miles away, my Ender 3 was packed in a box and when I plugged it in again, it prints great, no leveling ever again. I have never used glue (I found this very stupid) but clean the glass before every print with rubbing alcohol.
I’ve done all of the things listed here. Alcohol…glass sheet…hairspray…glue sticks…all worked for a while… Some helped, many did not…
UNTIL…I bought a $15,00 PEI sheet from Amazon. Amazing…no glue, no worries, just fine prints. Sure, I occasionally get spaghetti, but It’s always something that I did, not the printer. I now have similar sheets on 3 printers.

1 Like
My Ender 3 S1 Pro works perfectly without any adhesives. It is important to understand the difference between levelling and Z Offset on the S1 Pro, because it checks the Z position reference at the start of each print. Levelling is just that, it makes sure that all points on the bed are the same distance from the Z reference plane. The Z Offset is the distance between the end of the nozzle and the pin on the level measuring probe. If you change nozzles, you will probably need to change Z Offset. It is best to print something small and simple, gradually moving the Z offset down on successive runs until it sticks reliably. Once you have the correct offset for the nozzle you can level the bed without affecting the offset. I use the Aux Level procedure with the bed hot. A Z offset of about -3.00 works well with my 0.4 mm nozzles.
All good suggestions here and they are all worth keeping in mind but just remember one thing.
It has been my experience that the Z axis height is the core to everything else. Start with mastering the Z axis height and the rest will be so much easier.
After getting my Z axis height mastered I need nothing else but a clean surface except on the rare occasion that may be filament etc. as a seperate issue than the printer.
1 Like
After experiencing the same issue on my printer I re-calibrated my Z, upped the temp by 5°-10 until it stuck consistently. Until I got the perfect temp I used JT-16 adhesive. If you use JT-16 you will never have a lifting issue at all. Cleans up very quick and doesn’t smell bad . I might also suggest changing your nozzle even though the Z offset should take care of any minimal wear but you never know. I don’t have any sticking issues now but I do have horrible 1st layers which auto calibrate will not compensate for.
https://www.amazon.com/Geeetech-JT16-Solid-Glue-Stick/dp/B0C5MTL2PV
I am not sure what you mean by “horrible” first layers, but I recommend printing a small test piece and gradually lowering the Z Offset on successive tests. I found that I could get acceptable results over about 4 steps of Z Offset, but the condition of the first layer changed considerably. The lower you go, the more the printed lines fuse together. So you may be able to find a setting that solves your “horrible” problem.
Here is what I mean by “Horrible”:
This two patches have perfect “squish” 'in some parts and then over and under and others

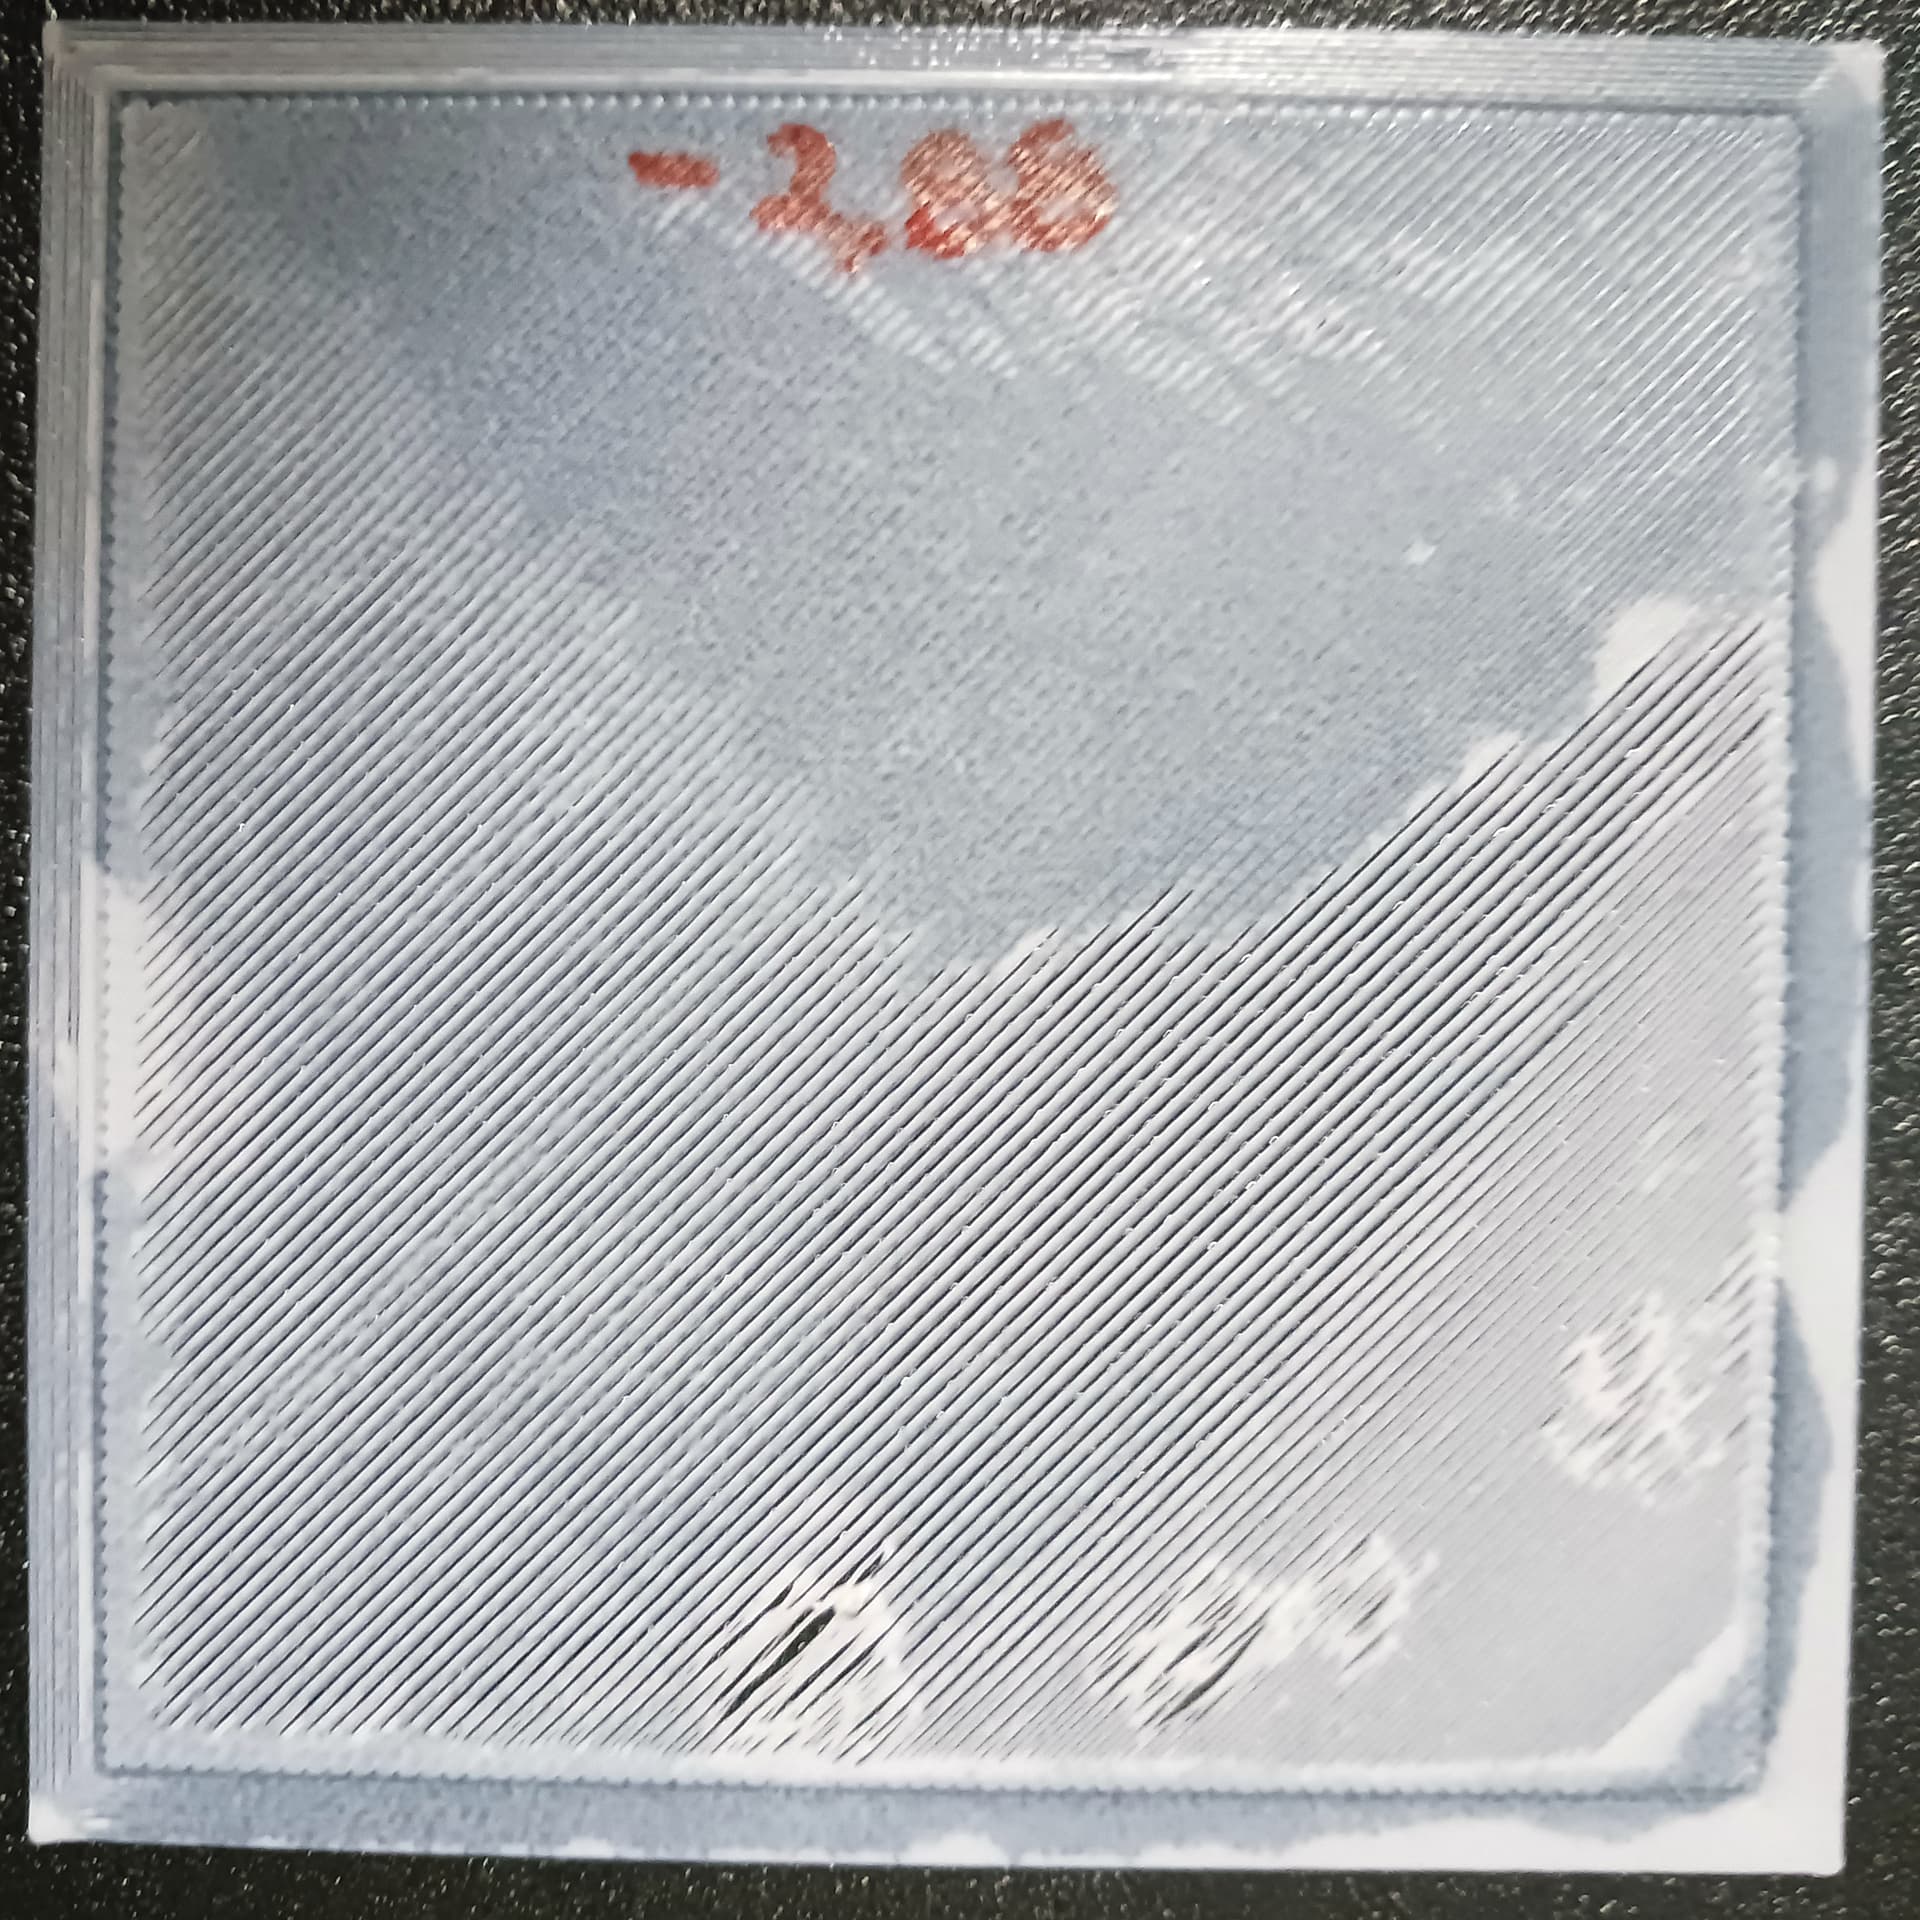
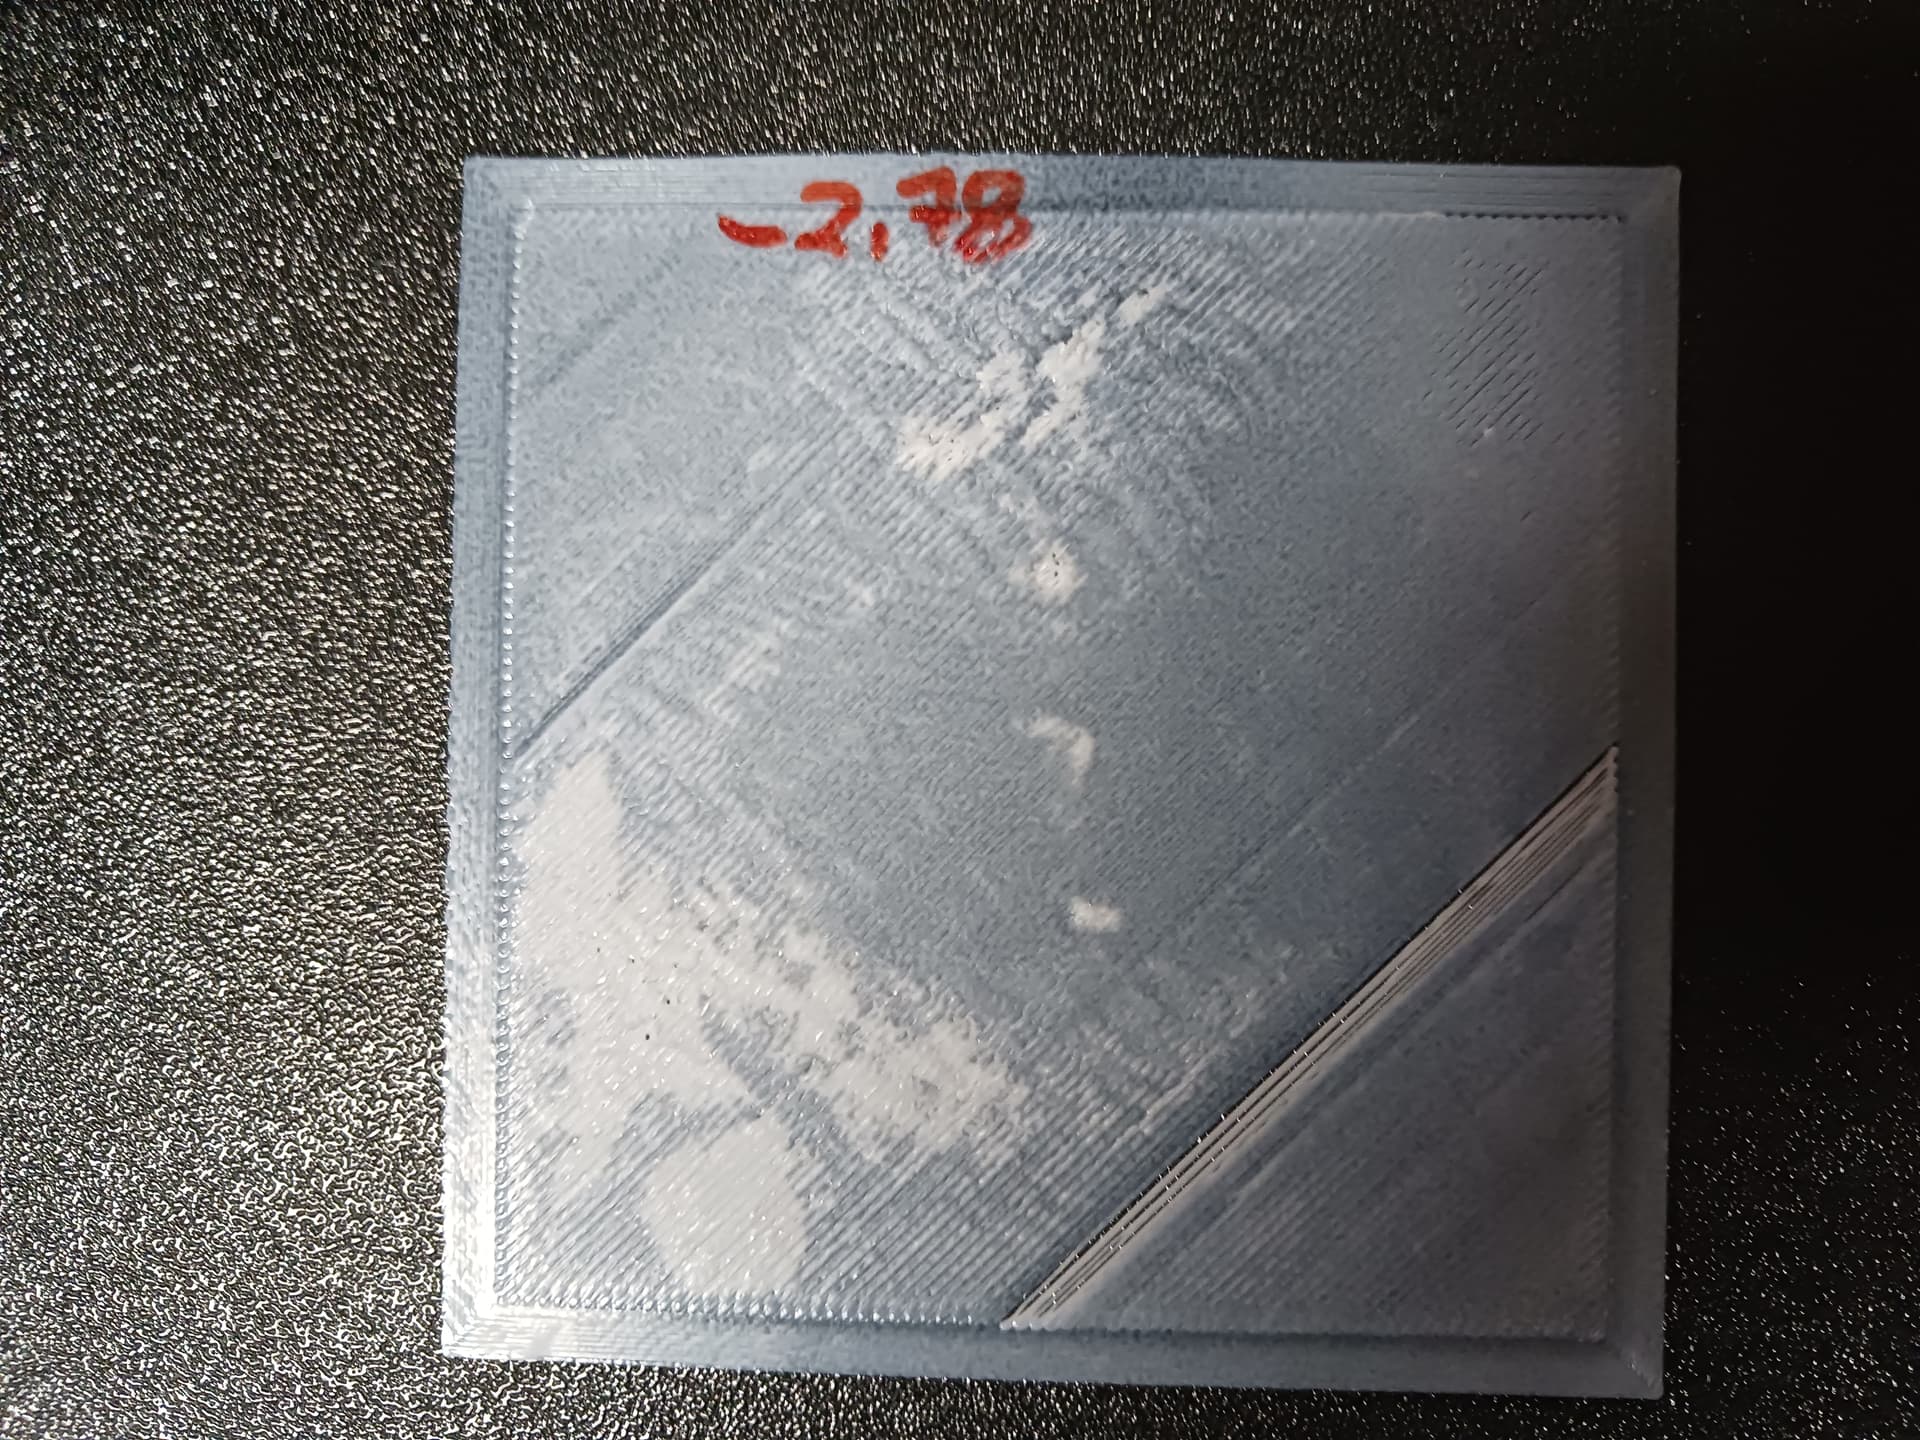

This patch is “Auto Calibrated and Auto Z” no other adjustments

So that is my dilemma. Auto Z is horrible and always too high. Manually adjusting the Z in the -(minus) in 0.01 increments yields no “perfect” 1st layer. There’s always “perfect”, too high and too low. No amount of tweaking helps. The entire bed has been replaced. The gantry leveled. The belts tightened. The screws tightened. The bed shimmed. Multiple slicers used…
I can make decent prints some of the times but the 1st layer should be smooth across the plate.
HORRIBLE!
1 Like
I am assuming you have checked the x and y axis for wobble etc. All is tightly aligned with no loose belts and the x carrage wheels dont spin freely.
Also tighten the bed down as far is it will go, then loosed off by 1 turn on each wheel. Then level manaually as per instalation instructions, then auto level.
Edit: Sorry i just re read your last post. Ignore most of above.
Next thought is nozzle temps or clogging. Else i have no idea.
Hi, I’ve got the same issue, no amount of manual levelling and auto- levelling (even a 12 x 12 matrix!) has made any improvements. I’ve come to the conclusion that the Creality S1 Pro auto levelling system just doesn’t work. I’ve replaced the horribly deformed original bed with a Gulf Coast Robotics 6mm machined alloy bed, which made an enorous improvement from none adhesion to a horrible patchy first layer. I’ve also replaced the pulley wheels on X & Y axis with linear rails and bearings. Pretty much a waste of money really.
Strange thing is that the very similar but bigger CR 10 Smart Pro works beautifully with the same Gulf Coast Robotics improvements except the Y axis which is still using the original pulley wheels. Apparently Gulf Coast Robotics has stopped trading, which is a real loss, their representaive Brett gave fantastic customer service.
Mind you the E3 S1 Pro still throws out decent prints after getting over the first layers.
Anyway I think that the Qidi Plus4 is the way forward for me.
A further discovery after thought and research!
My E3 S1 Pro has a mainboard withan STM32F401 PROCESSOR, this only has 256K of flash memory, which allegedly is not eneough for the auto levelling to work accurately enough. Wheras the mainboard with the STM32 F103 processor has 512K of flash memory. Some E3 S1 Pro’s were fitted with the F103 boards (I suspect they would be later versions). Now I mentioned above that my CR10 Smart Pro works beautifully, well that has an STM32F103 processor on it’s board.
I’ve probably compounded matters for the worse by using a 12 x 12 matrix, I’ll be trying a 5 x 5 autolevelling matrix later today, it might help with the poor flash memory issue (I hope).
In the meantime I’m trying to get a new E3 S1 Pro mainboard with the STM32F103 processor.
There is an article about fitting a BigTreeTech E3 V3 mainboard into an Ender 3 S1, if I can’t find a Creality board this will likely be my next move.
Open this link for more information.