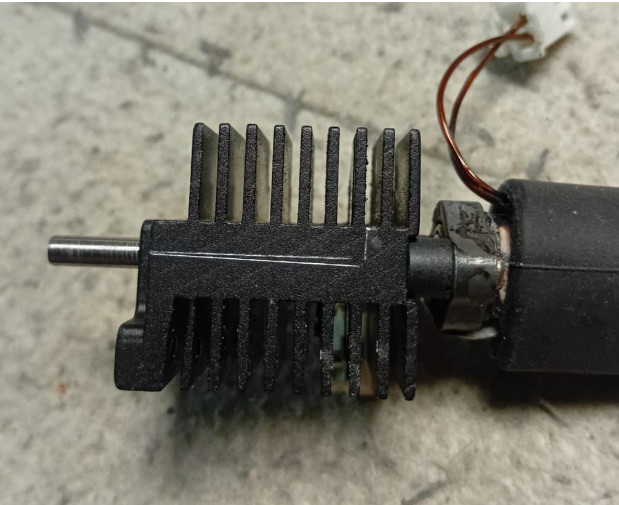
The heatsink is too small, and the fan does not cool it down enough.
Printing PETG I have to run the Model Fan at around 70% continuous, Not to cool the part down, but to cool the filament fed to the nozzle down.
If the Model Fan is not on or below 40%, heat creeps up and the filament gets soft and makes a lump just below the feeder gears and filament is not fed into the nozzle.
If the heatsink is larger and the fan blows sufficient air, this will not happen. The fan can be thicker which increase air volume.
I would also suggest the heatsink is split in two so that the heatsink physically is clamping on the copper ring of the nozzle to transfer heat more efficiently to the heatsink.
A larger heatsink consisting of a front and rear part that can split in two - there is enough space. One can always print another larger print head cover.
This will also allow a better way to apply heat paste. Heat paste dries out after a while, and is not really suitable to fill gaps between surfaces for cooling. You want physical contact between surfaces with heat paste.
One more thing that can make using the printer a LOT more user friendly, is a service button on the screen.
If a blob of filament forms on the nozzle or on the bed, one would like to remove it with a rag or tweezer or cut it off with a side cutter so it is not dropped or left on the print. All it should do is lower the bed by 50 mm and move the print head to the center and 100mm from the front so one can clean the nozzle and when done, press the service button again and the print can resume immediately.
Same button can be used when you have to work on the print head.
I had a feeder gear broke a tooth. Plastic gears on roller bearings ? Not how it’s done.
I have since replaced the plastic gears with all metal gears and I feel a lot better since.
Otherwise, I think the K2 plus is an awesome printer, The accuracy is fantastic, and mine runs 24/7, except when I have to clear the filament stuck in the feeder.
I don’t see how the part cooling fan would have an impact on heat creeping up, because it does not affect the cold side of the heat break. However some of the slicer default settings for anything but PLA aren’t that great. Have you tried limiting the volumetric flow rate for PETG and increasing the layer times in the cooling setting? And what hotend temperature does that happen at?
Printing PETG. With the previous hot end I printed at 240oC until I started getting “BM2797 Extruder temp is too high” errors and with the replacement hot end I have to print at 285oC or the parts are brittle and the filament delaminate, so no idea what the temperature actually is. Different thermistors will work at different settings because they work as a voltage divider with a resistor.
I have just completed a part, printed it very well, six hours. Starting the next part print one layer and the filament either makes a blob under the gears and cannot feed, or the filament melts up into the cooling nozzle and prevent feeding when that somehow cools down.
This happens almost every time.
Six hour print, one hour stripping and fixing.
That is why I say this is the Land Rover of printers, you have to strip and work on it constantly to get results.
The settings you refer to, the volumetric max is set to 18mm^2/s. Shouldn’t this be increased rather than decreased ? The slower the feed the more likely the filament will create a problem, right ?
There is no such adjustment as layer times in the cooling settings. I use Creality Print 7
I’m wondering if the correct thermal paste is being used on these hot end parts, or if any thermal paste is being used at all. It may be worth replacing it to see if that’s the cause…???
I learned a while back not to use standard CPU thermal paste in this area. Boron nitride paste is a better choice because it handles higher temperatures and provides good heat transfer. It will eventually dry out, but I’m used to taking the hot end apart for maintenance anyway.
One part printed 100%. Then when I do a Print Again, it prints the first layer, and then the filament makes a blob in the gears. Happens every time without fail.
I then stop the print, and a message sometimes appear “Y-axes experience abnormal resistance”.
All steppers are then released and one can push the axes freely around.
I have probably stripped this feeder a hundred times by now, the screws aren’t tightening properly any more, and who knows how many kg filament and time wasted by now.
There has to be a way to prevent this stupidness. One buy a printer to be productive and also to make money but at the rate one has to buy replacement spares this is an expensive exercise.
I have reduced the max feed volume from 18 to 16 (~20%) but it made no difference. The print times has just become longer by half an hour it seems.
I’m going to switch the printer off between each part and see if this stupidity is repeated.
It looks like the feeder forced the filament because it makes a deformed kink, and why only after the first layer and on the next part print ?
I have re-started the print and it surpassed the first layer barrier. Chances are very good that this part will be completed.
The heatsink should clamp the copper ring. If you want to cool power devices they have to be mechanically pressed against the cooling surface, they cannot be simply connected thermally with thermal paste.
If the heatsink front is spit from the rear and the nozzle is clamped by the two screws, you will have to loosen these screws a few turns and then unscrew the nozzle. If you screw the nozzle back in, you will have to tighten the heatsink screws to clamp on the copper ring.
As is, there is no way to determine if the nozzle top is actually cooled and cooled enough.
The heatsink remains cold enough to the touch, but I get that the filament is melted almost to the top inside the nozzle. This can only mean the heatsink is not cooling the nozzle enough.
I have checked the play inside the heatsink with the nozzle’s copper ring, There is a little play and could be the source of the problem.
I don’t know if someone here with a waterjet cutter or laser can cut the heatsink. If cut on the silver line the bottom part can still screw in and the front part can clamp the copper ring. The short line should face the other way, ie towards the front.
PETG, like TPU seems to have compression issues in the extruder.
The only way I can print TPU is to extrude PLA. PLA prints flawless without any issues, the printer likes PLA.
Then retract the PLA, it gets cut off as you know.
Inset the TPU or PETG, select the filament type on the printer screen, and extrude.
Print your object.
When completed, you have to retract the TPU or PETG. It will not do a second print in a row, the filament makes a blockage just below the gears and you have to strip and clear the obstruction, and clear the nozzle..
Put PLA in and extract.
Retract the PLA
Put the TPU or PETG in and extract. You can now do the second print in that material.
I have no explanation why the PETG print a 40 minute long first layer of the second print and then fail. This happened about 10 times in a row.
The above routine is a pain in the you know what, but I then have no failures printing the PETG.
As for reducing the max flow rate, according to https://chillipepper3d.co.za/product/phaetus-silicon-carbide-0-4mm-nozzle-for-creality-k2-k2-pro-k2-plus-hi/ the max flow rate of the K2 is 30mm^3/s and high-speed printing up to 600mm/s, so the problem is not the flow rate. Reducing the flow rate volume does makes the print time longer. Printing with a high max setting and a low setting made no difference whether the print failed or succeeded.
With the above routine the prints succeed every time.
I have reinstalled the original hot end.
I print the PETG with the nozzle temperature at 260oC, the bed at 80oC (at 70oC some parts come loose) and the rest of the settings are the same as for PLA. To release the parts off the bed, I let the bed temperature drop to 60oC and below. Blowing cold air on the part makes it releasing quicker, and on my to do list is a battery powered air blower for this.