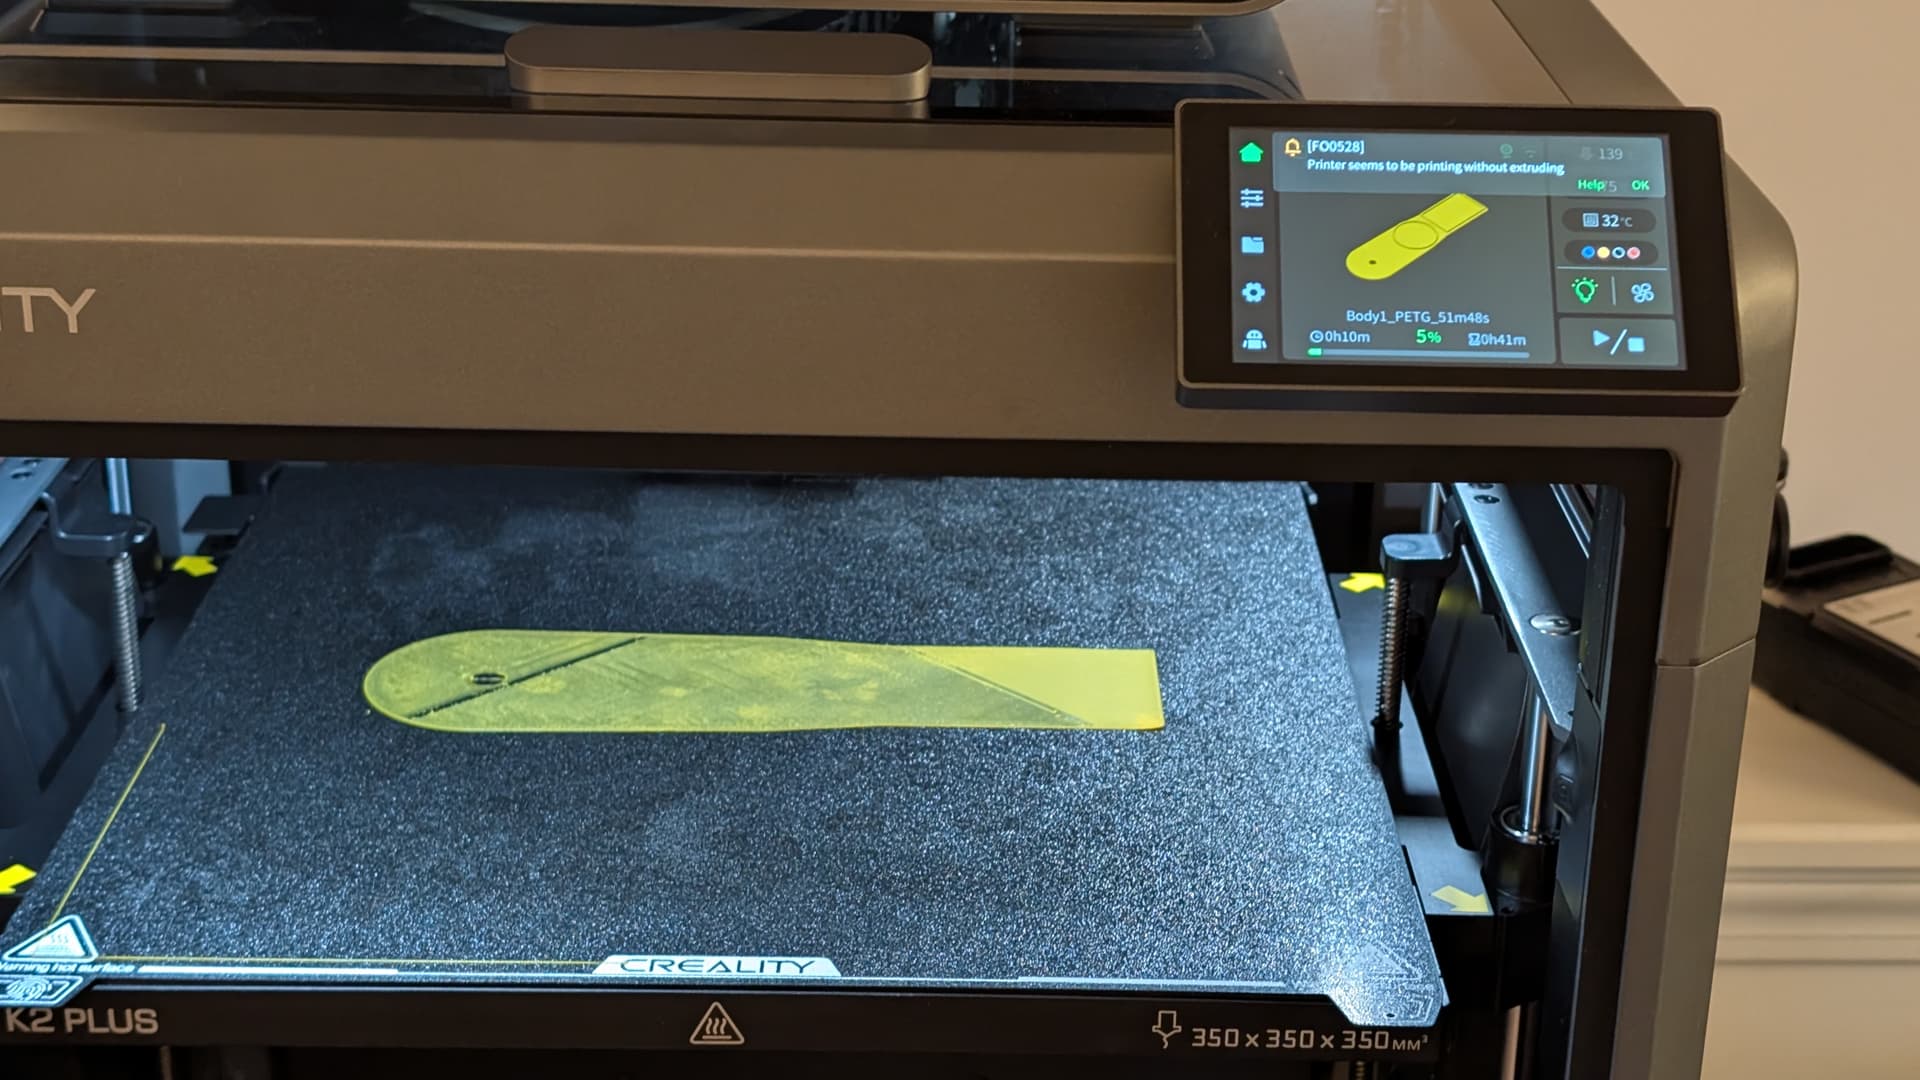
I have tried a few times to print objects with PETG and sometimes they come out fine and other times they fail with either an FR2865 or FO0528 error. It seems that the two objects that failed (twice each) had fairly large first layers and they failed on the second layer.
This shows the build plate after the failure (fidget toys). You can see that the lower left was part way through the second layer and the upper left shows a glob of filament that would have ruined the print.
I used Creality Print 6.1 with the generic PETG profile. Extruder is set to 250C and the bed is 70C. I added a brim but other than that the options are defaults. After the first failure, I cleaned the extruder and tried again and the same thing happened.
The other object I tried to print also failed on the second layer and I tried to print it again and it failed in the same way.
These issues look very similar to what Michael showed on his Teaching Tech YouTube channel Compromised value: Creality K2 Plus combo review. I have not used TPU yet but I do like PETG. Others seem to have a good experience with PETG.
The tips to address this on the Creality site focus on repair, not prevention.
I fully agree. I only print using PETG, of which 95% is the Carbon fiber type.
So far I have 5 different brands and I use the same temperatures for all of them.
If the filament is properly dry I have no problems at all.
Just don’t think they are dry straight from first opening it new.
I do keep my PETG in one of the Polymaker storage boxes after a 12 hour drying cycle. The box read read 10% when I took it out to print. The CFS is reading 23% and the ambient room is at 27%.
23 to 27% is pretty low and would be good to print with.
Where my printers are is in an enclosed cubby down the back and it is 70-80% in there a lot of the time.
If your print space is around 27%, I would print it at that and when finished, put it in your drier for a few hours and then into a vacuum seal bag (with silica gel pouch) till needed again.
Those Polymaker boxes seal up really well and have a hydrometer built in. I keep my 3 favorite PTEG spools in there.
So moisture does not seem to be the issue with extruder jams. I am at a loss as to how to proceed. I don’t want to rely on my Ender 3 S1 Pro to do all my PETG with the K2+ looming over it.
Whats your printing speed, i had many problems until i lowered it to 25mm/sec
Then it was perfect printing after that.
Also just using an ender v3 in an open office area, filament in same area, again no problems now speed is lower… 240/70 temps, ultimaker slicer old version with defaults and speed, temps and G29 BLT added to gcode start
OK, I dried my filament for another 12 hours and changed the temp to 240 first layer, 235 after that and a bed temp of 80C then 70C. I see a gap in my first layer but, as before, the second layer failed part way through with a FO0528 error.
I have not turned the speed down. It’s at the default. I would love to run at the K2+ max speed of 600mm/s but I will be happy with the default (60 for first layer, outer wall: 200, inner wall 300, etc.).
This forces the fist layer to run at 30% speed, adds a bit to the print time, but my first layers are almost always perfect these days with just about any type/brand of filament.
There’s other ways to do this of course, but I find this to be the simplest for my uses as it’s automatically added to everything I print on that print profile.
As mentioned by others, sometimes you need to lower the temperature with certain brands of filament, always check your filament roll for the suggested temps and start from there. I find with most I can get away with 250c but I find that Polymaker tends to work better 10c lower than that when printing some of the more vibrant colors.
Also, not sure if it’s the lighting on your photo, but your print bed looks a bit messy, give it a good clean with some soap and water then a quick spritz of rubbing alcohol every now and then. Especially if you’d previously been using other types of filaments.
As a side note: If you’re worried about TPU having the same issues, don’t be. TPU has insanely strong first layer bonding, I generally have to use a release agent to avoid damaging the build plate. Usually simple school gluestick works well). Most issues with TPU stem from the extruder itself, it’s a softer material so it can easily slip in the gears or bunch up in the hotend.
Have you been watching your hot end temperature while printing? I found mine would drop after each layer and then it would clog. The culprit was “Auto temperature”. It was turned ON and the factory settings were for PLA not PETG, so it kept resetting it. Make sure Auto temp is OFF in the filament settings or fix the Flow Temperature Graph for the higher temperatures.
Did you find a resolution to the issue? I’m having the same issues printing PETG. I increased and lowered the temps and same results. It usually clogs on the second layer.
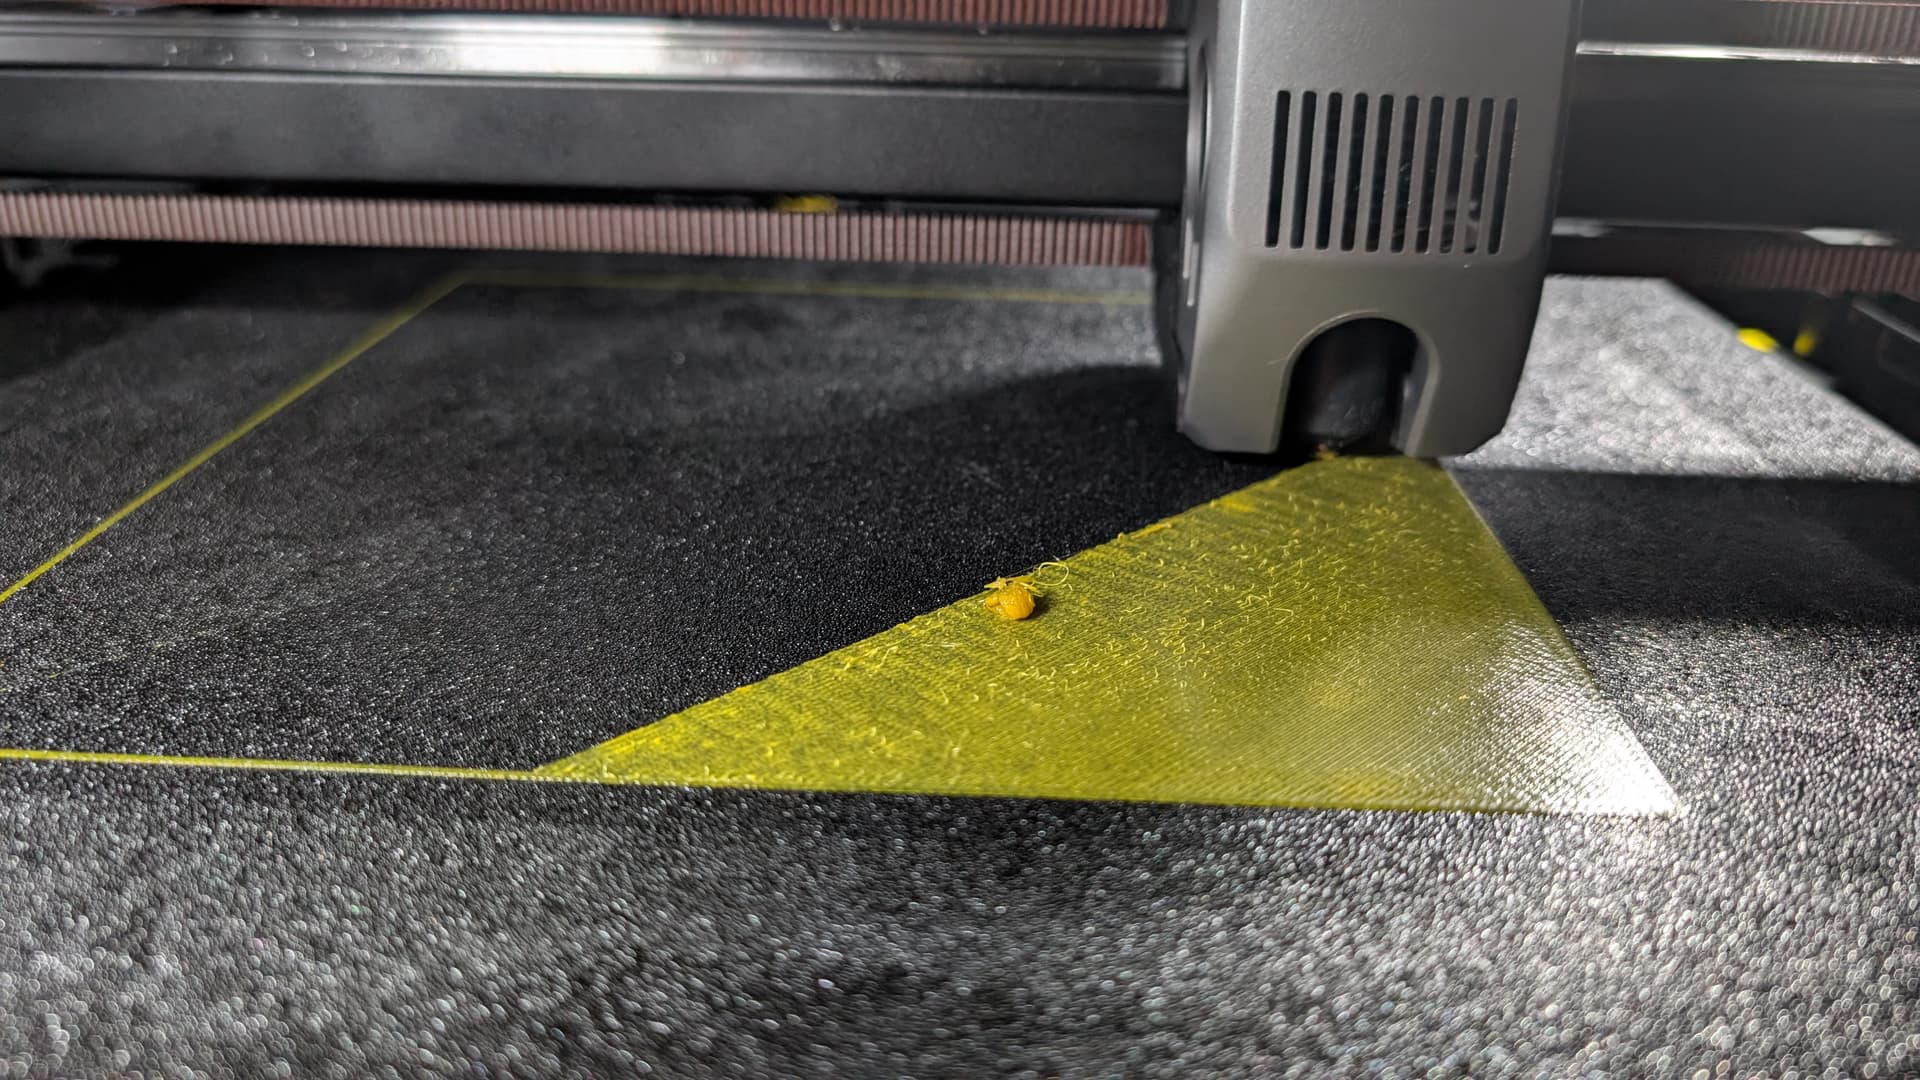
Back from traveling and I tried the suggestions quickly and they did not work. I did some PLA parts and I feel better now. I am getting back to this and gathering more data. I did a run today printing a 200mm x 200mm x 0.4mm plate. The first layer had lots of blobs and I aborted the print, to save myself having to clear another clog.
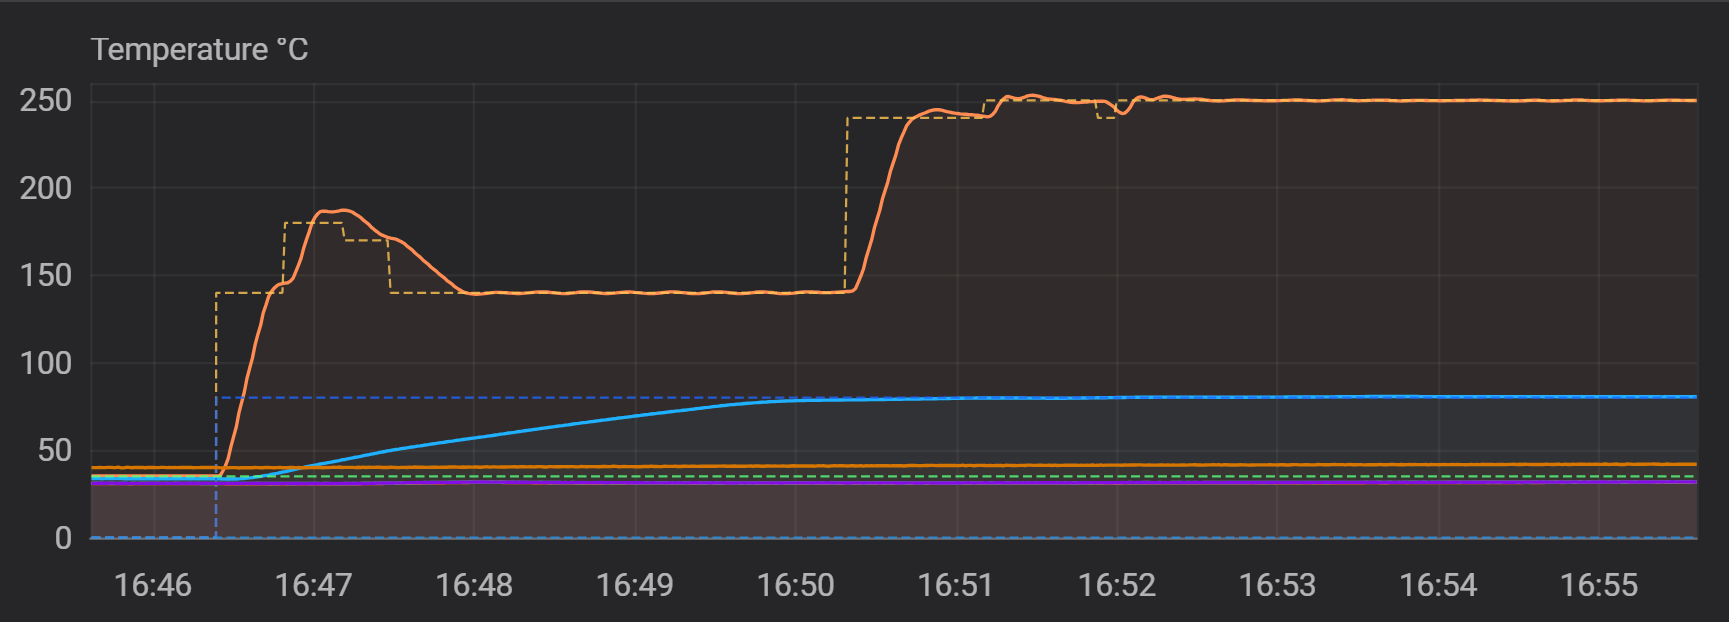
One of the causes of blobs with PETG is an extruder that is too hot but I already turned it down. Then I looked at the graph of extruder temp and rather than 240 C for the first layer, it went to 250. I set the first layer to 240 and subsequent layers to 235. I even confirmed in the gcode that it sets the temp to 240 at the start and after that it switches to 235. These are the only M104, or M109, commands in the file.
…
M104 S0
START_PRINT EXTRUDER_TEMP=240 BED_TEMP=80
T0
M104 S240
…
M104 S235 ; set nozzle temperature
…
Here is the graph. It briefly goes to 240 but then goes to 250.
250 does not occur in printer.cfg, printer_params.cfg or gcode_macro.cfg.
I did see what @Darrell_Degner referred to about auto temp. I am using Orcaslicer and I could not find an option for auto temp like there is in CrealityPrint. I do see some “M104 S220” lines in macros and a reference this in printer_param.cfg.
I did not see the temp go to 220C but maybe that was waiting until the second layer starts :-).
At this point it looks like the biggest issue is the clumping of filament on the first layer. I am guessing the 250 C may be the problem. I have have layer height set to 0.2mm and the rest are the defaults. I think I need to get this sorted out before getting back to the extruder clogs as they may be related.
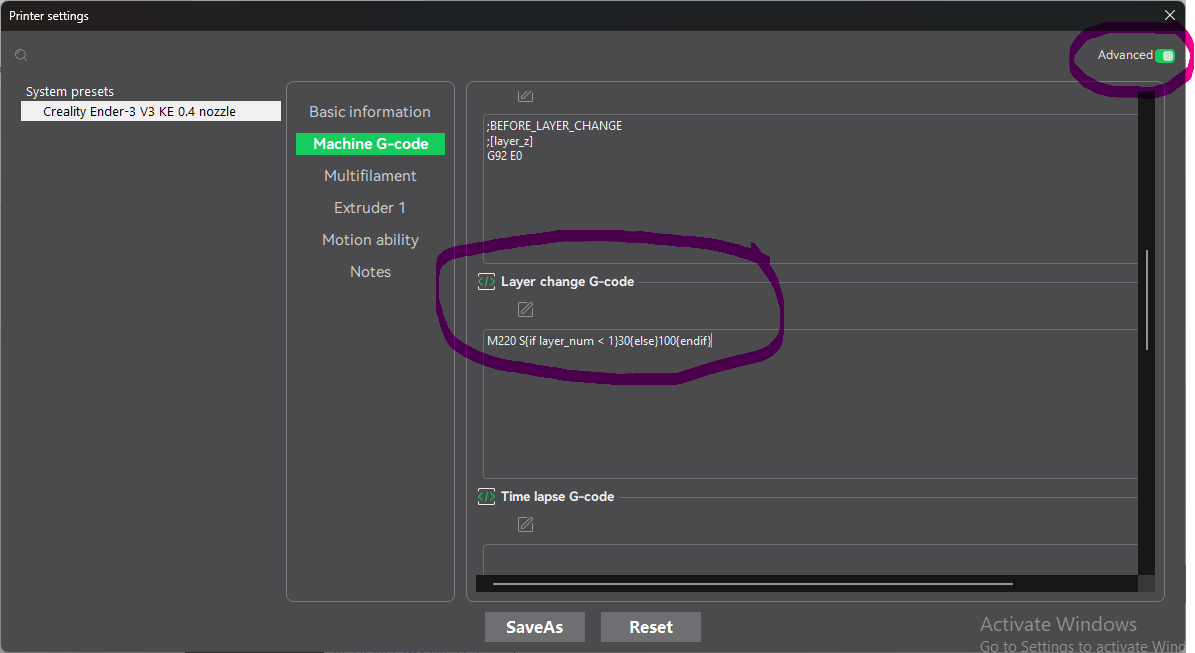
Also, I took @AxMn’s suggestion and I added line to the printer’s “Layer change G-code” to slow down layers 0 & 1. Not sure if that is helping but I will try anything.
I am running the latest firmware (1.1.2.10) from March 2025.
The photo looks like the print head might be too close to the bed, the nozzle then tends to scrape along the layer and pick up blobs which it deposits elsewhere. Have you tried raising your Z Offset in your printer settings a bit, +0.01mm increments, might do wonders. I tend to see this kind of issue after installing a new nozzle, so the first couple of prints are used to dial in a new Z Offset.
I print almost exclusively in PETG and first layer at 250c is pretty standard, it helps with bed adhesion.
I used to get this type of errors too (among other many errors), and then I discovered that the extruder motor tend to get too hot and the heat propagated to the extruder gears and to the filament, causing softening to the filament, and causing the jam in the extruder. My solution is to add cooling air from outside using an aquarium aerator through silicon tube and feed it directly into the extruder. Had zero trouble since.
Thanks again to everyone who provided suggestions.
I bumped the Z offset to 0.03 and it fixed the blobs seen on the previous photos.
I tried opening up the printer door, removing the extruder cover and the glass lid and I was able to print a 200x200x0.4 mm sheet (2 layers). I have not tried @HC_1234’s suggestion of an aquarium aerator but I think heat creep is a big part of the problem.
In my searches I have seen that this is a fairly common problem and I can only conclude that this was rushed to market. I plan to reach out to Creality support and see what they suggest.
Given the success I had with the Ender 3 S1 Pro and PETG, and the setbacks with the K2+, it has taken some of the wind out of my sails. Hopefully there a proper fix and I can get back on track.