I was recently given a CR-10S that is or appears to be running software V1.1.6. I have not investigated that version - that’s another task for later.
As stated - it was given to me and I’m attempting to make sure it works. The glass bed had a coating on it that was extremely ‘wrinkled’ and rough. I cleaned it off with acetone and alcohol and it is now smooth glass. My questions are:
can I use it as is?
if so, what should I use on the surface to improve adhesion - I tried with just the glass, but ‘benchy’ wouldn’t stick
if it should and can be recoated - what with?
I will have a ton more questions once I get something to ‘stick’ to the bed - I am hoping this unit will output reasonable quality product. I’m not planning on using it for any kind of ‘business’ - just something I can play with as a hobby.
Hello @irwinger and Welcome to the Creality Forum…
A glass bed should work fine with your prints but make sure:
The glass is not warped or bent…
Check your Z axis on that and maybe run some calibration tests…
If the nozzle is too far away from the plate it won’t stick properly or at all…
You’ve already cleaned it so that’s good. I’d try some adhesive. There are so many from glue sticks to hair spray… Pick one that works for your use…
I use a product called Bed Weld but I’ve never used a glass bed before…
Here is a really good video on how to put together and adjust the CR-10S:
I want to say that I’m pretty ‘mechanical’ in my skills (I had an old Solidoodle before… I have an early release CNC Wood router and I have both CO2 and Diode laser setups). So I did brief through the video quickly to get a grasp of the construction and setup.
I was attempting to level the bed and found that one corner (FR) was basically ‘down’ as far as I could get it and it was still in contact with the nozzle head. After reviewing the video section on the bed assembly, I pulled off the glass and the metal bed looking for a ‘master’ or coarse adjustment to try and drop the metal carriage plate down. I don’t see anything - it all appears to be fixed based on the wheels in the grooves/tracks.
Is there a ‘trick’ to lowering the bed or raising the z-axis home point? I did not see any elongated holes to make adjustments.
The heated aluminum bed is mounted to the carriage via 4 countersunk screws, springs and threaded into the adjuster knobs. At the rear left (RL) corner, the heater wires exit from the bottom of the aluminum plate. Reading about the original printer and early releases of this printer - the wires to the plate heater apparently were a weak spot and broke easily. So they created an ‘upgrade’ which is a plastic piece providing wire support/strain relief that is mounted on the underside through the RL plate leveling screw/spring combo.
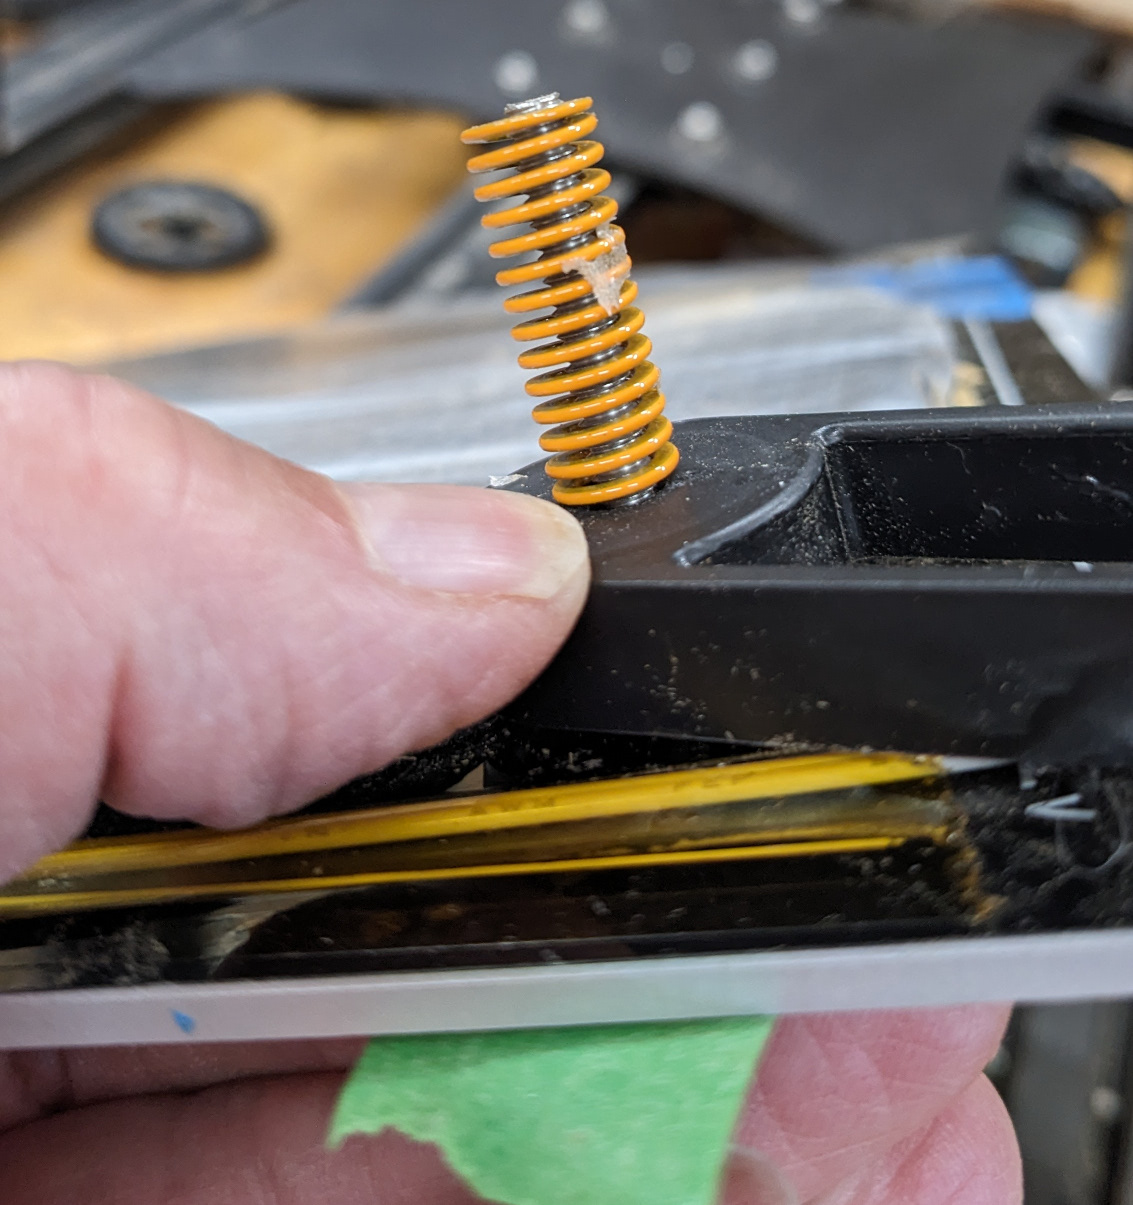
I will confess that I didn’t pay close attention to the dismantling of the aluminum top and now as I reassemble, it doesn’t make mechanical ‘sense’ to me. I am attaching pics of the screw/spring/support and screw/spring no support (different corner. The support adds 3/8"+ distance between the carriage and heater plate. Even adjusting the bed down as far as the spring will allow (spring fully compressed), I don’t recover that 3/8".
What am I missing? (pic of the screw/spring/strain relief attached for reference)
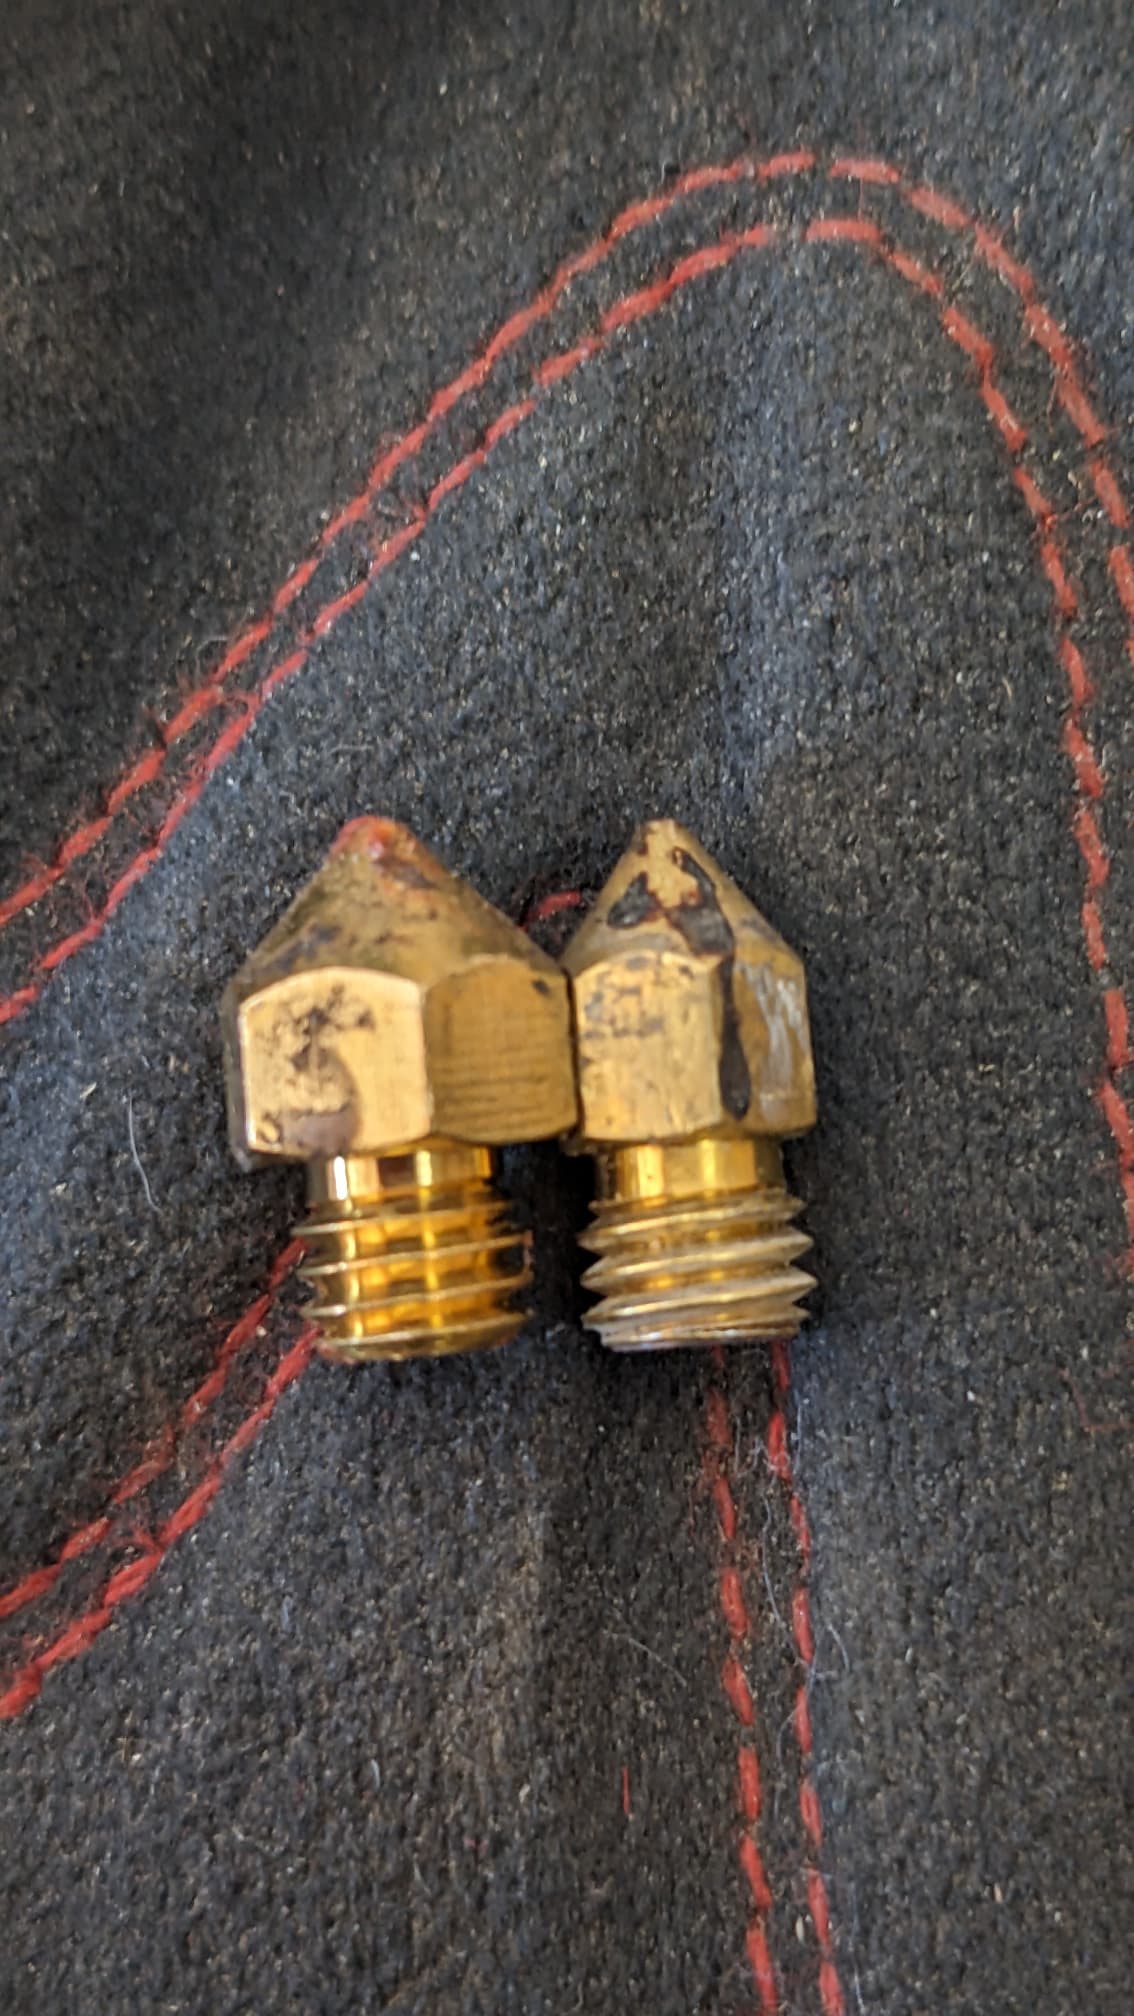
Now I’m wondering if the nozzle is the correct one for this model…? Some nozzles are longer and could make it too close to the bed if it’s the incorrect one…?
When setting the screw positions dont fully compress the springs, instead back of by around 3 turns so that you have room for adjustment in both up and down directions.
I would also reset the printer to factory defaults and ensure that the Z offset does not have an incorrect value entered. If the Z offset is too low then this would cause the nozzle to impact the bed.
Run through the bed leveling process for the printer from scratch to be sure everything is in the correct place and adjusted correctly. I would agree with @jimandyen that something doesnt seem to be lining up quite right, hopefully redoing the bed leveling from scratch should rectify the issue.
@jimandyen: I replaced the bowden tube, fittings and nozzle. I watched a few videos on nozzle/bowden tube replacement (ie: seat the bowden tube with nozzle 3/4 turn loose - then tighten nozzle for best seal). When I ran a small test - I saw PLA pooling between the lower heater block and the upper cooling section. I ordered an entire replacement hot end which I installed intact. Your suggestion that the nozzle may be incorrect caused me to look and while the nozzle is larger in size - it is no longer in length (see attached pic). I have not yet managed a test print to see if the PLA ‘pooling’ above the heat block is happening.
@Nikoli: If I don’t start with full spring compression, my nozzle ‘hits’ the glass surface. I have managed to adjust the ‘X’ beam on the 3-wheel carriage to ‘lift’ the beam on the right side where I have least adjustment. I have looked through every menu item (at least - I THINK I did… I certainly tried to move through sequentially) but I cannot find a ‘reset to factory defaults’ setting anywhere. Again - running software V1.1.6 and ‘About Printer’ calls this a Creality V2.1.
@jimandyen - just checked and confirmed… no leak on hot end
I attempted to output the ‘benchy’. It seemed like there wasn’t enough filament being extruded and deposited on the glass (I coated with glue from a glue stick). When I release the tension on the filament (squeeze the lever) and hand-push on the filament, it appears to flow freely. I took the glass plate out and started the benchy run just to see if and how much filament was coming out of the nozzle. It seemed to be VERY little flow. I’m now wondering if the knurled wheel that moves the filament is ‘worn smooth’ or at least allowing slippage?
I’m beginning to think I need to discard this printer on the ‘next’ unlucky sucker (me being the first one). Mechanically - it’s just not that complex.
Is there some kind of tension adjustment on those.? I know on other extruders there is one.
I’d at least give the next enthusiast a heads up on those issues to be fair. I bought my first K1 used and the seller became my tutor and really helped me out…
It sounds very much like the bed leveling needs re-doing, usually when you go through the bed leveling process you would set the Z values to 0 in the settings and then go around the bed leveling the corners. Once all 4 are level you would usually run the Auto Leveling which will then check the bed and store the heights it reads. Once thats done its usually a case of starting a print (preferably one with a large first layer area so you have time to make adjustments before it moves on to the 2nd layer) and then baby stepping the z offset using the printer control panel until the filament is laid evenly onto the bed.
I came across this video which may help you in the bed leveling process. Bed leveling is the most important thing to have correct as if the bed is not correctly tuned then prints will always likely fail. Good luck and hope the video helps out.
@Nikoli - interesting video. I think my issue is somehow still tied to the extrusion of the filament. I marked a piece of filament with a sharpie at 10mm and then proceeded to use the control panel on the controller to extrude 10mm and I only saw the filament move in 5 mm. More research revealed the M502 / M500 ‘reset to factory’ and ‘store values’ commands. That changed the output just a little… the ‘benchy’ actually laid down some PLA but it was VERY ‘strandy’.
It looks like there is not much available for legacy support for the CR-10S here on the boards… just you and jimandyen answering with jimandyen not even owning a CR-10S. I may try Creality for some assistance, but my expectations are pretty low. The other place I’m going to try is with the Facebook group.
In the end - the firmware I’m have is NOT the software that is shown in most videos. For instance - I do not have the ‘Auto Bed Leveling’ selection option in my control box. I can’t seem to find any upgrade firmware available for download.
Thanks again for the advice and suggestions… I’m not really willing to give up.
It sounds like you need to run through the esteps calibration procedure to get the extrusion distance set correctly. Here is a guide on how to do that, the guide references Creality Print as the Slicer but should be applicable… Creality Print Calibration Tutorial
Here is an alternative method should you find it easier… How To Calibrate the Extruder Steps
Once you have your flow rate dialed in you should find it will work a lot better and have more accuracy too.
These forums are still very much in their infancy and the community is still growing slowly so you may find the forums not as active as you expect. Creality support will likely be able to give you some pointers but not sure how much that would differ from the advice given here.
@Nikoli - thanks SO much for the links. I will check them out.
I think I got everything ‘working’ at least enough to see prints coming out. I ended up doing a factory reset which then caused the PLA to move 10mm as requested. I started a benchy which was going well… until the dog came into the shop all excited and disconnected the USB cable to the printer :(.
I’m just restarting now (1 hour) using the SD card (no cable risk) but I have to leave as soon as it finishes printing. Based on yesterday’s results - I think I may have some questions about fine-tuning the output for better quality - what forum would you recommend for a good ‘brain trust’ of experience for output quality?
Again - thanks so much for ‘sticking with me’ in this journey. I appreciate all the ideas, suggestions and links provided.
EDIT: I followed the link to the software/firmware Download page you provided… what is the difference between the ‘…Smart Marlin…’ vs the ‘…SmartCR-FDM…’ firmware? I’m GUESSING it has to do with the internal controller motherboard which I have not looked at. My suspicion is that I will need to identify the motherboard to know what version of firmware can be installed
You are very welcome @irwinger, always more than happy to help when I can, 3D printing can be tricky to get your head around at first but once you pick up all the tips, tricks and quirks you will be a master of the printer in no time
Glad to hear that the prints are now starting to come out well and that the extruder is feeding the correct amount now. It sounds like the previous owner may have had a different extruder/hotend on the machine at one point and forgot to revert their settings back when putting the original print head back on.
In terms of fine-tuning to get the best quality feel free to post pics here and we will be more than happy to offer feedback in any areas you may be struggling with. Even though some of us might not own a CR-10S the principles of tweaking and tuning are very similar across many printers so there will always likely be someone who can offer assistance
Most of the time the All3DP website is a good resource for tips and tricks when it comes to tuning your printer. Here is a link to the site if you wish to have a peruse All About 3D Printing
In terms of the firmware yes you are definitely best checking the motherboard to see what model number or revision you have. If you get stuck feel free to post a picture of the board and we should be able to help you identify it and locate the correct firmware
So glad you have kept the motivation to get the printer working as it should, it being 2nd hand is definitely adding complexities but it sounds like you are well on your way to working through them and getting back to a stable configuration