On April 9, Creality unveiled its newest addition to the Halot series, the HALOT-MAGE S 14K resin 3D printer. Promising “stunning detail and speed,” this printer caters to enthusiasts seeking fine detail printing capabilities. Specifically tailored for professionals, especially those crafting figurines and jewellery models, it’s designed to meet their exacting standards.

- Part 1: Creality Halot Mage Series Technical Parameters Comparison
- Part 2: Creality Halot Mage S Innovations
- Part 3: Creality Halot Mage S Printing Parameter Settings
- FAQs about Creality Halot Mage S
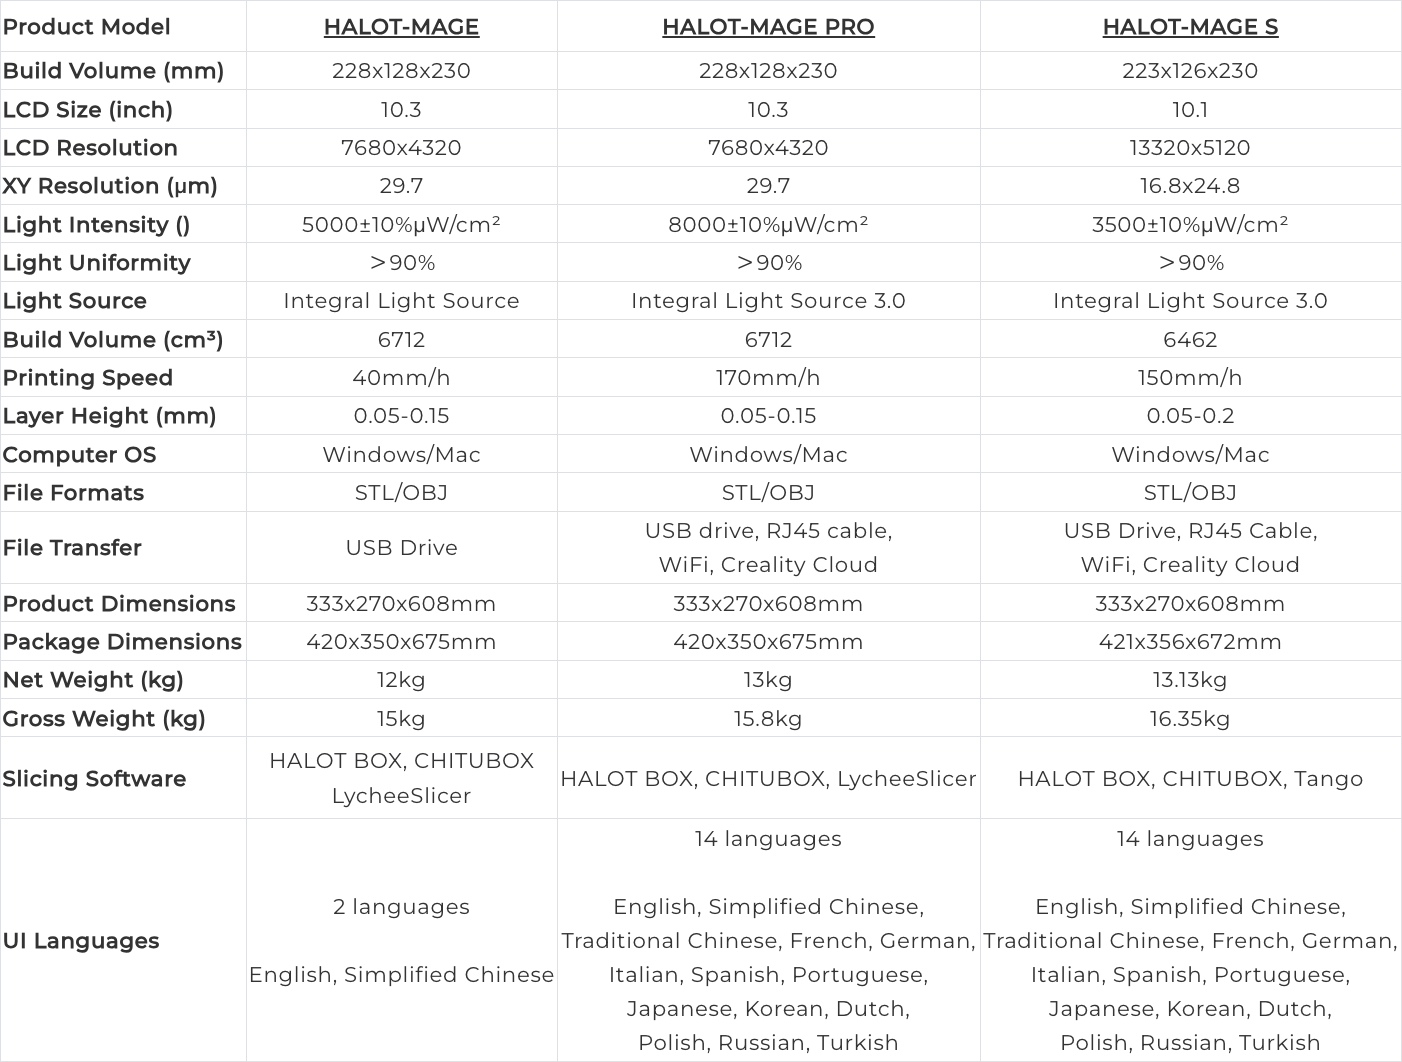
Part 1: Halot Mage Series Technical Parameters Comparison
Part 2: Creality Halot Mage S Innovations

1. Specifications Overview:
- 10.1-inch 14K ultra-high-resolution mono LCD screen
- Professional Integral Light Source 3.0
- “Dynax+” ultra-fast printing mode
- “Dynax” motion system
- Specially laser-carved build plate + wire-drawn plate adapter
- Smart HALOT-OS with built-in cloud personal model library
- Air purifier
- Software Ecosystem: HALOT-BOX self-f-developed slicer; 3-month CHITUBOX PRO membership (worth $45.99) for free; Creality Cloud APP
2. Key Features of the Halot Mage S 14K Resin 3D Printer:
2.1 10.1" LCD with 14K Resolution

Halot Mage S features a premium LCD screen with 14K (133205120) resolution. The pixel size is 16.824.8μm. The 10.1" LCD underpins a 223126230mm build volume. It has the magic to render shapes, textures and fabrics exactly as designed. No more holding back your creative talent.
2.2 Integral Light Source 3.0, Pro-level Fidelity
As the 3rd iteration of the integral light source, it boasts 90%+ UV light uniformity and can each resin layer precisely and consistently. Hence, the prints will be neat and sharp with 0.02-0.09mm dimensional accuracy.
2.3 “Dynax+” Mode for 150mm/h Ultra Fast Speed

Halot Mage S offers a 3-4x faster “Dynax+” mode that can be turned on with one tap. It is able to finish a 15cm tall model in just one hour. And, the print quality is still pretty good.
2.4 Agile & Steady “Dynax” Motion System
The system is made of a closed-loop motor and dual linear rails. The build plate can be lifted and lowered in just 1.2s, then ready to print the next layer. With steady motion, there will be minimal layer lines. (Mighty Closed-loop Motor: Fixed 1300N·m high torque, quick to start or stop. No vibration at low speed. No step loss at high speed. Dual Linear Rails: Rigid Z-axis, less Z wobbling.)
2.5 Specially Laser-carved Build Plate + W Wire-drawn Plate A Adapter
Nice Adhesion with New Laser-carved Build Plate: T The plate is CNC-machined and its surface adopts a special laser-carved pattern selected out of dozens of patterns. It ensures stronger adhesion and quicker removal of the models.
2.25x Leveling Tension with Non-slip Adapter: The build plate adapter is processed by wire drawing, which boosts the friction by 2.25 times to 3530N*. So, the leveling state is firmly locked without slacking.
2.6 Smart HALOT OS, Freedom of Control
The latest HALOT OS enables easy remote printing from a phone or PC. With network, it can directly download sliced model files from the built-in Creality Cloud personal model library. Now, printing is beyond the limits of time, space and device.
2.7 Smart Air Purifier, Odor-free Joy
The purifier can go ON/OFF according to the printing status. With a newly developed activated carbon filter, it is 33% more efficient* in absorbing resin odor (VOCs). At its back is also a vent hole to connect an exhaust tube.
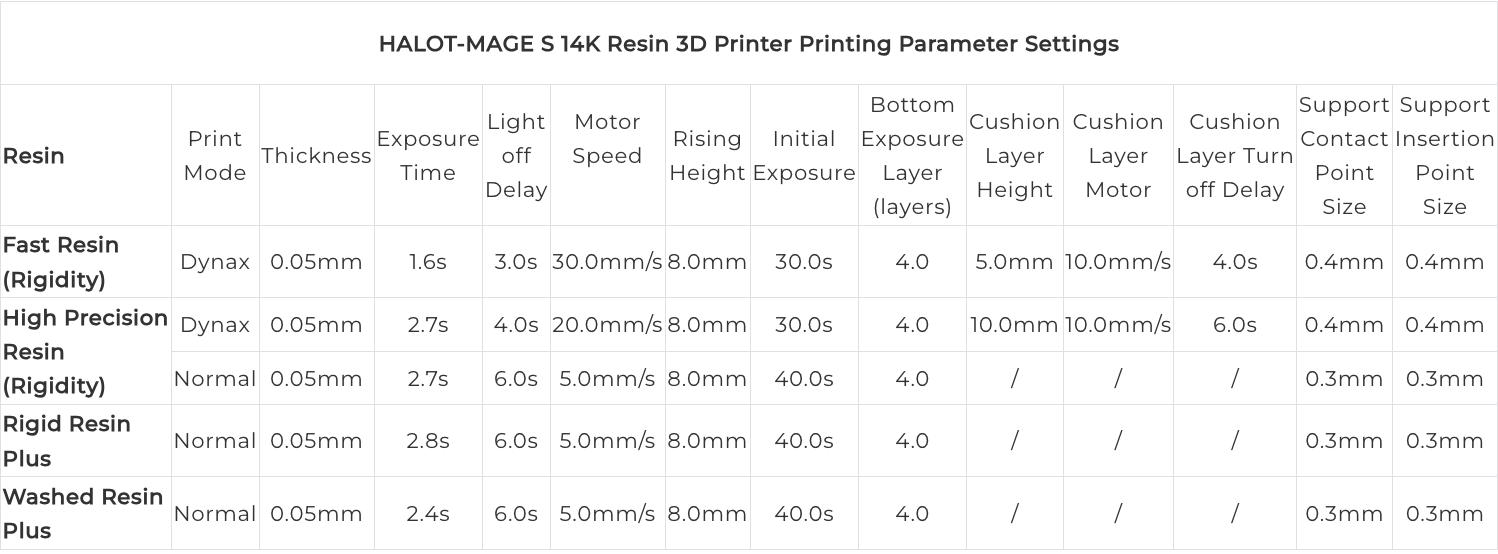
Part 3: Creality Halot Mage S Printing Parameter Settings
Part 4: FAQs about Creality Halot Mage S 3D Printer
1. What to do if the print has vertical stripes?
- Pls refer to the printing parameter setting table to adjust slicing parameters that can alleviate.
- Anti-aliasing can alleviate, pixel blurring can resolve (but the details will be a bit blurry), but ideally, tilt the model 30 to 60 degrees, stand it up a little, and print with supports.
2. What if the printed model has a stair-step pattern?
- Position the model plane parallel to the x or y-axis of the screen, or rotate directly horizontally 30 to 45 degrees.
- Enable anti-aliasing: 20-220.
3. The model being printed has internal voids or holes.
- Check STL and slicing, confirm if there are any defects in the model itself causing problems;
- Before printing, thoroughly clean the print screen, resin tray, and build platform to ensure that no foreign objects are present.
- Prior to printing, clear the screen exposure and clean any resin clumps in the resin vat before proceeding with printing.
- Increase the delay exposure and decrease the motor speed; it is possible that the high speed is causing the resin to not flow back into position and be pressed onto the build platform prematurely for printing.
- When printing a blank model, check that the exposure is normal and that the light transmission of the print screen is not reduced when printing in the middle of the model. If the light transmission is abnormal, it indicates a problem with the print screen and the print screen needs to be replaced.
4. Why does the printed model have layer lines?
- Insufficient exposure time can result in inadequate layer solidification. During the continuous layer-by-layer construction process, a particular layer may be partially missing due to insufficient solidification, making it impossible for subsequent layers to properly continue on the previous layer, resulting in layer delamination problems.
- Verify that the model support is adequate. If the model support is not in place or the density is not sufficient, it is easy to cause the model to shake slightly when it is removed from the mold during printing. At this point, it is recommended to increase the support density or manually add support to stabilize the model.
- Check if the release film in the material box is loose. If there is any looseness, it is recommended to adjust the tension of the release film steel ring.
- If there is an abnormal noise when operating the Z-axis, the swing amplitude is too large, or there is a jam in the printing platform when the Z-axis moves up and down.
- The lift speed during printing also affects the quality of the model. If the lift speed is too fast, one layer will have to follow the next layer without sufficient solidification, which will easily cause the phenomenon of model demolding between layers, directly reflected on the layer surface, resulting in layer delamination problems.
5. Why is the Halot Mage S not printing or printing is unsuccessful?
- Remove the material vat and printing platform, place a sheet of white paper on the print screen, and run a blank test to check if the exposure is functioning properly.
- Upgrade to the latest firmware.
- Use the small plastic scraper from the accessories to scrape the bottom of the vat to check for cured resin.
- Filter the resin again. Check if the resin has expired.
- If the local ambient temperature is too low, it may affect the activity of the resin.
Conclusion
Own one to start your printing journey.