The thermistor on your Ender 3 V2 plays a critical role in monitoring the temperature of the hotend. If you’re seeing temperature fluctuations or errors like “THERMAL RUNAWAY,” it might be time to replace it. Although this process may seem complex, we’ve simplified it into 5 easy steps.
In this comprehensive guide, we’ll walk you through how to replace the thermistor on Ender 3 V2 step by step.
Why Replace the Thermistor on Ender 3 V2?
The thermistor on the Ender 3 V2 may need replacement for several reasons, such as:
- Inaccurate Temperature Readings: If the temperature reading is inconsistent or fluctuates unexpectedly.
- THERMAL RUNAWAY Error: This safety error indicates the thermistor isn’t functioning correctly.
- Damaged Wires: The thermistor’s thin wires are prone to wear and damage, especially with frequent use.
Replacing the thermistor might seem daunting, but it’s a relatively simple task that you can complete with basic tools. Let’s get started.
Tools You’ll Need:
- Replacement thermistor (compatible with Ender 3 V2)
- Hex key set (1.5 mm or 2 mm)
- Phillips screwdriver
- Wire cutters
- Needle-nose pliers
- Kapton tape (optional)
- Zip ties or ribbon for wire management
How to Replace the Thermistor on Ender 3 V2 Step by Step
Step 1: Access the Mainboard
- Power off and unplug your printer for safety.
- Use a hex key to remove the screws securing the bottom cover.
- Phillips screwdriver
Step 2: Disconnect the Hotend Wires
- Cut the ribbons or zip ties holding the wires in place.
- Unplug the hotend wires (thermistor, heater cartridge, and fan) from the mainboard.
- Unscrew and remove the fan cover on the extrusion back board using a screwdriver.
- Gently pull out the Teflon tube from the extruder to access the hotend assembly.
Step 3: Remove the Old Thermistor
- Slide off the wire sleeve to expose the thermistor connection.
- Take off the silicone sock from the hotend.
- Peel off any tape securing the thermistor and gently pull out the old thermistor from the heating block.
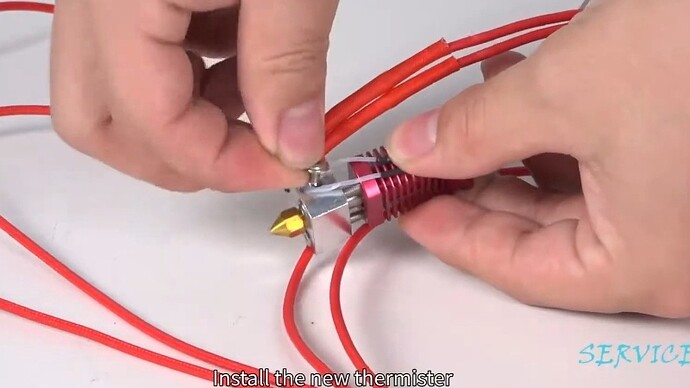
Step 4: Install the New Thermistor
- Insert the new thermistor into the hole on the hotend block and secure it with Kapton tape if needed.
- Reassemble the wire sleeve around the wires and reattach the nozzle kit and fan cover.
- Reinsert the Teflon tube back into the extruder.
Step 5: Reconnect and Test
- Plug the thermistor, heater cartridge, and fan wires back into the mainboard, ensuring each wire is connected to the correct port.
- Use new ribbons or zip ties to secure the wires neatly.
- Reconnect the mainboard fan wiring and reattach the bottom cover.
- Power on the printer, preheat the hotend, and monitor the temperature.
- Ensure it rises smoothly without errors.
Troubleshooting Tips:
If you see a “THERMAL RUNAWAY” error or the temperature reading is 0°C, check the thermistor connection.
Inaccurate temperature readings may indicate a loose or poorly secured thermistor.
Before buying a new thermistor for a “Nozzle and Bed temp too low” error, try tightening the thermistor’s connecting bolt, often the actual issue.
Final Thoughts
Replacing the thermistor on the Ender 3 V2 doesn’t have to be a complicated process. By following these simplified steps, you can quickly resolve temperature issues and get back to printing high-quality models. Proper maintenance of components like the thermistor is key to extending the lifespan of your 3D printer.
