Any one here have had there belt slowly shred? I have about 500 hours into this and about few months of ownership. I can not find a belt replacement, amazon shows one but its aftermarket not creality, any one experienced this issue? Btw i also keep my printer maintained if it matters and calibrated.
1 Like
you have to contact creality directly for this by mail: cs@creality.com
My K2 has approx 130 hours on it, and I just purchased it in July, Last night after cancelling a print, the head thrashed to the left very hard… and then the same to the back wall of the unit.. and then it stopped.. the filament didn’t get cut.. and the CFS couldn’t retract either… Once I finally re-heated the head I was able to issue a filament retract command with the touch screen, and it successfully retracted properly. But then I noticed that the belt had gotten torn pretty bad almost all the way thru right near the print head on the right hand side. Just contacted them via cs@creality.com will see what they say. I would like to just replace the belting myself if I can, I dread having to ship this beast back anywhere, and I’m very printer tech savvy. Looked online in their youtube videos, and there is not one specificially for XY Belt replacement for the K2plus for some odd reason… but there’s tons of other videos… Curious as to why?
and also curious why Creality doesn’t sell a belt replacement kit for the K2Plus either.. ?

2 Likes
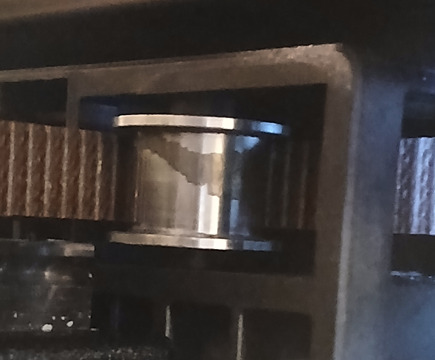
Yes - the belts on my K2 Plus are shedding material that accumulates on the pulleys and results in a squeaking noise during rapid movements. I clean it off with a cue tip dipped in methylated spirits, and also wipe the belts themselves with a paper towel (Creality support however have recommended this cleaning procedure) - it’s clear the material is coming off of the belts. I’ve since had to do this several times over the course of a few months.
I’m considering replacing the belts, however noticed that though they are GT2 pitch, they are NOT 9mm width as expected but instead 8mm! This is a rare width for GT2 belts, however I have found a few links on AliExpress including this one.
I might be able to get away with a 9mm size belt as it does just fit on the pulley, but no ideal.
Very disappointing on a printer that is less than 6 months old, and isn’t used everyday.
Here is an image showing the material deposited on the pulleys:
2 Likes
The rest of the belt still looks good. I think there was a small defect from the start. I would try to claim this from Creality. Dont know what the effect is of a defect belt on the pulleys bit i think i see it on your picture.
Update, I got ahold of a customer service rep tonight via chat and She is going to get a new belt sent out to me within the next 10 days. A bit slow but acceptable. I also ordered a set from the link above, but thats also from china so it will be about the same shipping time or longer. There are a few on Amazon for about double the aliexpress price, 16bucks but I think I’ll just probably wait for the one from crealilty than order a 3rd replacment. Once I have the replacements knowing my luck I’ll never need them again LOL. but it was fairly painless to get this replaced so I’m happy.
They said they’d send me a video link on how to replace the belt as well very soon. I’ll post the link for that here when I get it. as it seems kinda hard to find.
2 Likes
SO update again.. I got the replacment but it is the wrong part. Its 8mm wide, but about half the length of one belt . it barely gets from the printhead thru the beltway path “H” pattern to the middle of the back of the printer. They sent me partnumber 3204030101 which is NOT the part number for the XY belts on a K2 plus. I have reached back out via e-mail so far and will again double down and hit their website chat system in a few minutes to try to get another try at this .
Sigh.. I just don’t understand how firstly the belt could tear so quickly… but second , how if the belts are supposed to be an expendable item, how they are not for sale anywhere on their website. Its kinda insane.
And also. the documentation they sent with the shipping confirmation on the wrong part, was completely useless as it was not related to actualy changing the belt at all it was about changing one of the motors and it instructed me to break the glue bonds on the side panels of the entire printer to take them off and disassemble the entire top CoreXY assembly but there was literally no mention of how to re-string the belt at all.. The ONLY place I have found a similar video about how to replace the belting was on their service videos for the K1 which I guess is kinda similar so I am going to eventually use that as a guide of sorts..
But honestly this is getting ridiculous.
Maybe I should have waited to get the new bambu H2C instead at this point..
1 Like
Latest update.. Creality support got back to me fairly quickly and fedex’d me a new replacement belt that was the proper length. I just put it back on using a combo of a few of their repair videos becuase they still don’t have a belt replacement video that actually shows how to replace the belts.. I had to remove one of the auto-tensioners to thread the belt around the motor gear properly but that honestly wasn’t that hard, just an extra step.. Printer is calibrating as I write this and I think everything is working again.
BUT… if you look at the picture above that I originally posted.. I have a new theory about how this happened.. it was actually a manufacturing defect. now that I have the belt out of the machine and I’m looking at the “rip” , firstly I can’t even begin to rip the belt in my hands if I yank on it very, very hard… Its STRONG… so looking at the angle of the “rip” and the slight off angle of the end of the belt where its folded over to insert and lock into the head , it appears that actually whoever assembled this unit snipped thru half the belt when they were cutting off the excess belting during installation. I never noticed it until the gantry crashed but it honestly appears that it was definitely cut thru with nippers. I’m gonna follow up with support on their e-mail but at least I can be fairly sure that the belts will last a while now that I really see how strong they actually are.
Alls well that ends well I guess.. just wish it hadn’t taken over 2 weeks to get the replacement but keeping fingers crossed for good prints from this point forward now.
1 Like
Thank you for all the updates and information! I hope everything went well and the printer is working properly again.
What I was wondering is, could you tell me how long the belt should be to be the right length? I bought that aftermarket set from Aliexpress, but I’m not sure if it’s long enough. I hope you can measure (the defective one?) to get an idea of what the correct length should be.
Thank you very much for your time and effort!
Hi Ranney, The belt would need to be a minimum of 75 inches. The one I got from Creality was about 80 inches and I trimmed it down a bit.. its good to have it longer since for theading purposes you need to bend and twist the end you’re threading a bit and I don’t know if that could weaken it a bit so I cut that end off. Before I took off the old belt, I marked it on the center of where the “foldover” was on the ends where you lock the belt into the head. so I could mark the new belt the same when I put it back in. That way you know your tension will be about the same of what you took out.. also when loosening tension on the back, I counted number of turns to loosen and then reversed for re-tightening later. that way I stayed in the ballpark of tension from the factory.
Glad I could document some of this for folks.
Hope this helps!
4 Likes
I’m just about to tackle the Y-axis belt replacement as soon as it comes in. I ordered 2 sets, 1 from AliExpress and the other from Creality as the part# from Creality from what I read above was not the part# for the K2 plus. Hopefully one set will work.
The ‘tutorial’ they pointed me to was for the K1 Max and it stated you needed to take the top section completely off, is that truly the case for the K2 plus or can you snake it through the pulleys? I’ve had it apart before and replaced the X-axis motor so I’ve had the sides off before but the less dismantling to do to get the belt on the better… If I knew what HAD to come off that would be a great start to this replacement.
Thanks
I’m seeing that on my pullies too, and I did not use this printer much. Thank for the Aliexpress link. I order two belt sets. Now, if they need changed, I bet it’s hard than changing the serpentine belt in the car (just did my jeep a few months ago). The entire hot end needs taken apart?
You should have made a video for us! LOL
Hey Guys, I should have taken some videos / pictures of what I did to replace the belt but NO absolutely not, you do not have to take off the entire top and unglue the sides of the printer…
Basically you need to take the back off the printer, and then remove the entire belt tensioning sensor mechanism on whatever side of the machine you’re replacing the belt on. Watch THAT video and it will give you 90% of the info you need to do the job. Along with any video they tear down the hotend to replace parts on it..
This will give you access to everything you need to snake the belt back thru the pulleys. It IS a bit tricky to get the belt thru the S curve in the motor area but its definitely doable… one of the K1 MAX tutorials I watched actually said to use CA glue to glue the end of the old belt to the end of the new one and then slowly pull out the old belt while pulling the new one thru to re-thread it… I did not end up going that route.. I just used some smalll screwdrivers, and a tab of tape on the end of the belt to bend and pull it around the pathway where it needed to go.
When I saw that first tutorial of them taking apart the entire upper assembly of the printer including de- laminating the glue on the side-panels I was pretty much thinking the same thing.. what the hell did I get myself into here…. but its not the case.
Good luck, and yes, DaveyK you do have to take most of the printer hot end head apart so you can get to where the belts get folded into the carriage slider frame. and pushing the folded belts (around those little pins ) is also a bit finicky , but the pins are tapered a bit so pay attention to that as well, so they act like a wedge when sliding them in.
Once I replaced the belt I had no other issues. and have been happily printing ever since. just make sure you do AT LEAST one if not 2-3 belt tensioning calibrations, and also it helps to keep track of how many turns you loosen the tension to restore tension again on re-assembly later.
Feel free to ask me any more questions !
2 Likes
So i have replaced the belt twice the first time it broke and that was the biggest pain to replace. The second one started to shred so I replaced it and now the 3rd one afer the 1st print with it has already started to shred. I saw on some reddit forums that the guide could be messed up and thats what is causing it. Has anyone else had the same issue?
I was also given the part number you originally were told. Do you have the new part number by chance so I can order that one?