Does anyone know how to level the bed on the K2 Pro without the need for being an engineer or programmer?
Since day one I’ve been having constant issues with the first layer. Starts fine then goes really bad about 1/3 through the test print. Being a beginner I didn’t know any different and thought that was normal. Now I’ve got a little time working with the K2 Pro (and Plus) I know that’s not right.
If I manually adjust the z offset during the test print I can get a really good first layer (a -0.125 adjustment). But I work and can’t be home 24/7to make sure the first layer is layed down (at least) good. You shouldn’t need to be a programmer or engineer to get things right. I have to manually adjust the Plus z offset by -0.11.
I see all the ways to adjust the bed level and z offset but I’m no engineer or programmer and working 60-70 hours a week means I don’t have time to tinker for 100’s of hours to get it right.
There has to be an easy way to set these so the first layer comes out good. If not, Creality, if you want a solid consumer base make it easy to tune the printers so a beginner can actually enjoy the experience of owning an expensive machine that is supposed to bring enjoyment and fun to the family.
Sorry, about the bleet, it’s rather frustrating because the little one is into cos play and that was one of the main purposes of buying the printer. For me, it’s getting back into model making.
1 Like
It should be automatic, no manual adjustments required
Would be nice but I run the calibration before every print. I’ve run the auto calibration from the printer menu numberous times. Same results.
I’ve cleaned the cameras, lubed the rods, rails, screws. Nothing makes a difference.
The only mechanical issue I had with the Pro (besides the hotend dying all of a sudden) was the mount for the left screw was bent and the screw was not in the mount bearing (flopping loose). After discussions with Creality there solution was to just remove the mouint, bend it back into shape and insert the screw back into the bearing.
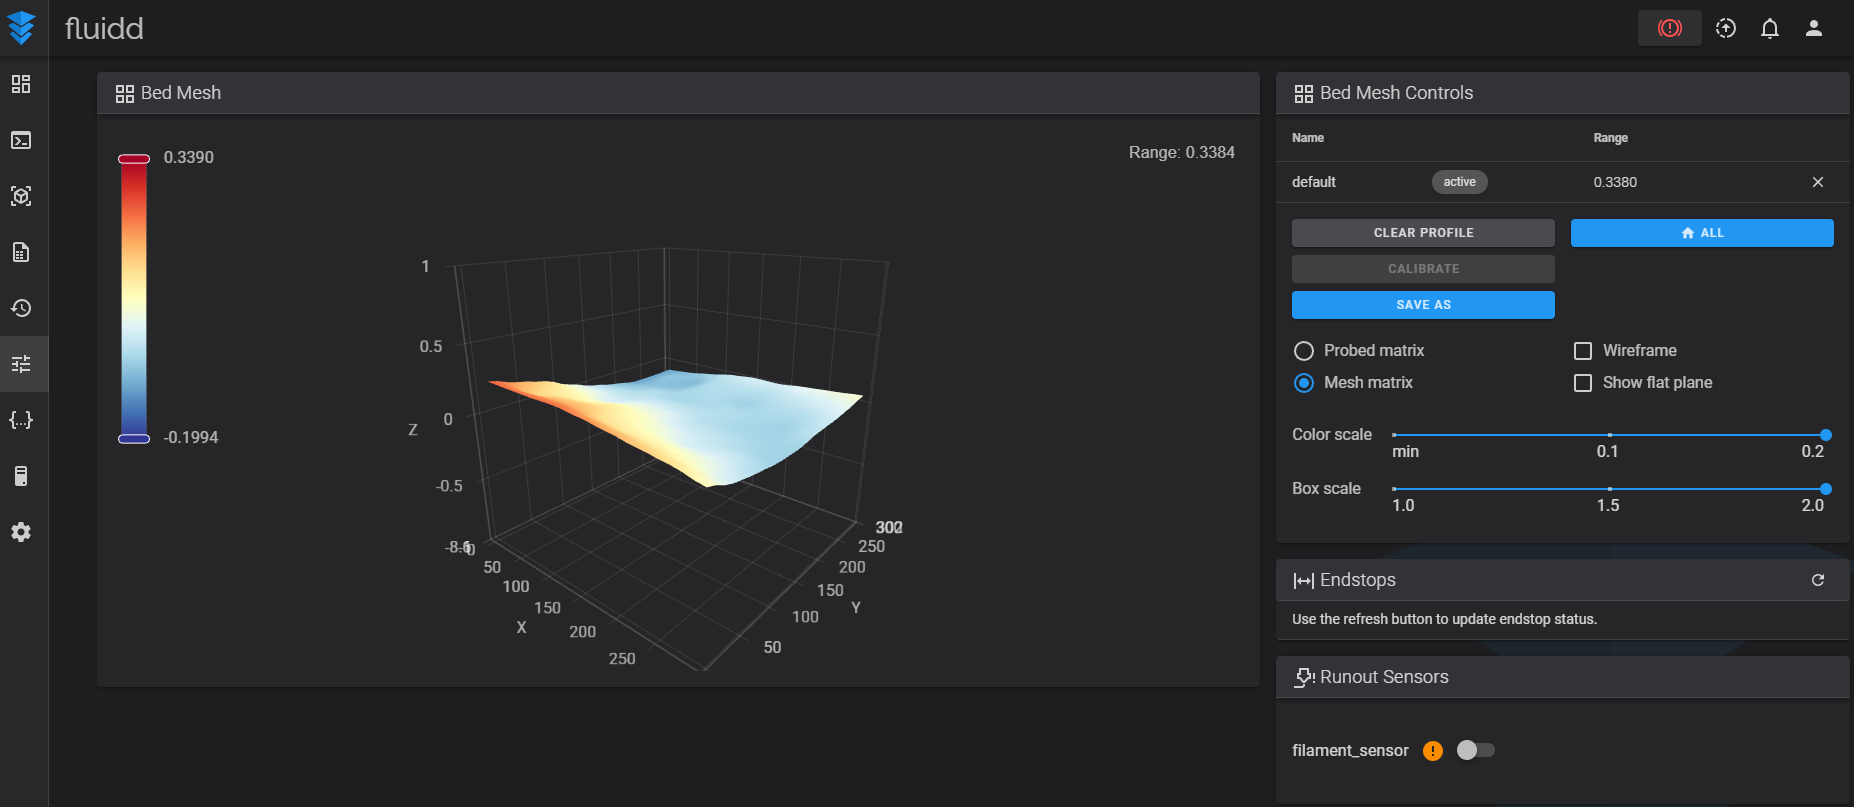
The only thing I can think of (after seeing the bed mesh in Fluidd) is trying to set the bed level. According to what I’ve read, if you try and set the z offset in Fluidd the g-code just resets it back to 0.
Just an addendum: what I can see (from an untrained eye) is that the issues with the first layer follow the curvature of the bed mesh. Right hand side starts fine (a lille low and squished) but then as it heads left (where the mesh shows the bed rising) is turns to custard. It’s like there’s no compensation for the rising level of the bed.
Instead of playing with z offset go to Quality in Creality print and increase first layer width to 0.7 . Has worked well for me. Also when it comes to lubrication I found a video on the K2 wiki that said to use WD 40 Specialist Silicone spray. I tried this and my machine is running sweet.
They recommend re-lubricating once a week especially if printing with ABS
Hello !
Could you share a picture of the first layer ?
And can you share a picture of the bed leveling map ? You can find it via Fluidd ( IP of your printer followed by :4408 in the URL bar of your navigator)
Sometimes it is not an issue due to the Z-offset but the leveling of the bed
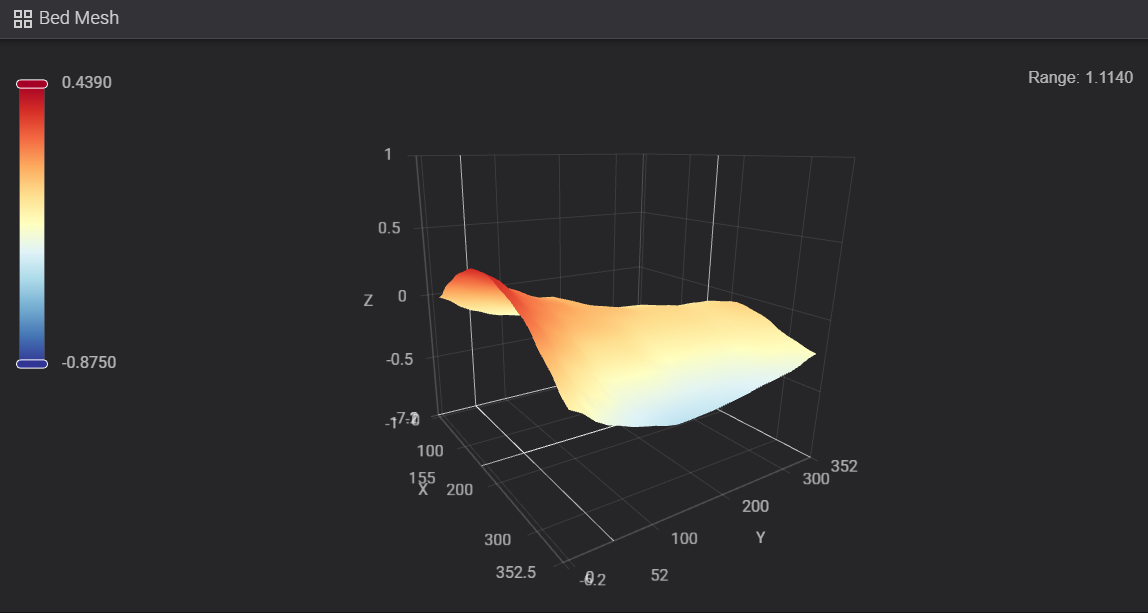
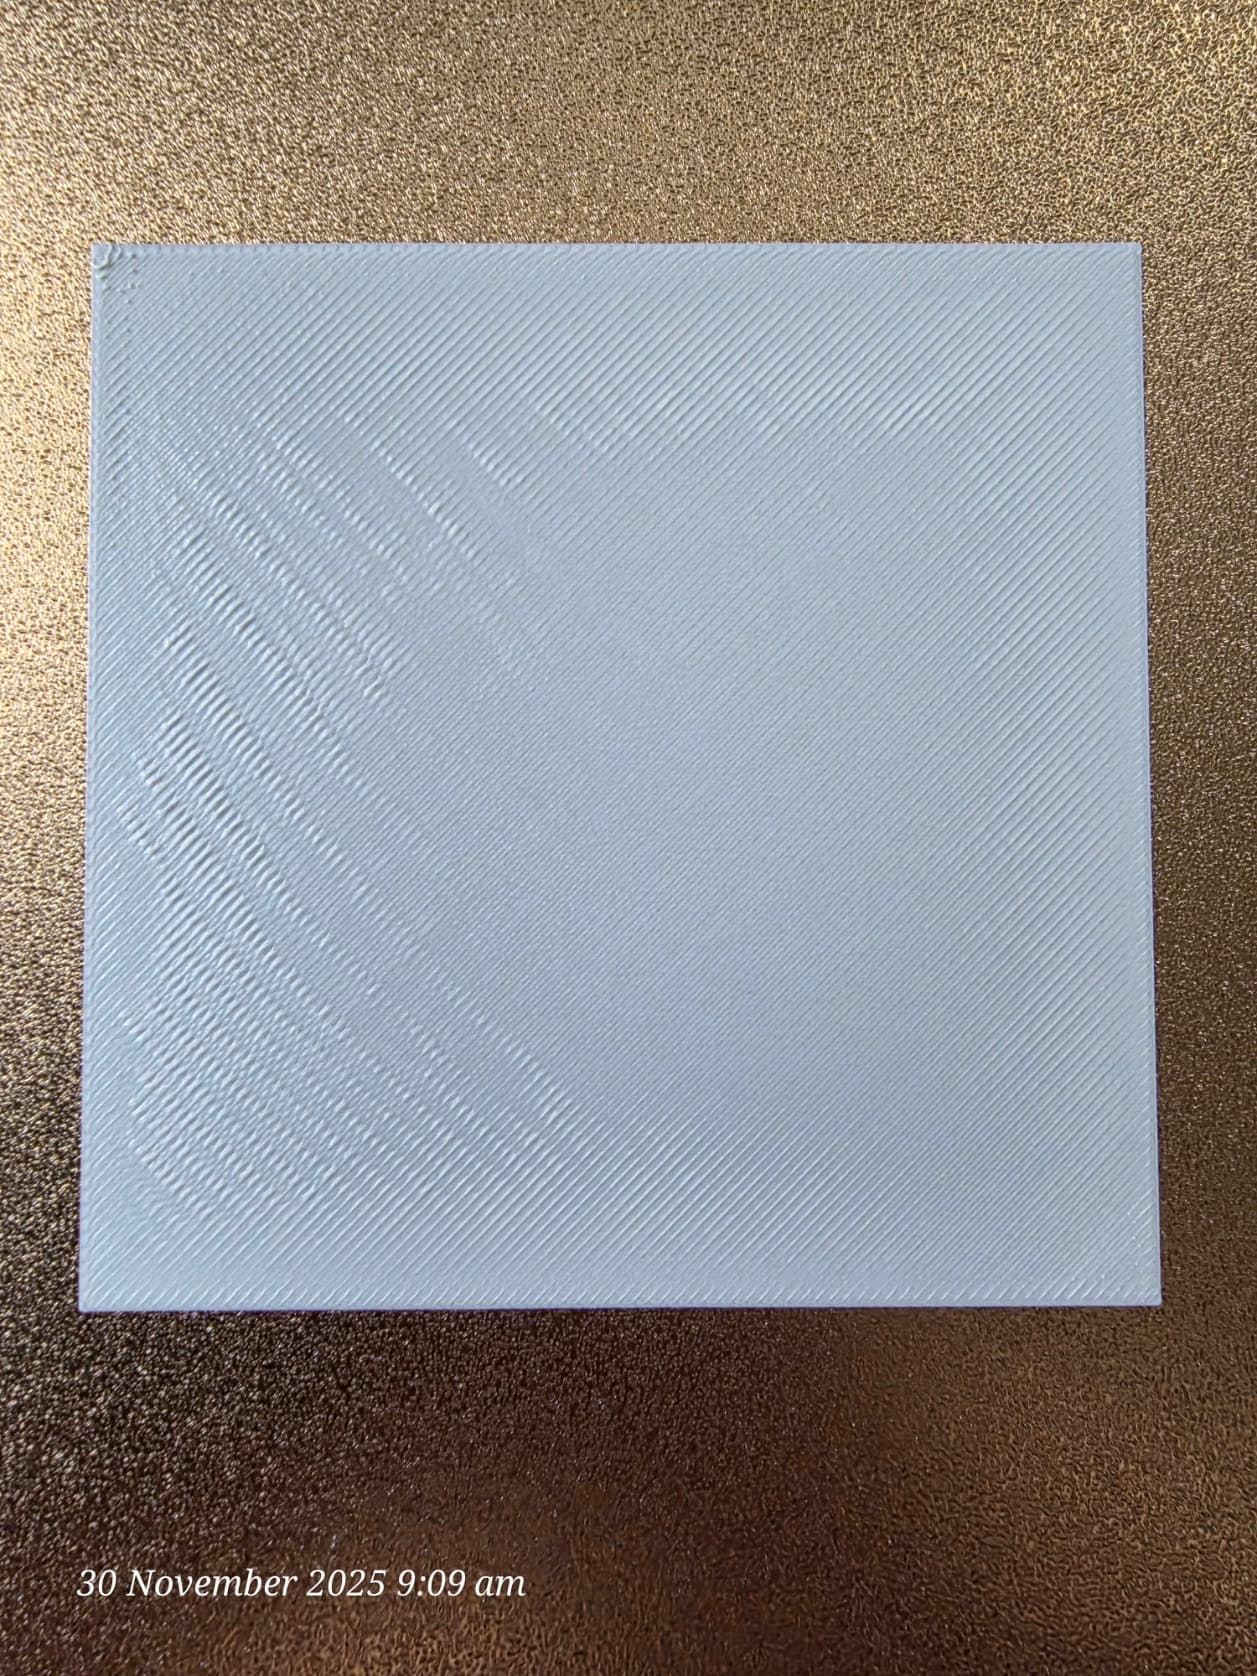
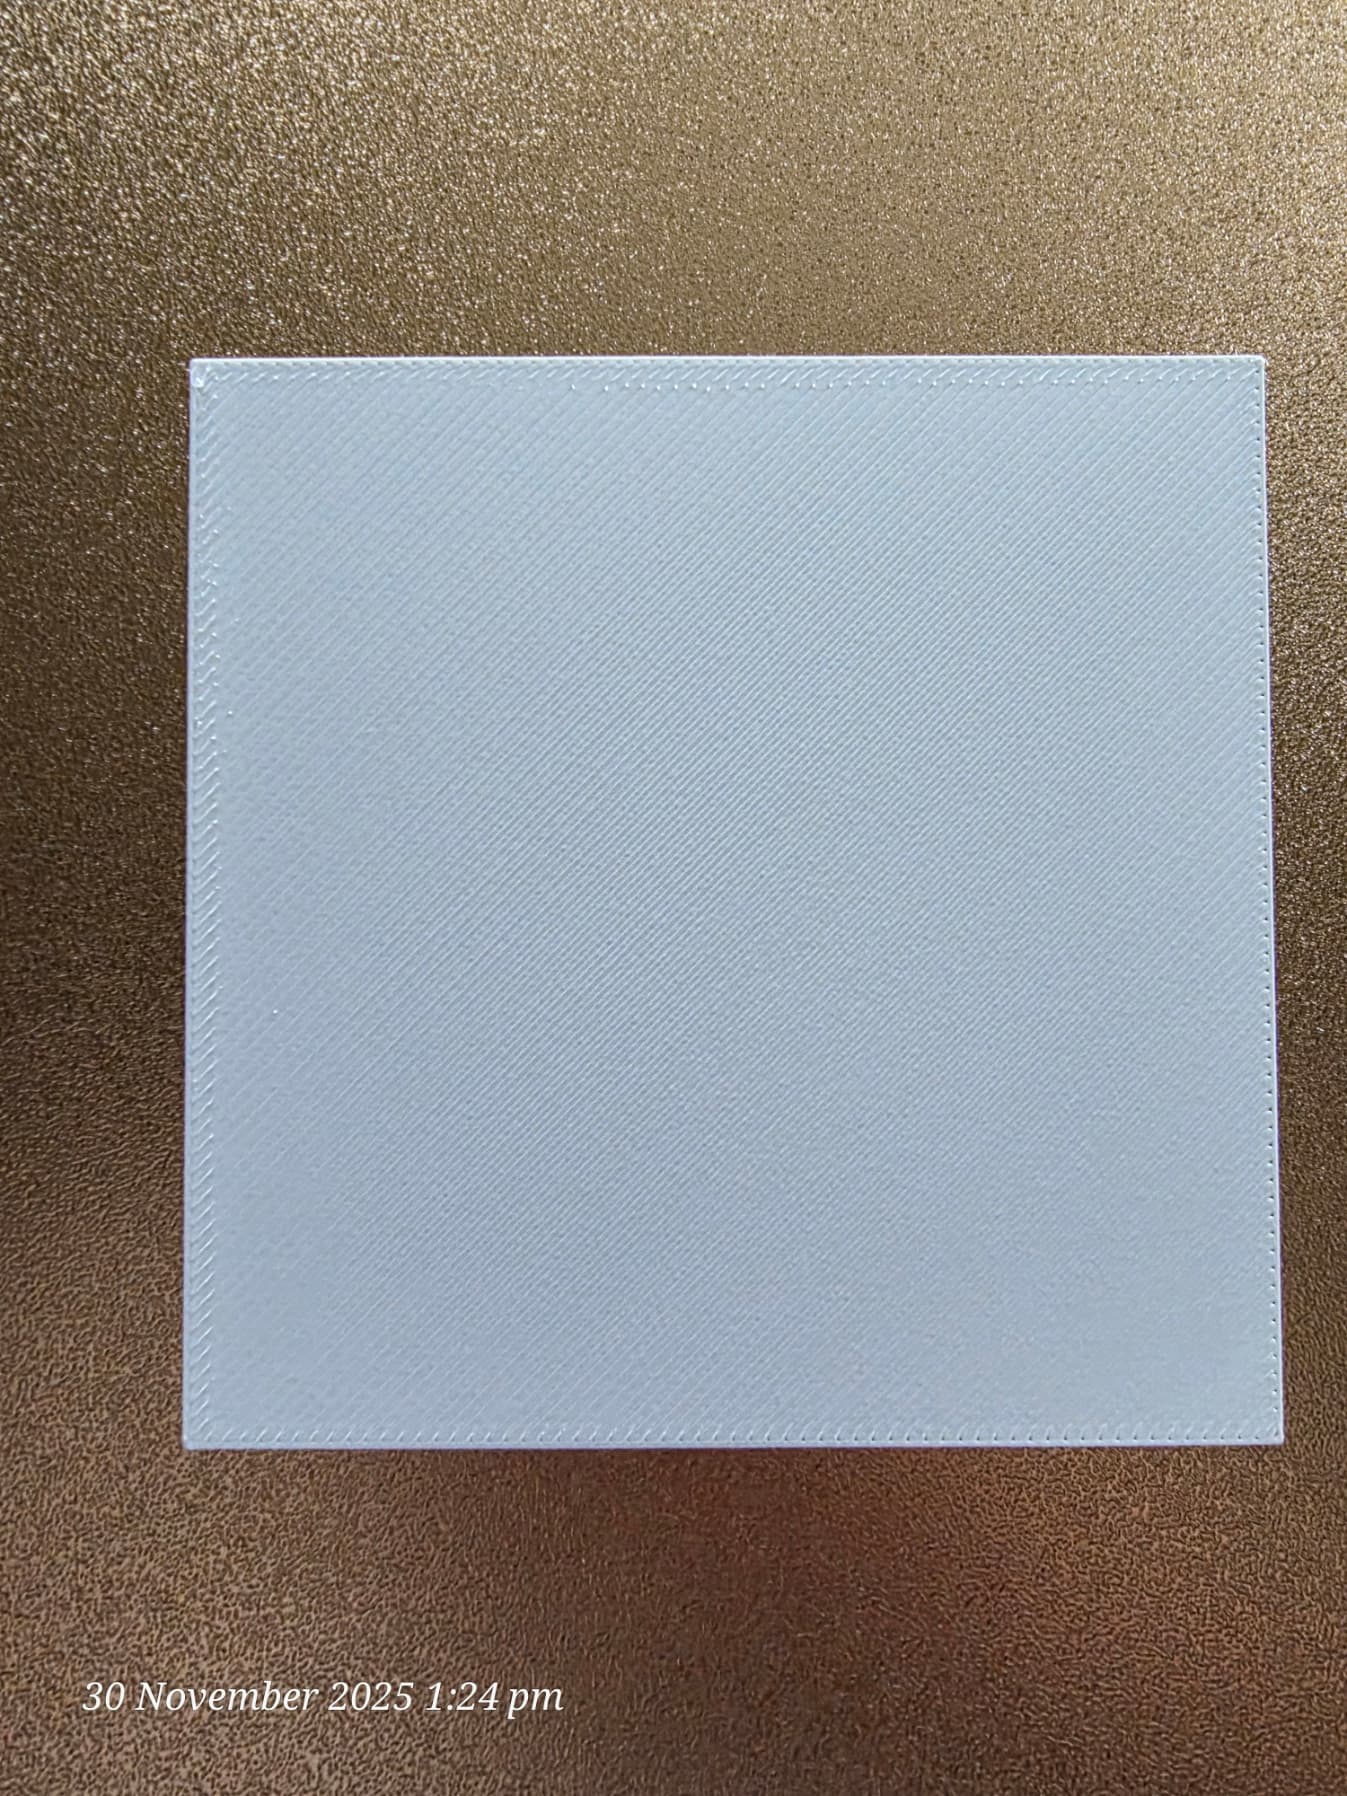
It was the bed leveling. DnG Crafts on YouTube updated his K2 Plus bed level macro to work on any bed size and I’ve gone through and run that several times. The bed level range is now 0.3384 (from 1.1342). The first layer is good now. Now I need to work on the K2 Plus  . The first mesh os the Pro (0.3384). The second is the Plus (1.1140). The two print pics are showing the improvements after each bed leveling using DnG’s macros on the Pro. Trust me you don’t want to see the mess the Plus makes with the first layer.
I’m slowly learning.
Thank you so much. I’ll give that a go as well. I’ve got the WD40 silicone spray ordered now. I wish Creality would be consistent with their videos and how to maintain the K2 series.
You’re recommendation worked a charm. I increased to 0.6 and it looks good.
1 Like
Well I guess they are just making it up as they go. In the relatively short time I have been involved with 3D printing the advances in the technology have been fast and furious but always improving.
With the silicone spray I found dropping the bed to the floor and unlocking the motors so you can freely move xy was the go. I also removed the build plate and cover the hotbed with a microfiber cloth. The silicone spray won’t hurt the rubber belts if a bit of over-spray gets on them. Leave for 5 minutes then operate xy by hand backwards and forwards. I run Z up and down a few times with the motor. After that a quick wipe up of side walls and floor and you’re done. You will appreciate the smooth running after that.
3 Likes
I wrote up a post about this: Fine tuning your 3D printer bed using Aluminum foil and Fluidd | Beyond the intersection of technology and life
Also included a python program that you could use to fine tune your bed using AL foil or AL tape.
Thank you. I’ll give it a go. I’ve managed to get the bed level on the Plus to 0.770 but still a work in progress.
100% agree almost spot on how I do it, good to see some one else doing it the same way.
Instead of spraying the WD direct I now spray it first into a small egg cup and then use an artist paint brush to apply it. Works a treat and no over spray to clean up.