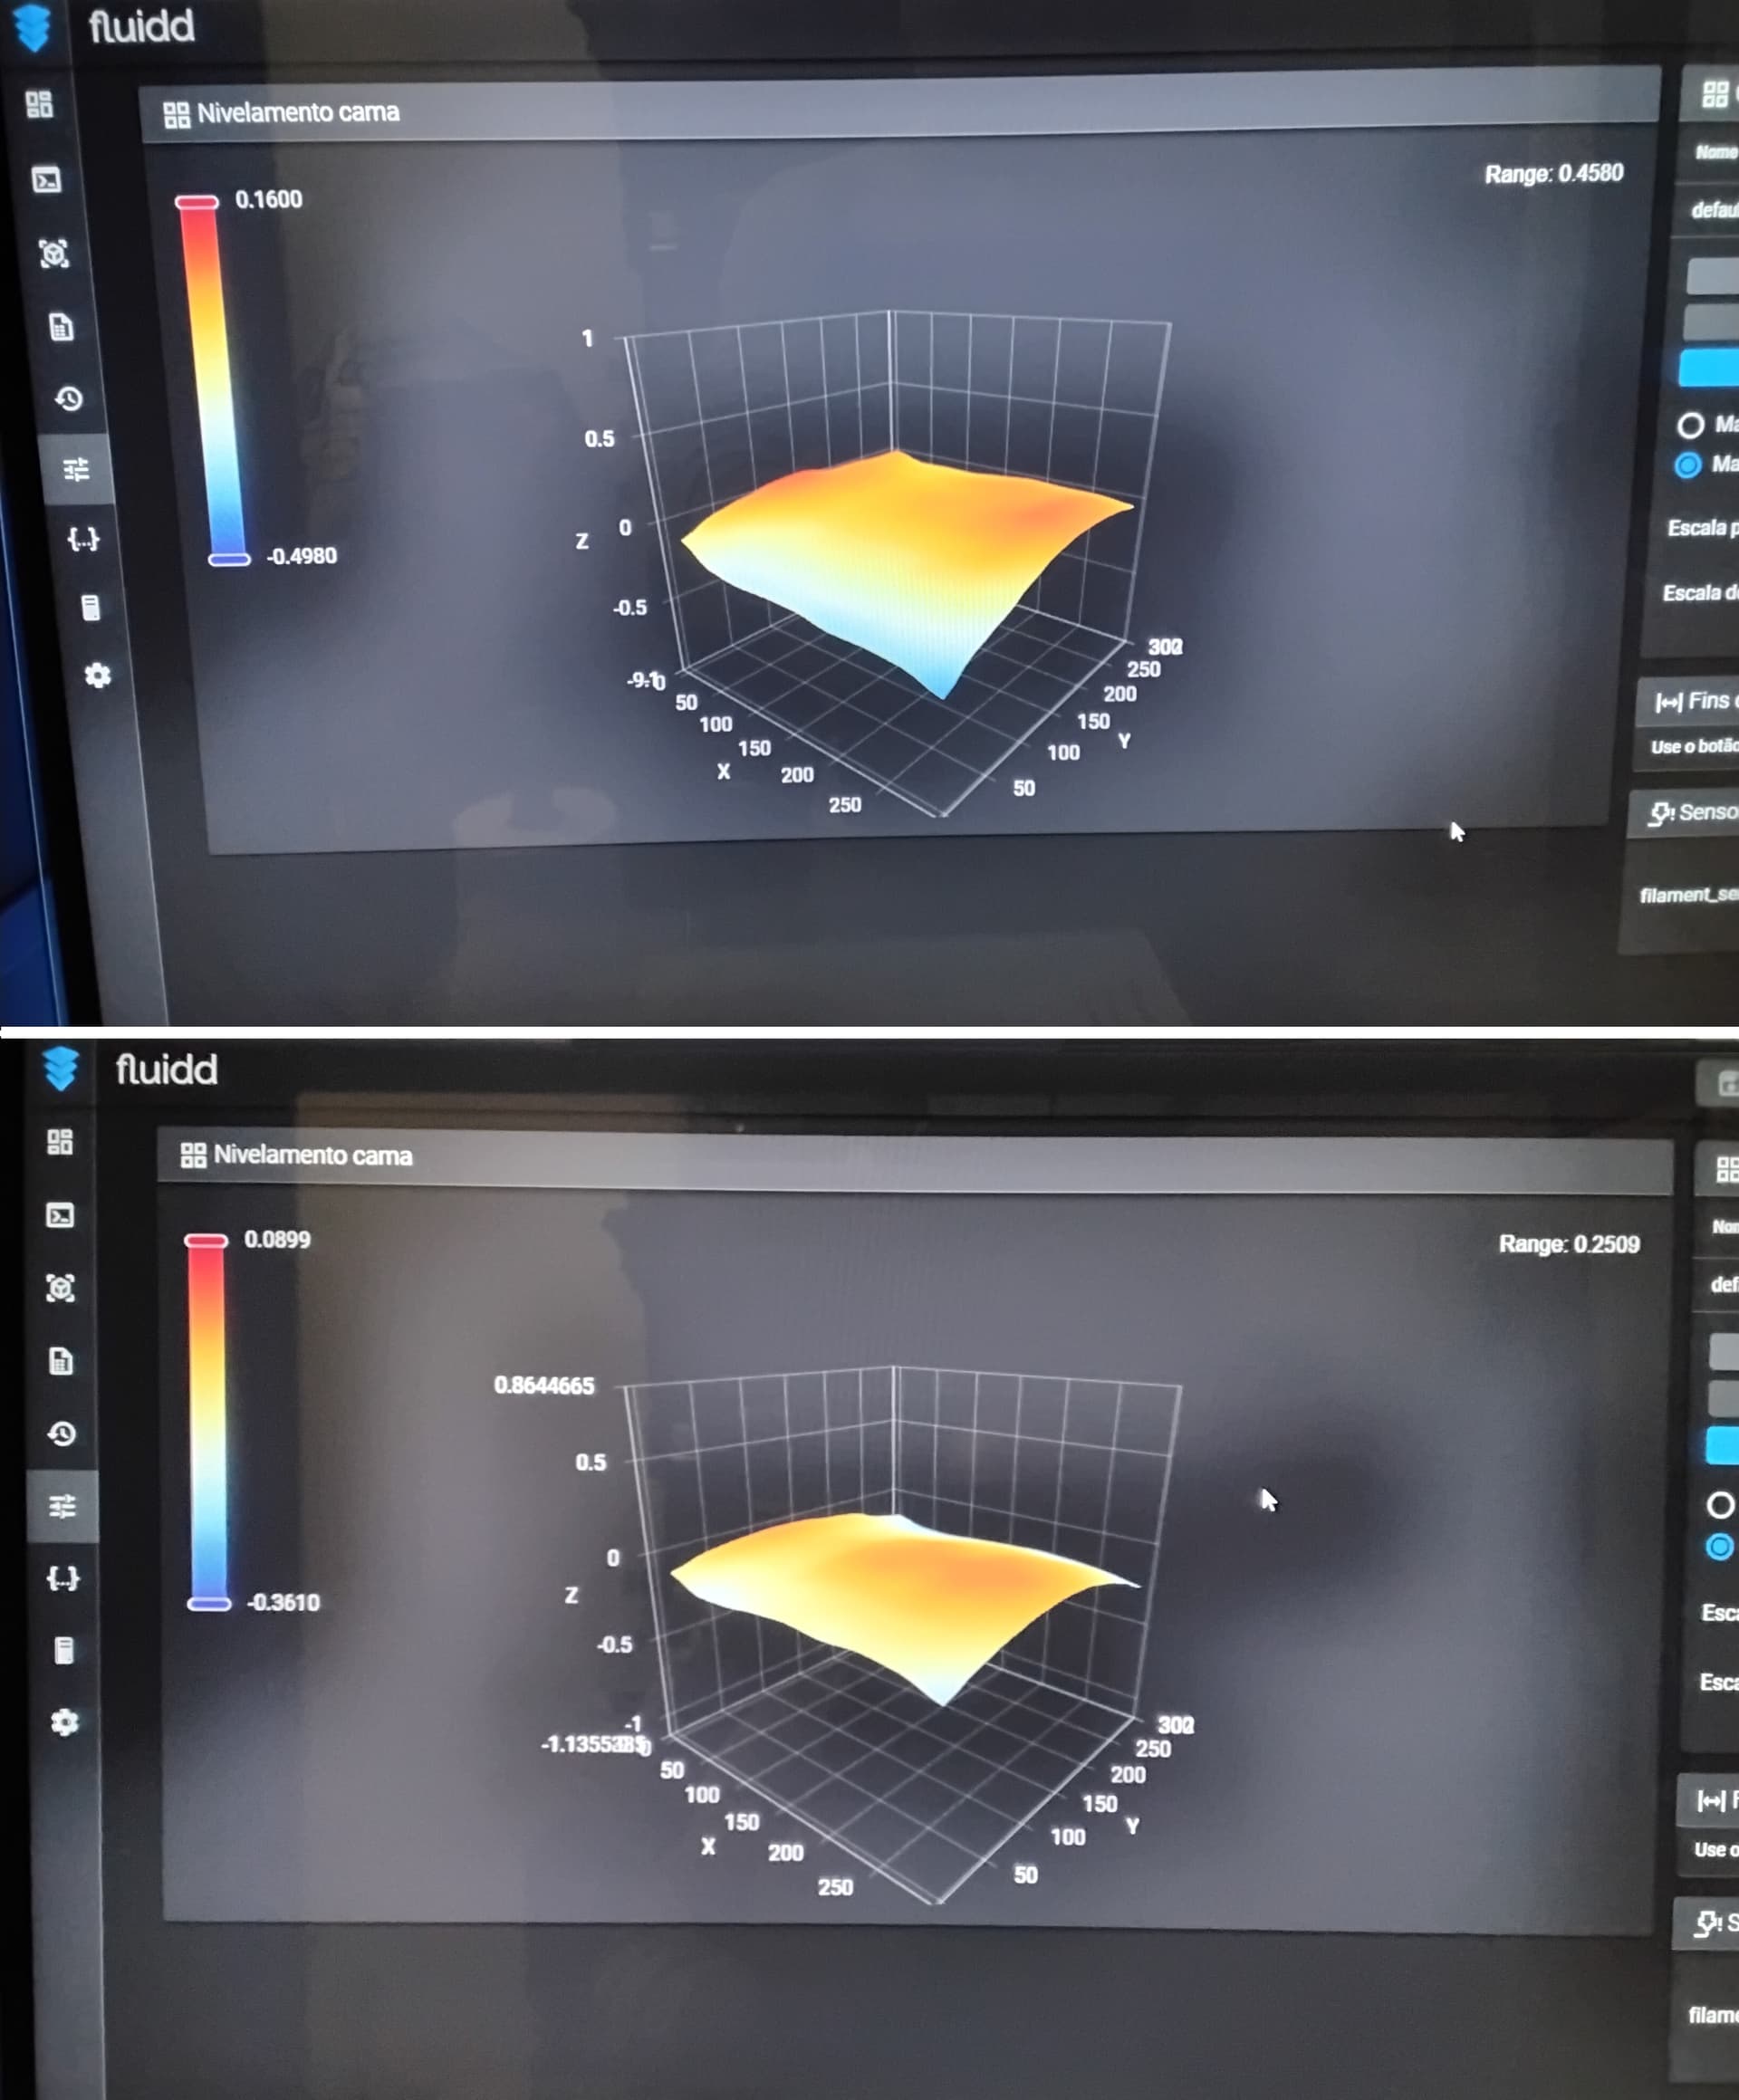
I’ve done a perfect bed leveling on my K2 Pro. There’s no need for extreme measures. I leveled the bed using the Paper Method, turning the knobs to perfection. I didn’t need sanding, aluminum tape, or anything else. It went from 0.45 to 0.25. Even when it was tilted, my printer was printing flawlessly. You can follow this official Creality video tutorial to perform your leveling, the leveling method starts at 6:24. You must fine-tune each corner at least four times in a circular pattern because when you fine-tune one knob, you mess with the level on the other side. Don’t forget to perform all calibrations after you leveled the bed. You can access the Fluidd web interface by entering the printer’s IP address in your internet browser, plus the door :4408 (example: http://192.168.1.3:4408/).
Maintenance:
I also recommend everybody to perform frequent maintenance on your printers, they will last longer and the printing results will be perfect. Apart from the normal maintenance you see in the video, I also recommend everybody to lubricate all the rollers on the printer frequently. For that, Creality recommends using only WD-40 Specialist Silicone spray. Check this official Creality video for maintenance tips.
I applaud your optimism. If I only had a 0.45 Bed variance I would have left it there. I started from a 1.2 bed variance and got it down to 0.68 with foil tape.
I pulled off the tape and Bed leveling did not work as described. When the z position was homed, the local interface used in the video would not move 10mm up. It said “Range limit Reached”. I was able to make the move using Fluidd. Then, 1mm down had no clearance! 2mm worked, but only when using Fluidd. The local interface kept giving range limit errors. Then, when I switched off motion in the local interface, the bed went to the bottom of the printer. Same in Fluidd. I had to move the head position electronically. Then I found that the adjusting nuts spun the screw shaft freely. There was nothing holding the screw shafts in place, but there was Loctite on the screw shafts where the nut ran. I have cleaned the threads of the adjusting screws and applied Loctite to the head of the screws in hopes that it will not spin freely once the build plate is added.
I will update this thread once the Loctite has set. I may not update until Tuesday or Wednesday of next week if I run out of time tonight.
The bottom line at this point is, the instructions in the video are only vaguely related to my K2-Plus.
Hello Gozmon, I feel sorry for your bad luck. If you can’t manage to level your bed fairly, your last resort would be to buy a R3MEN Graphite Bed. They are amazing, I’ve seen people achieving 0.09 with those beds, they are a little on the expensive side ($ 130), but they are the best you can get. Cheers https://www.r3men.com
Thanks for the tip. I was also thinking about a glass bed. Do you have any insight on how those do in leveling?
I haven’t given up yet. I’m back in the shop tomorrow. I still want to give this one last chance with the three times around method now that my adjusting screws are set. I may have been fooling myself back when the screws spun freely.
Hello Gozmon, give it a go and tell us if you were successful. A glass bed is proper for a bed slinger, not so much for a Core XY. If you want good adhesion and durability using most of the filaments, a standard textured PEI is the best. If you want a smoother plate, you can get a BIQU CryoGrip Pro Frostbite Panda, for example, it contributes to improved Z-Axis precision, greater accuracy, and consistency in the vertical dimension. It also needs lower bed temperatures to print but is not indicated for ABS and TPU, as it will stick too much.
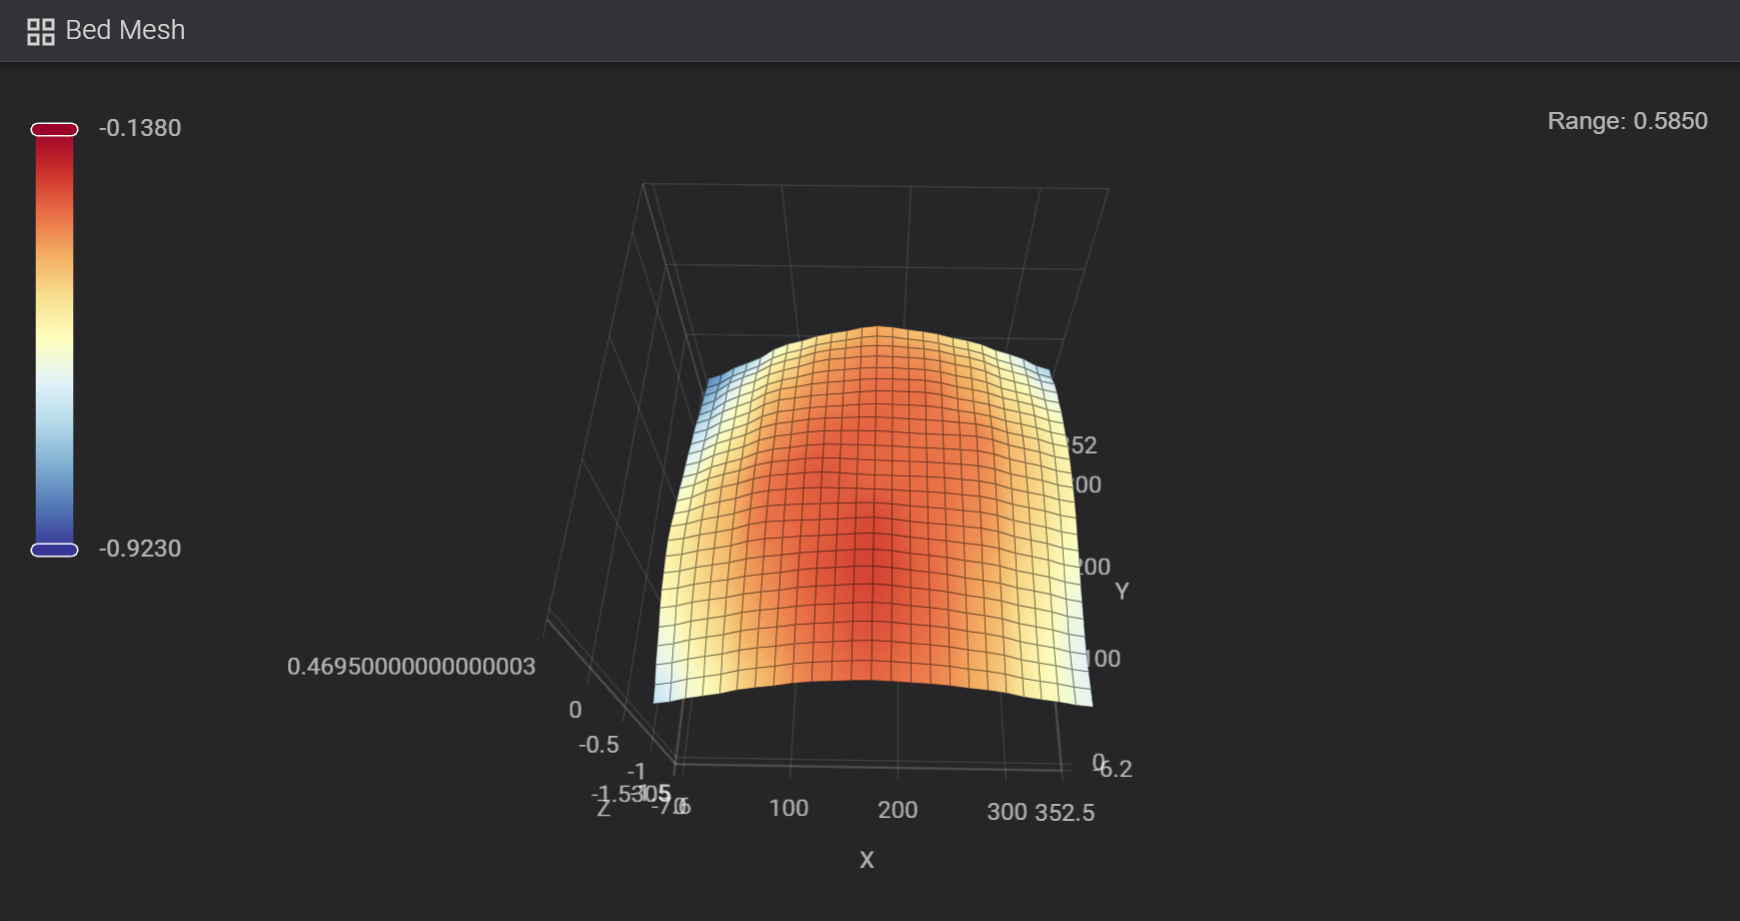
Here’s what I got after going around the plate 9 times. I would say Nuno’s 3 times around the plate is a minimum. I kept going around the plate until no adjustments are needed to achieve equal friction on the paper in all corners. It took 9 times around the plate to achieve stability.
Definitely each corner messes with the other. Even with 9 times around the plate, this is the best I got. IMHO, that is barely adequate.
BTW, in this configuration, the plate guides are below the top of the plate. Fortunately, I had already printed some extenders. I wish there were a way to raze z-naught. I have read about people adjusting the z-offset, but the procedure they describe looks like the bed leveling procedure. There may just be a confusion on the terms.
With that said, one thing I find very odd is that my entire plate is in negative z. I can not rase it any more unless someone knows a trick for that. Also a bit odd to me, even though all of the plate is in negative Z space, It is still to high for the back plate guides to operate.
The plate is clearly bowed. Looks like a strip of aluminum foil down the left and right side with another small square of aluminum in the back corners should bring things into range.
Before I start gluing aluminum to the base plate, does anyone have any further suggestions (besides purchasing a rigid print plate?) I am particularly intrigued with the Idea of changing z-naught. That would give me more adjustment range and make the plate guides usable.
Apart from a, BIQU CryoGrip Pro Frostbite Panda, Creality offers new Epoxy Resin Build Plates, but not for the K2 Series yet, they are very flat. We just have to wait a little longer for them to become available. You got your bed a lot better, remember you started with 1.2, that was like a Farfalle Pasta.
Yep, better than before. Going around all the extra times and securing the adjusting screw was the trick. However, not as good as judiciously placed aluminum foil. I think I’ll fine tune this with foil until the Epoxy Resin Build Plate comes out for the K2 plus, although the R3MEN Graphite Bed is very interesting.
Just for grins I tested the flatness of the plate at room temperature. It came in great. Looks like the real issue here is that the base plate bows when heated to 50c and does not have enough adjustment range at 50c. That lines up with another weakness of the original Creality base plate, uneven heating. I do not have the instrumentation to quantify it, but it really seems from the print quality, that the original base plate does not heat evenly (particularly the edges I have trouble with and the corners). Combine that with a low quality Aluminum alloy and all the symptoms line up. Aluminum is awful for thermal expansion (23.6 10−6/°C linear coefficient of expansion). The very best aluminum alloy for expansion is 4032, at 19.4 10−6/°C. That’s still pretty bad. There are several Stainless Steal alloy’s running in the 5.x range (nearly all of the 4xxxx series of stainless alloys are below 5.8) That is nearly 4 times better performance for very little cost change. That’s just poor materials engineering.
Bottom line, Aluminum is not an appropriate material for a build plate. Note these thermal expansions will eventually generate micro cracks in the aluminum and make the expansion problems get even worse and even more inconsistent across the plate.
At the very best, the original build plate on the K2 series is temporary. I have had mine less than a year and I really wish the epoxy plates were available. My K2 needs a build plate replacement already.
My previous post does not hold up unless Creality has changed base plates since April-2025. Replacement base plates are 7mm Steel, and from what I can see in the picture, the heating elements extend all the way to the edge and corners. With that said, all this information comes from Amazon “Creality Official K2 Plus Hotbed Kit, Original K2 Plus Heated Bed”. There are 2 “Official” replacements on Amazon. Both claim to be made by Creality, but they have different ASIN numbers. That’s not right. The Creality site contains no information about the plate. My base plate looks slightly different than the one pictured on Creality and on Amazon. So, is the base plate stele or Aluminum? It sure behaves like aluminum, but Amazon says the standard material for a Creality plate is steal. Hummm, I sure wish Creality was more forthcoming. The lack of information undermines my trust.
Thanks, but that is a build plate. The actual problem is with the base plate. I use textured and decorative build plates. The Base plate is what needs to be fixed. It has a serious thermal expansion problem. Anything else is just a band-aid. At this point it appears to be a limitation of Creality’s materials engineering capabilities.
Thanks for pointing out the r3men base plate. R3men seem to understand the physics and thermodynamics of building a flat surface with out thermal deformation. I don’t want to take a chance on another plate built with the Creality design. R3men looks like the only option.
Yes, I don’t think you can get better leveling other than buying an R3MEN Graphite Bed. They test the beds for any imperfections, and we are talking about microns, not millimeters. Hope you get the perfect bed. Cheers.