New Ender 3 V3 in Cura & Creality Slicer

Hi all,

just found a single post about the new Ender-3 V3s but that didn’t address the problems I face so I`ll try it here.

image.png.06534f0828ea9dbbb662f3d8c52be0bf.png

I`m pretty new to 3D printing and maybe you can help me out a bit if I miss some basics.

I have the issue that my printer does things at the beginning that doesn’t make 100% sense to me.

Question 1)

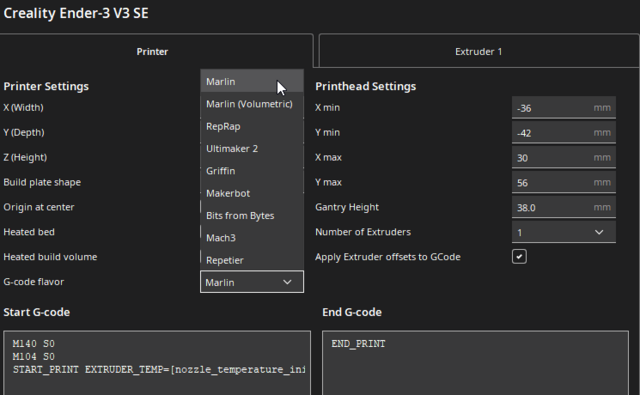
When I use the Creality Slicer and look at the start / end g-code it just has the following default text:

Start:

M140 S0
M104 S0
START_PRINT EXTRUDER_TEMP=[nozzle_temperature_initial_layer] BED_TEMP=[bed_temperature_initial_layer]

End:

END_PRINT

What I found so far:

The new Enders have a Klipper-Based Creality OS.

I can’t select Klipper as a G-Code Flavor. Does this somehow create an issue?

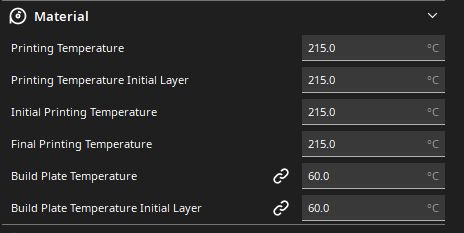
Because I set the printing temperature to 215°C at all points, but shortly before the nozzle purge at the edge of the bed starts, it’s rising up to 240°C and stays there.

I have no explenation why. I set the default material print temp to 215°C and also all other temps.

image.png.c7937c11afa7e5d06afae8bc59b5685a.png

What am I missing that the extruder temp moves to 240°C all the time?

For comparison, the default Ender 3 V3-SE G-Code in Cura looks like that:

Start:

M220 S100 ;Reset Feedrate
M221 S100 ;Reset Flowrate
G28 ;Home
M420 S1; Use saved mesh leveling data
G92 E0 ;Reset Extruder
G1 Z2.0 F3000 ;Move Z Axis up
G1 X-3 Y20 Z0.28 F5000.0 ;Move to start position
M190 S{material_bed_temperature_layer_0} ; Set bed temperature and wait
M109 S{material_print_temperature_layer_0} ; Set hotend temperature and wait
G1 X-3 Y100.0 Z0.28 F1500.0 E15 ;Draw the first line
G1 X-2 Y100.0 Z0.28 F5000.0 ;Move to side a little
G1 X-2 Y20 Z0.28 F1500.0 E30 ;Draw the second line
G92 E0 ;Reset Extruder
G1 E-1.0000 F1800 ;Retract a bit
G1 Z2.0 F3000 ;Move Z Axis up
G1 E0.0000 F1800

End:

G91 ;Relative positioning
G1 E-2 F2700 ;Retract a bit
G1 E-2 Z0.2 F2400 ;Retract and raise Z
G1 X5 Y5 F3000 ;Wipe out
G1 Z10 ;Raise Z more
G90 ;Absolute positioning
G1 X0 Y{machine_depth} ;Present print
M106 S0 ;Turn-off fan
M104 S0 ;Turn-off hotend
M140 S0 ;Turn-off bed
M84 X Y E ;Disable all steppers but Z

When using this G-Code I`m running into a coordinate error on every print.

For now I put the short version in Klipper-Style into Cura and that starts the print at least.

image.thumb.png.d389b84cea44a4c2fd09aa3b1d4dc53d.png

Question 2)

When starting a print the printer levels the bed every time. Is that normal or somewhere hidden in “START_PRINT”?

Question 3)

Between leveling it cleans the nozzle. While doing this it’s scratching the bed a little. Is that hard pressure normal?

Thanks to every reply!
1 Like

I have a new one today also and it looks like the nozzle scratched my bed also during nozzle cleaning step ?

Yes same for me. Also it doesn’t seem to make a difference if you select or de-select “calibration”, he does it anyways everytime.

Hi! With a risk of being wrong, I think that the cleaning procedure is something like this:

  • Move to a scrap place (back of plate, far from build area)
  • Heat up nozzle to melt plastic. (~220 C)
  • Start “scratch” the heated nozzle against the bed, to get away all plastic from the nozzle.
  • Stop (with nozzle against plate) and cool down (~130 C) so that plastic inside nozzle will not drip out.
  • After this, the nozzle can measure the bed level (bump up/down in the middle a few times) and get results of strain gages
  • When this is complete, it actually starts the print by doing a pre-extrude/wipe on the left side before print. Including heating the nozzle again etc.

If you had selected “calibration” it would also measure the bed levels after the clean and before the wipe/print. This is the move around and sampling the bed heights in a mesh.

Hence, when printing without calibration, it will still take time to “clean” the nozzle, calibrate/measure the bed level, purge/wipe the nozzle and then start to print.

Most likely it is the klipper macro START_PRINT that will do all of this.

I might be wrong, but this is what I have made out of all this. Please correct/help me if I am wrong here.

1 Like

Thanks for that detailed reply! That sounds like it makes sense.

I looked up the Klipper documentation but I can’t figure out on how to edit this.
Is that START_PRINT macro part of the Klipper OS?
If so, I probably can’t edit it without rooting the printer.

My hope was that this is a local file in my Cura / Creality Slicer directory which I can tune myself.

Do you have any experience on that nozzle-bed scratching process?
Does it damage the nozzle tip over time or is the nozzle so hard that this doesn’t matter?

1 Like

I have rooted mine and then applied the very nice helper script by Guilouz: GitHub - Guilouz/Creality-Helper-Script: Helper Script for Creality K1 / KE / Ender-3 V3 Series

He also has a repo with the extracted firmwares: GitHub - Guilouz/Creality-Ender3-V3-Extracted-Firmwares: Creality Ender-3 V3 extracted firmwares by version

When browsing this, if you are skilled in python, you can find various things about the macros etc. One bad thing is that creatlity has hidden some parts of this in compiled binaries (instead of python as rest of klipper).
For example if you look in the repo at this directory:
Firmware/usr/share/klipper/klippy/extras
You can see that there are a few .so files (prtouch_v2_wrapper.cpython-38-mipsel-linux-gnu.so) that is loaded by a companion python file. These are compiled and we cannot see exactly what they do, However, it seems like Creality forgot to remove one old version, in “prtouch.py”, This file, if you understand some python, will give clues to what the probing does.
To find the macros you should probably read up on klipper and search in the macro files. It might be somewhat difficult as some parts are defined/written in the klipper macro files and other parts are in the python files, and in this case, even in the hidden (compiled) files.

Regarding Cura…I personally switched to Orca Slicer, which is very close to Creality Print, but in my opinion, better. Maybe you should try that? If you root the printer you can even have direct contact with the printer from OrcaSlicer and do upload&print etc.

1 Like

I don’t understand the cleaning step scratching the bed??? On my K1C, the plates have a nozzle cleaning brush, and the cleaning step moves to that brush on the back of the plate and does the nozzle cleaning. If you’re using a plate that doesn’t have the cleaning brush, you’ll have to disable the nozzle cleaning step. The only way I found in a brief search is to alter the G-code, but there may be a setting I haven’t found. I just have the “A” and “B” plates for my K1C, and both have the nozzle cleaning brush and that’s where the nozzle cleaning routine goes to clean the nozzle.

Personally I am not so worried. It is only trying to get rid of plastic so that it can do a good calibration against the bed. This is done by pressure against the bed and if some plastic were there it would not get a good calibration. The wipe is to remove this. It only does it with a hot nozzle so that plastic can melt.

For me, this method has delivered a perfect first layer on all prints I have done so far…and that is not something I have been spoiled with during my years with 3d printers. :grin:

I guess that the hardened nozzle is much harder than the plastic PEI coating and it will most likely wear out the print sheet instead of nozzle. Hence a new sheet will be needed if that happens.

Anyhow, this is my guess and time will tell if I am wrong (which happens quite often). For now I prefer the good first layer.

I don’t have any issue getting a good first layer. FWIW, the cleaning brush has nothing to do with calibration, that’s done after the brush cleaning step. That being the case, I can’t see how the brush has any effect on the calibration. I’m sure the nozzle would wear through the plate coating fairly soon if I didn’t have the brush there.

However, as long as it works for you, that’s all that counts. I want to keep my build plates as long as I can, so I’ll keep the brush, it’s not hurting anything back there, that works for me. :wink:

I think it has. On this printer, the accuracy of the Z-calibration, i.e. when the nozzle hits the bed, will be wrong if there are plastic bits stuck on the nozzle. It is measuring when the strain gauges give signal and if there is something between the nozzle and the bed that causes the strain gauges to trigger before the metal/nozzle is on the bed, there will be an error in this “end-stop” calibration of the Z axis. At least this is how I understand how it works (again, I might be wrong :smile: ). Therefore, this step is done before it is calibrating its end-stop of Z.

I agree that a brush on the plate would have been a better solution and that would most likely save the plate (and possibly the nozzle) better. I am just trying to explain how I think that Creality team decided to implemented it on this (less expensive compared to K1C etc) machine. My observations are based on studies both when it operates as well as digging into the source code a bit.

Maybe they saved some money on cheaper plates…and will earn a few on me buying some new plates… :smile:

Exactly, calibration is done after the nozzle cleaning. I didn’t say that having the nozzle clean wasn’t important. However, the nozzle cleaning step is to insure that it is clean BEFORE the calibration. Other than cleaning the nozzle of any debris, I still maintain that the nozzle cleaning itself isn’t part of the calibration, it’s just preparing for the calibration.

FWIW, there are printable nozzle cleaning brushes that you can print using TPC if you’re so inclined. I saw them, but so far I haven’t invested in any plate that doesn’t have the brush, I just have the Creality A and B plates. So far I haven’t needed anything else.