Noob here - my first 2 items didn't print successfully. Thoughts?

Hi!

Just bought a used Ender 3 v3 SE and some PLA filament. Never used a 3d printer before. I tried printing 2 things last night and neither worked out. Really fun process / potentials, but not successful first time. Care to read this and offer advice?

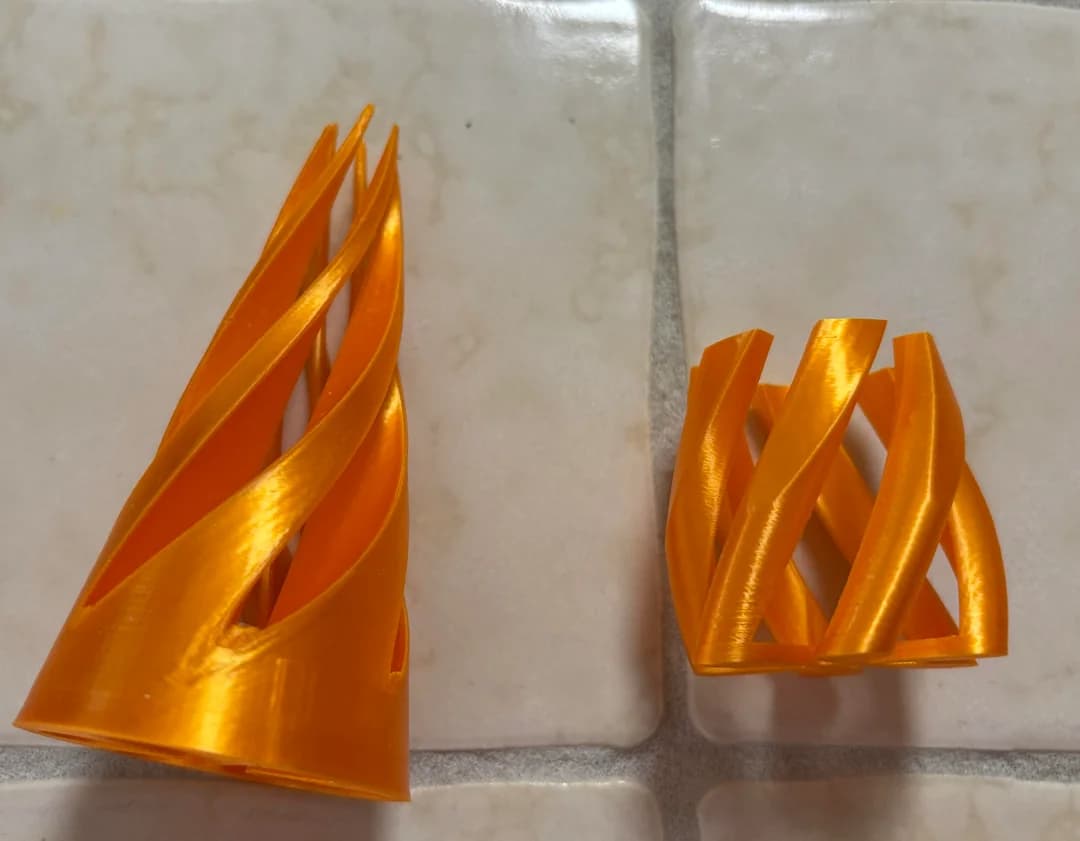
Got some STL files, used Creality Print v4.3.7 to open the STL, clicked on normal for the triangles and high quality for the cones. Clicked on slice, local exported the file to the SD.

On the printer, I did a factory reset. Went into leveling in menu. It ran and showed some numbers (some neg, some positive… just informative data, right? Need to do anything with those numbers?)

Then printed the triangles.

After a little while, I see that 1 triangle came off the bed / was on another shape. So I ended that print.

Then on the cones… the 2 cones were separate STLs. I only have 1 color, so I opened both in creality print, clicked on auto for placement on the plate, sliced, saved to SD card.

Started the print and went to bed.

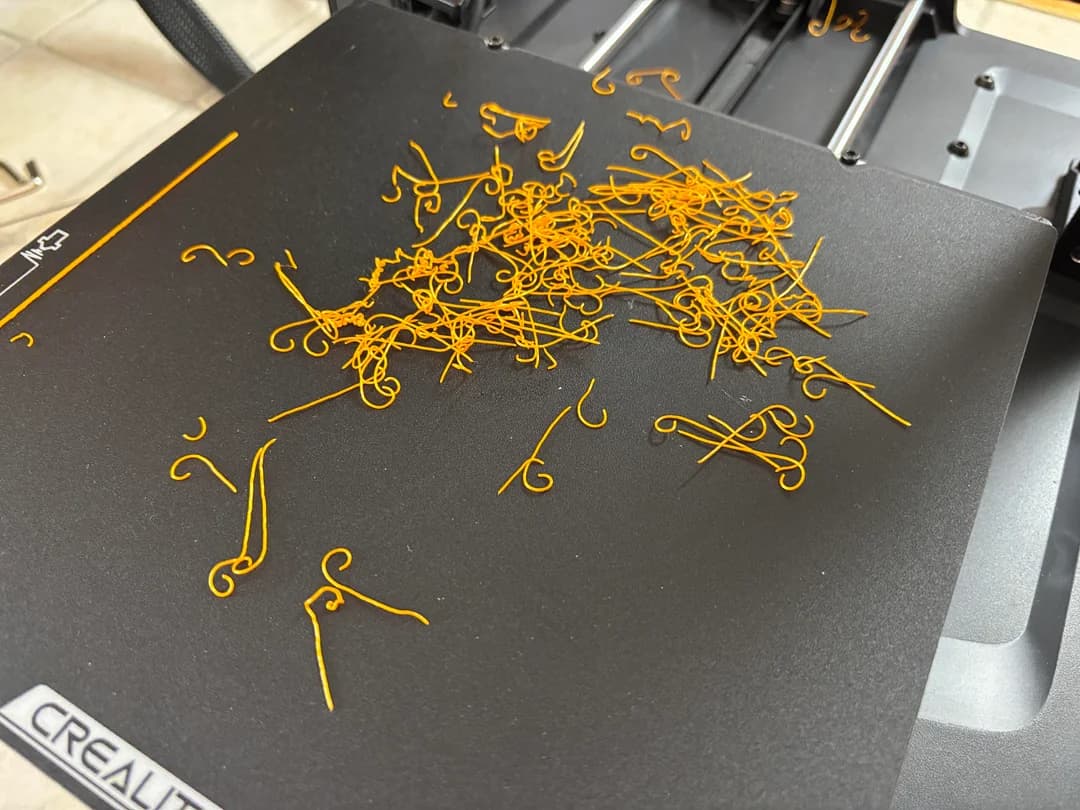
the short cone was off the plate (got pushed off at some point?) and all those little threads were at the top of the ‘finished’ cone. I pulled the little threads off.

With all that, any advice / info?

I saw the extruder got to 205 deg and the plate was 60 deg? (the default temps? I didn’t change those).

I have read about how people wake up and see a blob / 3d printing is not 100% perfect?

Does the fact that I have loads of thin threads mean anything vs. a single blob?

The auto placement wasn’t actually good? How far apart do you place things?

Are the default temps OK? the printer gets that from the slicer file, right? I just said I was using PLA and the extruder is .4

Looking now, there’s all types of settings for the material in creality print! The spool says it’s inland 3d printer filament Silk PLA, 1.75dia, Googling that, I see that the 205 temp is in the middle of the range, 60c plate is at the bottom of 60 - 80c range.

Key question? How tight should all the hex screws be? I tightened some of the screws before printing - a little more snug than they were (most screws kinda felt like they were just touching (as soon as person felt the screw touched the metal, they stopped) / not snugged down. From a video I saw, only the gantry screws are user installed? the ones elsewhere were set by factory (but get loose over time?)

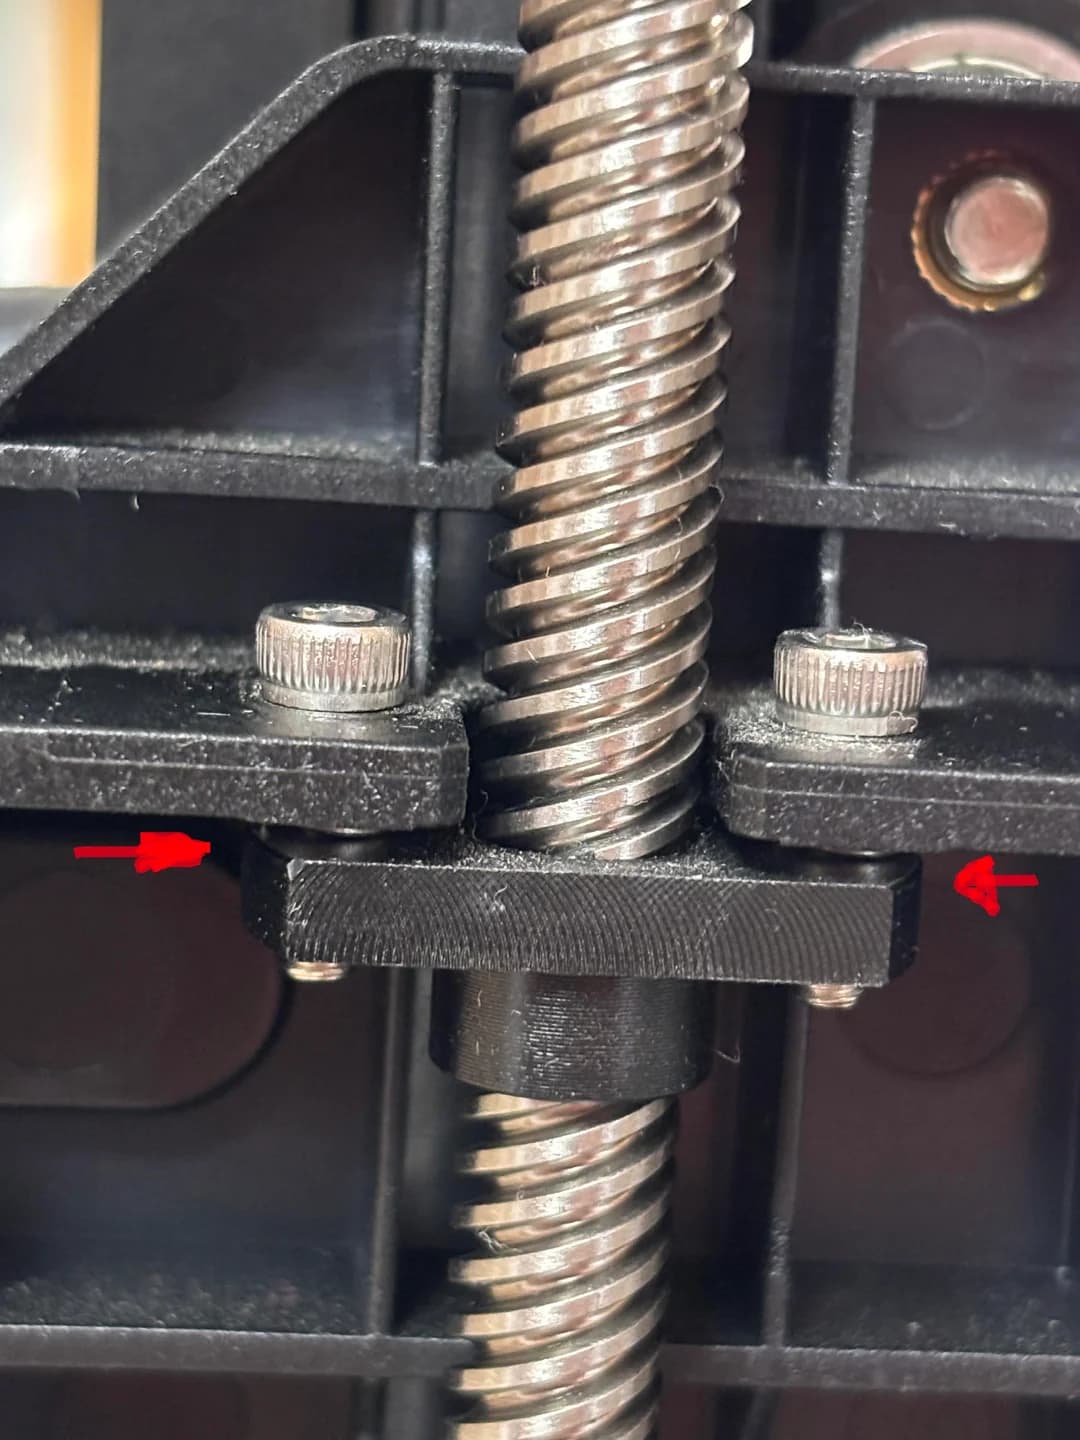
NOTE the gap on the gantry threaded rods. Should there be that gap? How much of a gap?

Is it ok to snug up any and all screws I see?

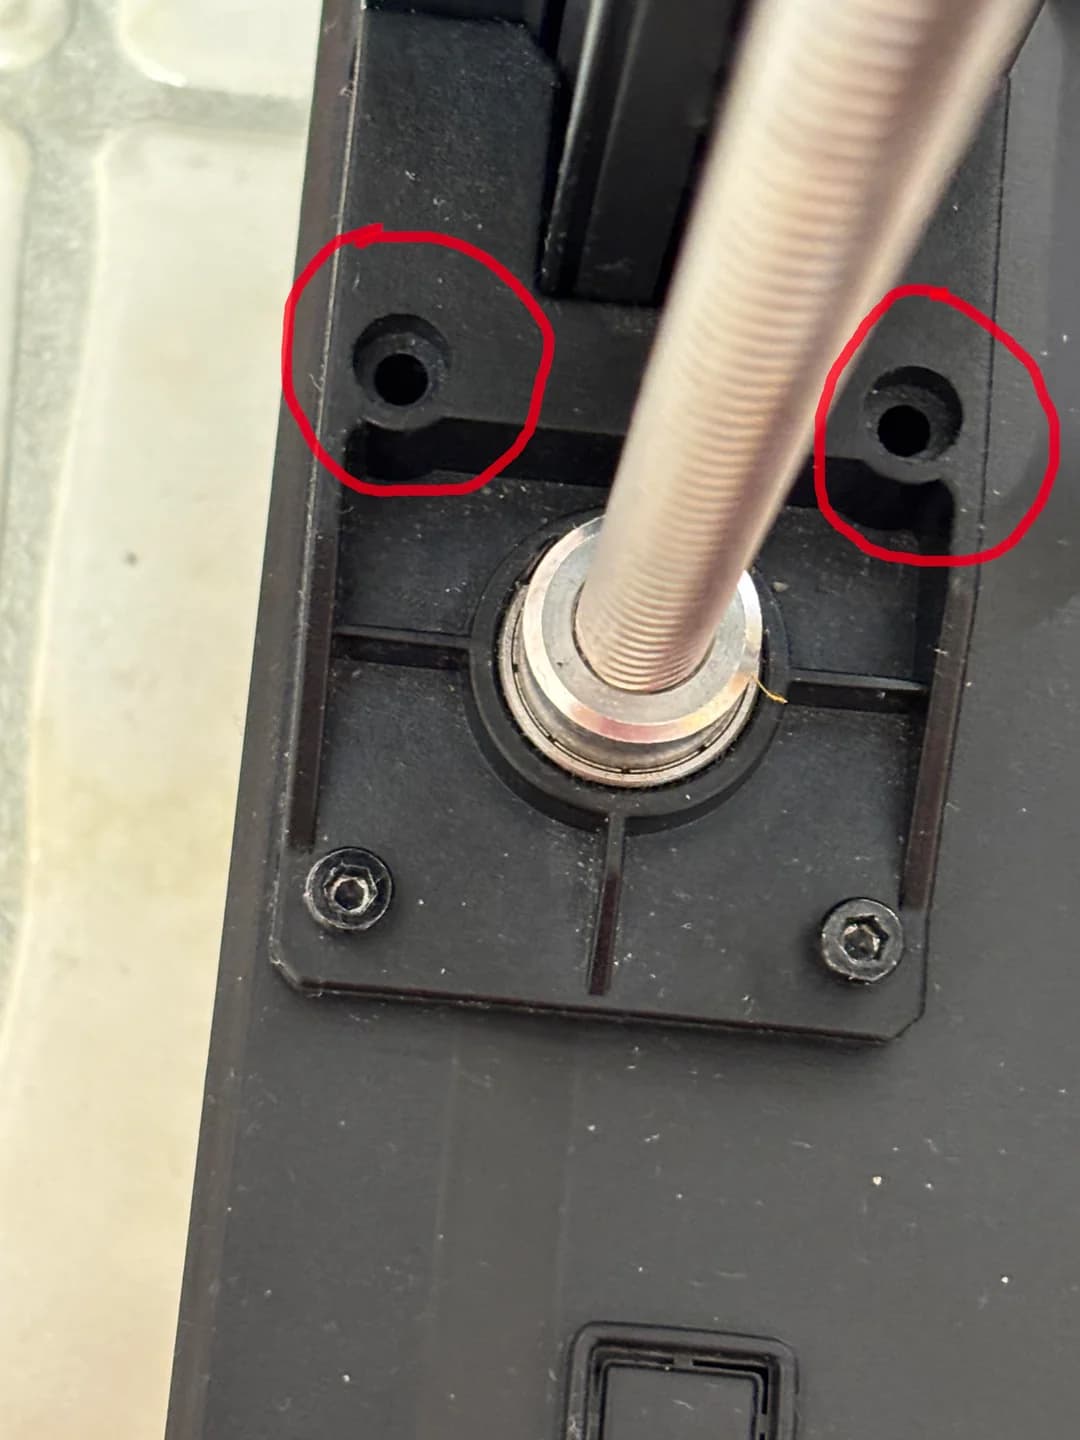
And I noticed a couple screws that are missing. Any recommendation on where to get replacements?

The last picture with the leadscrew nuts, don’t overtighten those. Tighten them and back them off half/full turn. Being loose they take up any play in the leadscrew to avoid z banding.

Although this printer has autolevel it usually needs a little tweak on the Z-offset to get best bed adhesion. Try printing a 100x100x0.2 thick square, you can adjust the z-offset while it is printing to get the best result. If it is stringy it is too far from the bed, if it is wrinkly it is too close, it should be a single smooth layer, for my V3KE (very similar printer) I have to move the head down a further -0.21mm. Once you have the z-offset right don’t autocalibrate every print, it will undo the z-offset you have just got right.

1 Like

Hello NoobPrinter,

What @Bonfireman says is the best approach.

My comment is that, “many do start a print and then go to bed”.
Me, I am not that confident that something un expected won’t happen at some time.
I don’t want to wake up to a problem.
I call in on it from time to time, or access the camera occasionally.

Many 3D printers either come with or have cameras attached … they are not there for lonely people to watch a print when there is nothing on TV :smile:

Just my view.

Cheers and enjoy your new experience.

1 Like

Thanks. I tightened all the screws around the machine - all were no more than finger tight would be a good way to describe them. I used the allen keys.

I’ll go back to loosen the leadscrews - it’s printing something.

I tried the cone that didn’t finish last night. went to watch TV. This time it was taller but came loose from the bed again. I cleaned the bed with 70% rubbing alcohol. I saw some people saying to slow the first layer and make it thicker?
I changed the .2mm default thickness to .3? using the creality print 5.x software, that made that tab and that setting turn yellow - not saved or not recommended : ) I WAS able to save it. We’ll see how it prints.

I have to try the z offset test @Bonfireman suggests. THANKS!

a .2mm thick square?! that’s 1 layer. And you can adjust the z while printing?! you had to move the head down by .21mm? WOW! How high off the bed is the nozzle supposed to be? Seems having to adjust it .21, it was WAY too high (relatively speaking - the layer is .2 / you are lowering the nozzle .21. So the auto system had the nozzle at least at .41?! you had to cut that height in 1/2? Or am I not understanding something?

And the calibrate option when printing - is that the same as leveling? I’ll turn it off.

If you take the bed off to clean it or remove an object, do you do the leveling again? And then re-enter your manual z offset again? (no need to test again?)

Some other questions if you don’t mind?

  1. How often do you replace the nozzle? Someone said ‘after a few 1kg spools’? that often!?

  2. What brand of filament do you like? And where do you get it?

  3. what’s the minimum I can spend on quality filament?

  4. Do you use PLA? Or something else?

THANKS!

Yes you can start a print there is an adjust button bottom left corner, select that and you should see z-offset, which adjust it there.

“How often do you replace the nozzle? Someone said ‘after a few 1kg spools’? that often!?” depends what you are printing. A brass nozzle printing only PLA will last for months perhaps even a year. Print something abrasive and it might not even last a roll.
" What brand of filament do you like? And where do you get it?" I use a lot of Sunlu filament either bought direct or from Amazon, whoever has the best deal.
“Do you use PLA? Or something else?” PLA, PETG, TPU I print on my Enders, ABS, ASA and trying out PP but that stuff is difficult I print additionally on my Qidi printers (they are enclosed coreXY with built in heaters)

“If you take the bed off to clean it or remove an object, do you do the leveling again? And then re-enter your manual z offset again? (no need to test again?)” Shouldn’t need to, I have a second bed that I swap for the one I have just printed on and start a new print while the other is cooling, they must be almost identical thicknesses for that to work. Washing a bed shouldn’t need relevelling.

Caution with using rubbing alcohol, while it often contains isopropyl alcohol it might contain something else. Being 70% there is 30% left for something else, mostly water but could be an aromatic oil or antiseptic that wouldn’t be good for bed adhesion. I would get some 99% isopropyl alcohol. Do not use acetone on the bed, it can destroy the PEI layer, been there done that.

1 Like

I am a total noob as well. Have the Ender3 V3 SE. I have had it for about 2 months and have successfully printed one small object but that took about 6 tries and since then (maybe 6 weeks ago) have not had any success.
Currently trying to print something small (just under 0.5 g of material, just trying to get through something successfully). I get the same issue EVERY time. the print starts and gets one layer down, occasionally two or three, and then the part comes off the bed. It looks like the head is dragging through the part but I can’t tell if it is that or just part adhesion to the bed. I’ve played with head and bed temps as well as cleaned the bed and tried with hairspray. I have piles or ruined material.
I’m using PLA from Microcenter (Inland 1.75mm)
I’ve run head temps from 190-220
I’ve run various bed temps - currently 60.

What would you recommend? Aside from my prevailing thought of the garbage truck?
As I type this I am running a factory reset and relevel.

Make sure that the print bed is super clean, fairy/dawn washing liquid, dry it then wipe down with isopropyl alcohol. Next make sure the z-offset is dialled in so that first layer is properly squished into the bed, that bit is crucial to getting the print to stick. Plenty of threads on here to have a read through detailing the z-offset to help you.