Not sticking, frustration rising

I received a Ender-3 Max Neo for Christmas as my first foray into 3D printing. Following the Creality setup instructions, the printer is now set up, and everything seems to operate properly with 2 exceptions. When I tried my first print (the rabbit that came with the printer software), I was the proud owner of a blob of strings. Re-ran the bed leveling and all the rest of the setup steps, and ran the print again. Got a blob of strings. Re-checked everything, and found 2 items that seemed to be out of the ordinary: first, the Z-axis wheels seem extremely tight (can’t be turned by hand, and require a lot of force to try to turn the adjustment nuts), and second, after running through every video and bit of advice I can find for leveling the bed, raising the bed temperature to 65C and cutting the print speed to 75%, trying glue stick and hairspray, and tuning the Z-offset to -2mm, I’m still getting a mess of filament dragged around by the nozzle instead of a bunny rabbit. I’m still concerned the nozzle is still too high above the bed, but I’m nervous about cranking it down much further. Needless to say, it doesn’t projectile-print too well.

So, what am I doing wrong adjusting the pressure of the Z-axis eccentric nuts, and why won’t the darn thing stick that first layer? I’ve been messing with this for about a week, and I don’t teem any closer to solving the problems. I’ve tried every leveling technique I could find on Creality Cloud and YouTube, and every pressure adjustment video I could find on the eccentric nuts. No joy. I’d love to start printing some of the neat stuff I’ve found designs for, but until these are straightened out all I can print are some great little tiny birds’ nests…

Hi @Brian_Klenk and welcome to the forums.

Sorry to hear you have been having issues with your printer…

What I would suggest is going over the entire printer to double check that all bolts are tight and firmly in place. I would also recommend checking over all of the rollers… you mention that some of them were really tight and I think they all need tweaking slightly. What I would recommend is working your way around the rollers adjusting the eccentric nuts, you want to be able to turn the rollers by hand but still feel friction, they should be adjusted so that all rollers on the same fixture feel the same but with no wobble.

Once you have got the bolts and rollers all checked over I would recommend performing the leveling procedure to make sure everything is square, your printer seems to have the bed adjustment screws so I would recommend tightening them all up so that they cant come undone easily on their own, you dont want the springs to be fully compressed but you want them firm enough that if you brush your finger over the adjustment wheel that it doesnt move easily out of place. For a rough guide… on my Ender 3 V2 the screws would poke out from the bottom of the adjusters by approx 5-8mm. Once you have them all roughly equally adjusted I would move on to the actual leveling process on the printer…

I am not familiar with the Neo but I would presume it has 2 leveling procedures like most of the printers with probes which would be manual leveling and auto bed leveling. Perform the manual leveling to get the nozzle at the correct height from the bed, best to always ignore the centre of the bed and just concentrate on the four corners. Keep going around the bed (preferably in a clockwise or anti-clockwise direction) until you dont have to adjust a single bed screw, once you make it round the bed 2 or 3 times without having to make an adjustment your bed will be as level as it can be. At this point I would then start the Auto Leveling process that utilises the probe. The printer will use the probe to mesh out the bed and teach itself where the high and low points are so that it can compensate during the print. Once the auto leveling is complete head into the menus and be sure to store/save the settings just to be sure everything is saved.

Once thats all done you would then start a print and wait for the nozzle to begin laying the first layer of filament down, best to use a model with a large surface area so you have plenty of time during the first layer to make adjustments… during the printing of the first layer use the printer controls to manually adjust the z offset to suit, you want the nozzle to be close enough that its kind of pushing the filament into the bed rather than dropping it onto the bed or squishing it too hard. After a few tries you should find the sweet spot. Once done be sure to again save/store the settings to make sure everything is saved.

You should then find the printer will print ok for you, if ever you notice print issues from there on its usually just a case of either re-running the auto leveling to create an up to date fresh mesh of the bed or tweak the z offset slightly.

Also be sure to clean your print bed with something like IPA between prints to ensure the bed is clean and free of any grease as the smallest bit of grease or debris can cause a print to lose adhesion and fail :frowning:

I apologise for the essay but wanted to try and cover all bases :slight_smile:

I also stumbled on this video which should help you with the leveling process, the link should take you straight to the bit in the video where he does the bed leveling…
Creality Ender-3 Max Neo - Overview & Bed Leveling

Good luck and hope it helps :slight_smile:

No need to apologize! I need all the help I can get… actually, these are all the steps I’ve run and rerun several times. I’m thinking I need to print a 1-2 layer “test pattern” and tweak the “Tune” setting as it goes. I’ve done this, but not with a large enough figure to make adjustments before the nozzle moves on to higher layers. Thanks again, and wish me luck!

1 Like

look on the web for “chep bed levelling print” it draws squares around the bed , this gives you plenty of time to stop and adjust the z height.
please note i have 11 printers, never ever needed glue or sprays to hold down the print.
if you can move the first layer with your finger then Z needs to move down more, try 0.05 steps until the first layer sticks .
let us know how you get on.

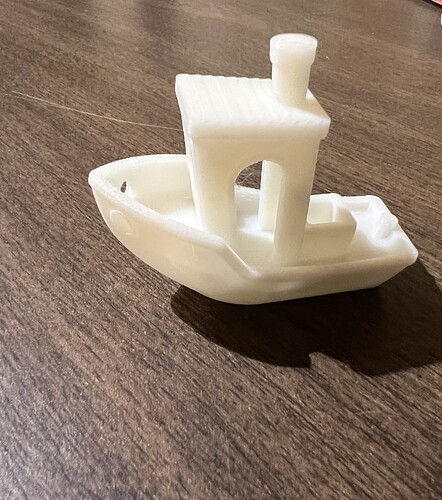
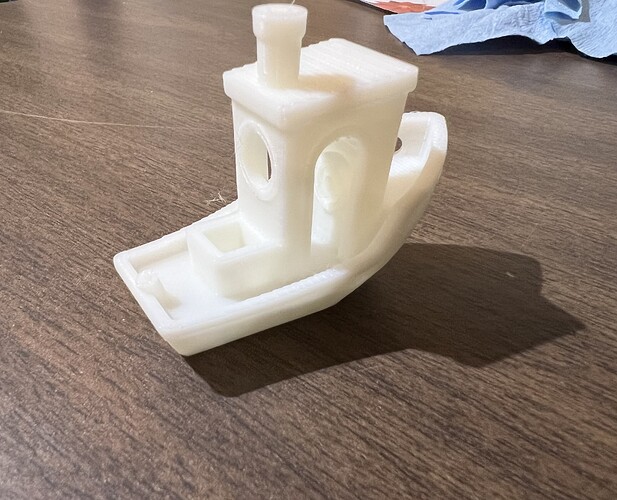
Success! I can’t think of another time in the last 60 years or so that I’ve been excited by a toy boat, but I am now. I ended up reducing the print speed to 50%, cranking the Z-axis offset to -2.94mm, and raising the bed temperature a bit with no glue or hairspray. The print came out great; no artifacts or errors (or trenches in the build plate), and I even had to use the cheap putty knife that came with the printer for a little gentle encouragement.


Many thanks for the help from the forum. I honestly had no idea how many people are into 3-d printing, or how willing to provide help to a beginner. I’m looking forward to learning more about the process, and eventually being able to pass on the favor (probably in the late 2030’s at this rate, but what the heck!)

2 Likes

Brian
great news, i know that feeling.
please try the Chep print test, its great for ensuring the whole bed is level, i have no affiliation with this you tuber but he has some great tips.
welcome to the no glue no hairspray world.
whats next on you print list?

Brian i think the max speed for your printer is 120mm/s.
try printing the boat at 75% see what happens, you can then work out what sort of speed your printer / filament can handle.

Brian
my ender printers have Z around -3.1 so your in the ball park for correct Z, looks like you can go more if needed

Congratulations @Brian_Klenk! The benchy boat came out really well! So glad to see you were able to get the printer working properly and producing a nice clean print! Definitely sounds like you have the printer working as it should now :slight_smile:

So glad we were able to help you get things working as they should. You are never too old to learn something new :smiley: Heres to many years of fun and happy 3D printing for you! :smiley: