Strange one, and similar to another issue that has yet to be figured out but I’m sure one in the same. After the first two layers it makes this pentagram type shape/motion and continues on, then after another layer or two, makes another shape and keeps going like this for as long as the print is. The part that bothers me, is that it drags the nozzle into the freshly-laid layer and creates an obvious divet/gully and I can’t seem to put my finger on why yet. I have “avoid crossing walls” turned on. Is there an option similar to “avoid printed areas for travel”? I couldn’t find one in creality print. Has anyone else had this happen to them? Please don’t mind the bad language!
1 Like
Hello Kris_Bee,
Not sure if this is anything to go on, but maybe try Gyroid for the infill (wavy lines).
Cheers.
1 Like
Have a look if you have “ignore small gaps” or “fill small gaps” enabled/disabled (Sorry, I’m a recent convert to the Creality software, so I only know what it was called in Cura). It could be the nozzle zipping around to fill tiny holes in the edge of your design.
If we had a facility like Octoprint had where you could “watch” the print in software it might also offer some clues, but if there’s a Creality version of that function, I haven’t found it yet…!
1 Like
Hey! Have you checked your Z-Hop settings? It sounds like the nozzle might not be lifting between layer changes or travel moves, which can cause that dragging you’re seeing.
Here’s how to find it in Creality Print (CP6):
1. On the left side of “Prepare” view, where your objects are listed, look at the printer profile settings name at the top, just above the objects tab. (Should say K2 Plus nozzle .4) or whatever nozzle you’re using.
2. Click the pencil icon next to it to edit that printer profile.
3. Under the “Settings Overrides” section, look for:
• Enable Retraction at Layer Change
• Enable Z-Hop When Retracted
4. Turn both on—they’re usually disabled by default out of the box.
These two settings work together, Z-Hop only activates during retraction, so enabling both is key. Give it a try and see if it smooths out the transitions!
Thanks a lot but in that section, I don’t have “Settings Overrides”, I think that’s more in the filament profile. However, in “Extruder 1” I do have the following:
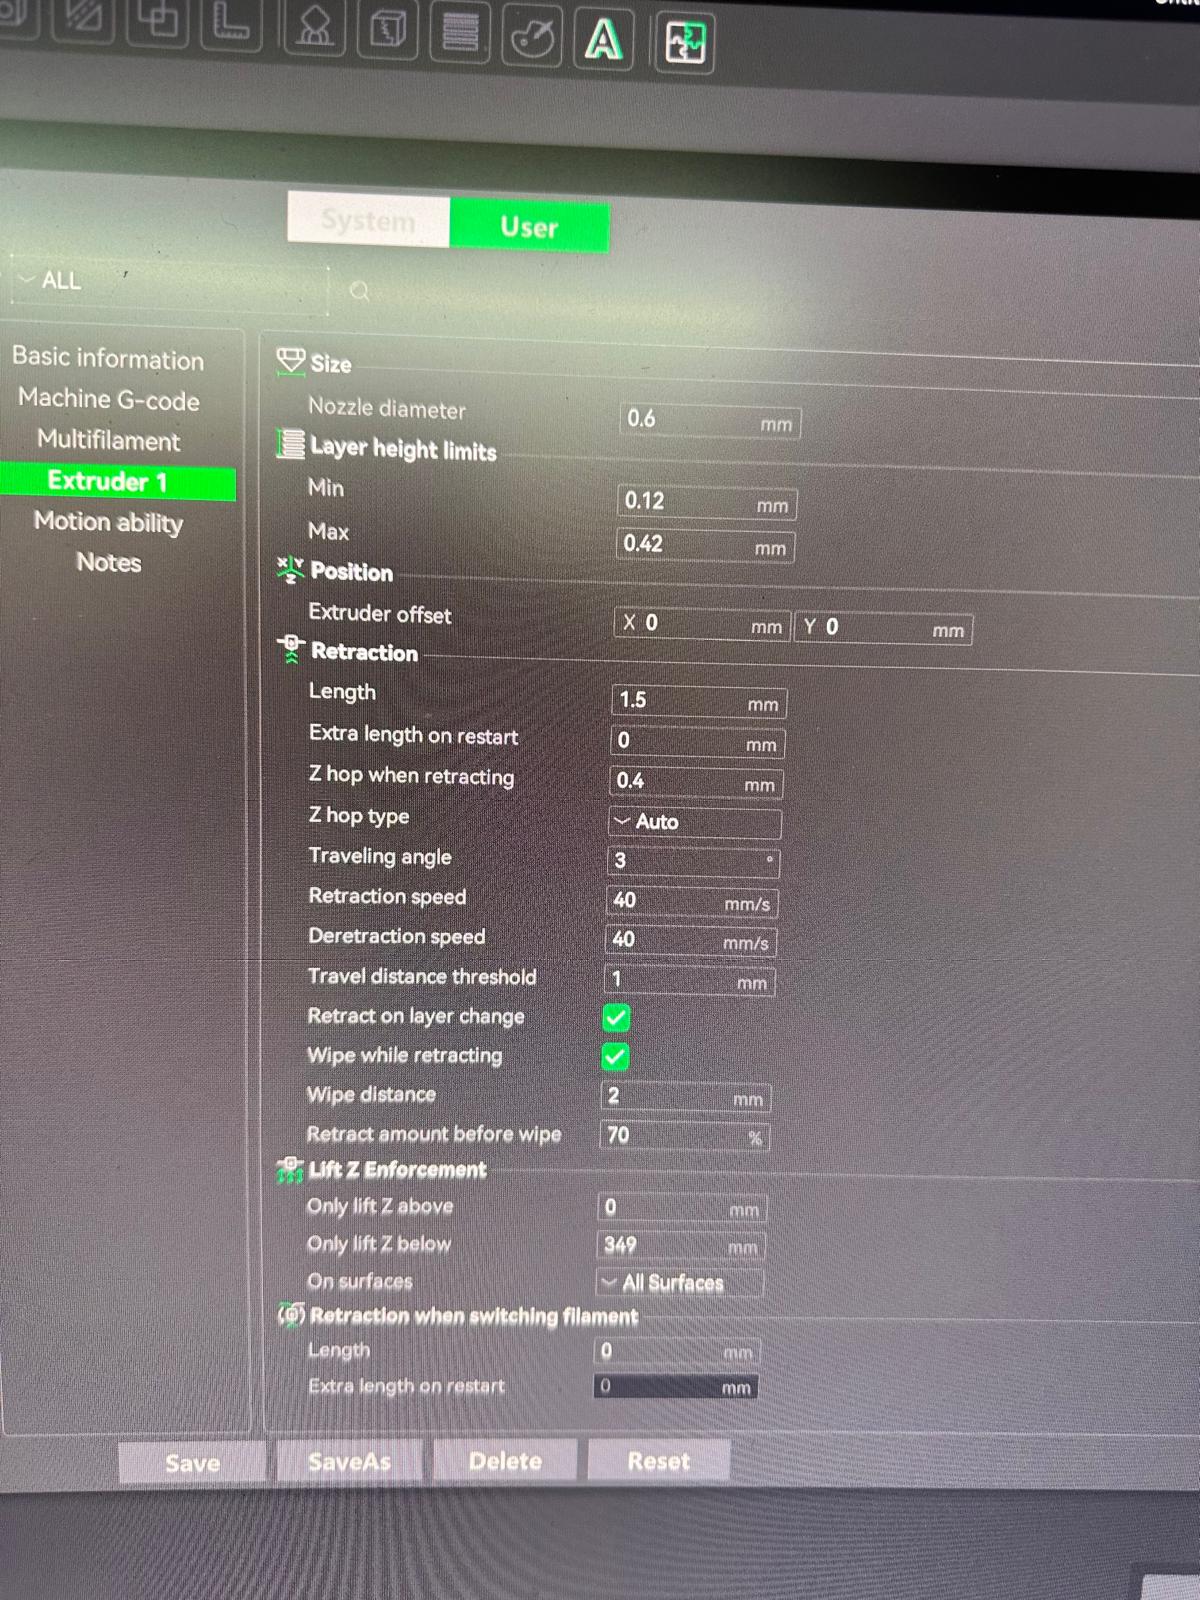
What’s caught my eye in particular is “Wipe while retracting”. I’m going to disable that and run the test print again (I always just use a test primitive disc). I have a feeling that’s what it’s doing based on the paths it’s taking being different each time it drags, but consistent every time at the junction it does it with the same path (pentagram in this case one time, a rectangle in another). It’s no strange coincidence that it keeps doing this consistently. I’m going to print and report back.
1 Like
Saweeet! Those settings should get you dialed in! ![]()
I had no idea where they were until I caught a video by The Incompetent Craftsman on YouTube. He was walking through his K2 calibration and pointed them out in CP. Super helpful.
I’m a fan of CP, but I still bounce between it and Cura. I’ve got tons of profiles on it. Used to be Cura + Orca for a while when CP was still working through some of the early kinks.
Can’t wait to hear how it turns out, fingers crossed one of those tweaks fixes the issue!
It’s definitely a feature, not a bug lol. Disabling wipe in the filament override didn’t work though, so I’m going to verify disabling it in the printer/nozzle settings does. Either way, if the other params are dialed in, it’s definitely useful. However, while I say that - printing a large drawer with a bigger flat plane, the blobs it wiped didn’t have anywhere to go but in the way of the nozzle acting like a speed bump. I had to pause the print, cut what I could off, and use a cordless soldering iron to melt away the obstacle.
Kris, saw this only now.
These movements come from the gap fills the slicer does to fill tiny gaps between the wall and the infill.
Nothing to worry about!
In the Strength settings you can switch Apply gap fill to ‘Everywhere’, ‘Nowhere’ or top and bottom layers only.
They should only happen for the full (100% infill) top/bottom layers anyhow…
Thanks frank but the “Filter out tiny gaps” is set to 0 which I believe voids it.
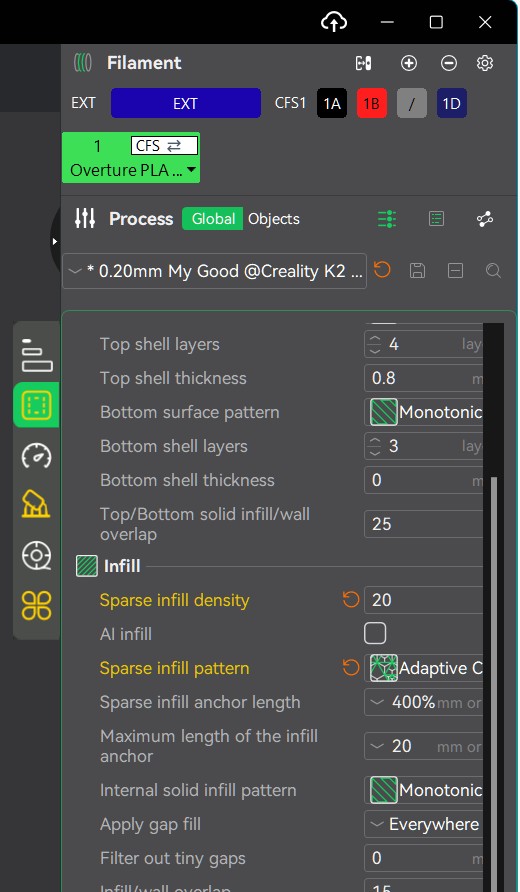
The filter out tiny gaps on 0 disables that small areas are not filled and will fill all areas. You need to set it to >0 to apply a filter to fill only bigger than the number gaps.
I would keep the filter on 0 but set the above to top & bottom surface only if you don’t like it on the middle full infill layers.
1 Like
In the name of science I’ll try it lol ![]()
That was what it was!
1 Like
Heck yeah!!! @frankjoke is an expert at this stuff. Glad you were able to solve it ![]()
![]()
(added bonus, I also learned something new!)
I made the same suggestion five hours earlier…sigh…but @frankjoke did give better ideas where to find it I guess…