So there I was printing a few things, no problems, the world was a happy place. I found a rather large print that would take up the whole bed (160x298x14) so I figured I’ll try it.
That’s when the Gates Of Hell opened and the Demons rushed forth!!!
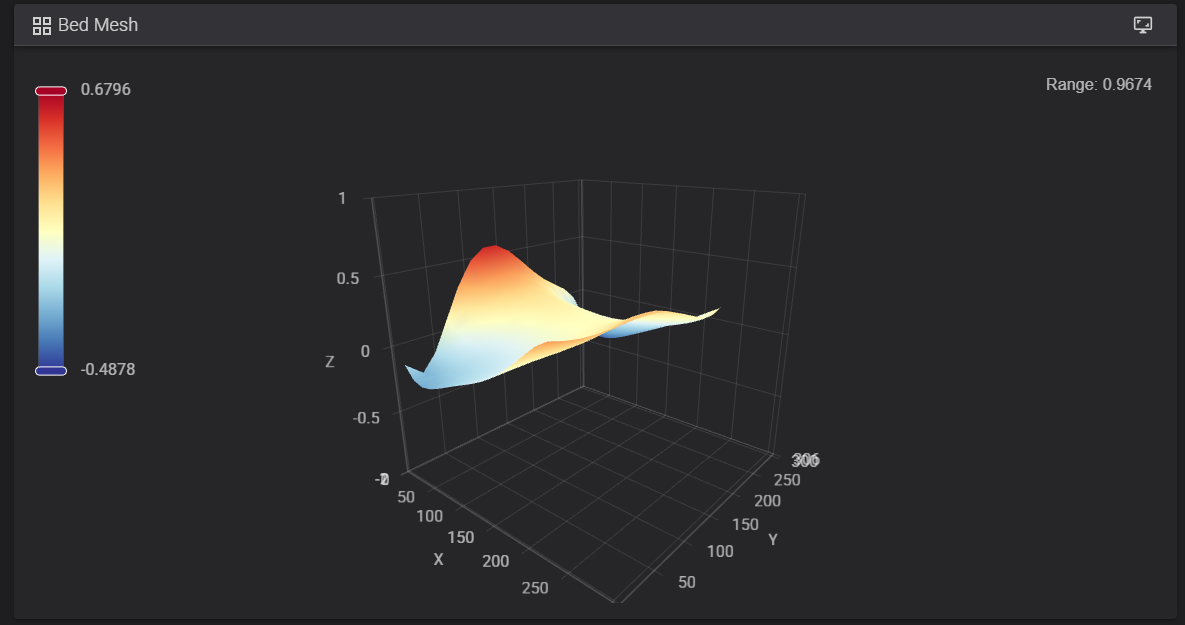
OK, nothing like that, but I was stunned by what my print bed looked like:
Well, let’s break out our Book, Bell, and Candlestick (see: Bell, Book and Candle - Wikipedia for the literary allusion) to exercise these demons
Seriously, though, the graph is lacking a few things that are standard practice. First, there should be a unit on the X/Y/Z labels, OR a key stating that the measurements are in mm (or at least that is my guess). Next, it looks like the center of the bed is roughly set to z=0, and it is warped in a saddle shape (that is believable). If that assumption is correct, overall range is +0.68mm and -0.49mm. To help intuitively get an idea how far that is, it is roughly the thickness of 6 to 20 sheets of standard printer paper (depending on the thickness of the paper). That is actually believable. Now the question is if you want to do something about it, and if you actually need to… There are several ways to deal with this. The first is to use a borosilicate glass print plate – floated glass flatness in measured in dozens of nanometers (which is millionths of an inch to us Yank’s). The second way of dealing with this is just to print rafts for each print. Wasteful of plastic, but you do not have to do anything else but configure the prints to “just work ™”. The third option, if such operations are comfortable to you, is to manually bend it back flat – since you have measurements of the flatness, you can mark the two high corners with tape, fip the print plate upside-down on a table, then place a few pieces of paper under the previously marked high corners (and only the corners), and push down. I would start with say 2 sheets thickness (this will put the table less than the warpage, but allow you to push slightly past flatness – the material will spring back some. Once you have done this, you can then set it on the table and see if it sits flat. If not, add a few more pieces of paper and repeat. Eventually you should get it a lot closer to flat, and then you can remount into the machine and take proper measurements. The latter method is a bit of monkey-puzzle, but is one of the steps you can do while fine-tuning your machine.
I know that my descriptions are rather confusing. I looked and could not find any videos using this technique for a plate. Here is one used to straighten a machine shaft https://www.youtube.com/watch?v=LaO9AySNDzQ, just apply the idea to 2D instead of 1D.
Hope this helps to expel your demons. My description is arcane enough to qualify as a mechanic’s spell of flatness BTW, if you do try any of these, report back as it might be useful for other folks…