Over extrusion and print quality on K2

I have seen a lot of people with perfect prints coming out of the K2, and keep wondering if I am doing something wrong.

My prints are coming out extremely overextruded, to the point the automatic flow calibration got Klipper to reduce the flow to 81% from the 0.95 original on Hyper PLA (which comes down to .7695).

That almost fixes the first layer, but of course everything else is under-extruded as that point.

It seems like the first layer is having too much squish, as even the brim is glued together on prints, except I had a proper brim in one of the corners of the print. Some straight lines just come as squiggles.

On fluidd, I can see 0.36 as the max difference on the bed leveling, with the edges being more on the lower side.

It might be that doing a z offset could help with the issue, but why is it even happening in the first place?

Anyone seeing something similar or having any ideas? I am not that familiar with klipper (played with Marlin before on an ender 3, and Bambu’s version of it).

1 Like

Is this with Creality Print?

I too would like to know more about what to do for this issue. It sounds like OP is having a very similar problem.

It is hard to really pin down a description, but I agree with the main body. When I first started printing some small models, things looked good and seemed to stay put on the bed well. Branching out and doing larger prints has been where the issues really started appearing in bulk. For instance, two large flat trays that spanned most of the print bed had VERY different first layers. The upper (back) half of the bed did will enough, but when it moved to the front to start printing, it ended up way too close to the bed and was ending up with really extreme compression.

I used this article initially to fix the problem, and followed each of the steps that it outlined:
https://wiki.creality.com/en/k2-flagship-series/k2-plus/layer-compression

None of them fixed the problem except the z-offset change, which did end up working. However NOW I am having to babysit every single print and adjust it on the fly. Sometimes it is far away, and I have gaps in my brims, or they won’t connect to the print (which causes the model to curl and come off the bed), sometimes it is so close that it is near scraping the bed and layers are overlapping each other.

I have tinkered with flow and z offset in tandem, but nothing really stays put, and it always needs adjusted per print and either will be flawless, or terrible.

To answer the follow up from 3D4Everyone, I am using Creality Print V5.1.6.10470.

I am curious if this might be an issue with the nozzle camera/sensor. Doing the bed leveling before printing doesn’t help at all, and doing PA calibration still ends up with the nozzle either being too far or too close while it runs its test. Might also be a warped bed? I am open to any suggestions.

So far this has all been with Creality Hyper-PLA on a cardboard spool, using the built in presets for said filament in the printer and on Creality Print.

Thanks!

1 Like

Creality Print and/or Orca Slicer behave exactly the same and face the same issues.

This is how my bed bed mesh looks. The right side of the printer is higher, but the corners on the right side are elevated.

At one point I managed to get it slightly better, but I had to rais one of the back corners so much that the plate wouldn’t connect with the stoppers in the back any longer. This did shift the middle section though.

I printed a 350x350 single layer sheet - it looks as terrible as you can imagine: wavy all over, front right corner extremely underextruded, but the section right between the front right corner and everything else, about 3cm, looks like what I have on my other printers

Hi,

Thanks for replying. I did see the link you mentioned and all my bolts, nuts, etc are ok (I had already tried removing and adding the nozzle again.

You will see in a post I just did an output of my bed Mesh and there is a clear warping in one of the corners.

IF just using the z-offset fix it for you, there’s a way to change the startup macro on klipper and include that z-offset on every printer. I am just not that well versed in Klipper to know exactly where it would go but you would add something like:

G29.1 Z-0.04 ;If you need more squeeze
G29.1 Z0.04 ;If you need less squeeze

Of course, for my problem, it might fix different portion of my bed, but the corner where AI Flow should work would still be useless. Trying to do AI flow right now completely destroys my flow, moving it down to 81% of 0.95 configured filamente… that’s 0.75 flow ratio… yeah.
After hearing so much about “oh do the flow, it just works”… I was surprised.

I am sure the bed on my X1C is not flat at all, yet that printer has super smooth and perfect first layers every time, to the point I can’t feel any lines at all on a sheet and there is no underextrusion anywhere.

One last detail on Creality Print profiles - I noticed in the Strength tab under Infill/Wall Overlap that is set to 30% by default on all standard profiles, High Quality has it at 15%.
In my opinion, that’s excessive and will lead to overextrusions. I backed mine down to 15%, but it didn’t make a difference on my first layers.

Your information has been very helpful, and I appreciate your input and troubleshooting steps. Hoping we both find resolutions. I see lots of similarities in your description of the issue, namely when you mentioned the brims being okay on one side/corner while being glued or squiggly on the other. Even on comparatively smaller prints I have started noticing the same behavior.

The z offset does help, but it has not presented itself as a real solution yet. I say this because sometimes I will start a new print right off the end of the previous and it will suddenly be too close again, or even too far away. There is never any real reason or pattern to it other than that it is going to be wrong. In addition to that, it seems that sometimes it will print what appears to be a good first layer on one side and then in the middle, but will then move to the other and print a subsequently terrible one. Adjusting the z offset does help, but it makes me wonder if I am not messing up the other side that was printing okay. This isn’t exclusive to the front and back, but also seems to come up side to side as well.

I may see what the AI flow can do for it, though it sounds like its a coin toss. To me it seems like the printer is checking the level, but then not really doing anything with that information; if that makes sense.

I am going to use your other steps and measures as a guide. Perhaps some of what you have tried will end up working for me. Who knows!

The AI Flow won’t help, just make things worse if you have some kind of warping on the corner.

Normally the HyperPLA can print well at 0.95, but because mine both underextruded at the corner and overextruded when going up on the Y axis, it generates an abomination and tries to print HyperPLA at 0.7695.

Still, even at this configuration, the bottom layers are super squished and don’t connect, while the top layers look like very carefully and straightly placed angel hair pasta.

Gonna go out on a limb here and say that maybe I found part of the problem. Seems like a good place to start, anyway :roll_eyes:

oh wow, that seems big, but it might be easy to fix.

From what I have observed on mine, all of the bed screws come attached all the way, so you can only make the corners raise in size, not lower them. Increasing the back left will probably lead to improvements.

The issue is as you raise the corners, the in between doesn’t exactly follow it (although a shim could be made).

There are a few other minor things on my printer, and the original box, that point to some kind of damage, but I do wonder if transport was so rough to the point of twisting something or if this was simply how the bed came.

With that much variation at each point on the mesh i wonder if somthing is loose on the measuring end, rather than such variation on the actual bed between points.

I just saw that some of the calibrations will leave a bit of filament on the bed and, eventually, that lead to some measurements being wrong.

My first layer improved, but it is still bad.

I ended up chasing down bed levelling issues most of the day yesterday. Went do bed with the sounds of the calibration routine still ringing in my ears. I did end up having to shim one side a bit, and had to come up with a slightly shorter spacer under my front left corner to actually bring it down far enough to get in to spec.

Hoping with a touch more work today that I can get back to testing. If this ends up being the issue then I will feel a bit bad for taking over mb_0’s thread just because i didn’t check my bed level…

But I do appreciate all this input. I am coming from a much loved and heavily modded ender 3, and this K2 represents a massive change of pace and tech. Chatting through this stuff is helping with exploring the machine more.

1 Like

Don’t feel bad, I think providing information and sharing what you are doing is helpful to everyone who will read this.

Interesting that we both decided to do the same thing - shim the bed. I am using aluminum foil to shim mine and it correct some of the low spots, but it is nowhere as good as it should be.

Still, I am not sure if this should be necessary. This is bringing me memories of my old Ender 3 and the non-stop days of fixing the bed leveling.

I will say it again, even though I have some warping on my X1C bed/plate it puts out perfect first layers every single time.

On the other hand, the K2P low spots are masked by the textured PEI, at a glance you may not notice but if you look for more than a couple seconds you will see the wavy pattern shows below.
There are so many high spots for me that I don’t have a layer, just neatly separated lines.

For testing, I have been printing single layer sheets. What really drives me crazy is that this can be fixed by manually adjusting the Z offset, to different levels, during printing. Whatever configuration is available on the bed mesh isn’t properly performing the compensation needed.

And this is the part that kills me, if even simple toys that are supposed to connect to each other, or print in place fidgets fails with the cheap filament, I have no confidence in throwing the more expensive work at this printer and expect a good result.

2 Likes

I do believe that the leveling efforts have paid off in many ways. I finally ended up with a print that is not requiring me to adjust z offset. I do still see some parts being raised a bit higher on the right side, but that is where my shim is, so I can adjust.

The only remaining issue I am having may be more related to your original post. I feel like the whole thing is maybe still having trouble with flow rate. I got a “pretty good” first layer that was a touch high on the right side, but then the next layer up actually had small gaps like it was too far away. I dumped another 5% flow rate on, and it looks better. Regardless of that adjustment though, the edges of the infill still don’t want to touch the walls in some places, and there isn’t a single wall that is actually touching the printed brim, so it will end up being totally useless for holding down the print. That may have more to do with the actual motion and speed/jerk settings though, in which case I may need to just make a new thread.

I am trying to keep my expectations in check on the first layer stuff. Credit where it is due, Creality seems to have worked harder on this printer than they have on probably the last 2 generations when it comes to updating firmware instead of making a whole new printer. I see in the slicer that the AI is still listed as “beta”, and am hoping to see it improve over time with new updates. I may tinker with it to see if it helps any of this terrible edge work, but based on your review, I don’t really know what to expect from it.

it could be your first layer is too squished. I had an “amazing” first layer on a small print, but it was actually just squished and it messed the next layer.

Looking at the configs for printer.cfg, the bed mash fade doesn’t start for a while, so it should follow the compensation for a little bit.

On the print I played with manual z-offset, it often only required a little amount, like 0.03 compensation. I am seeing variations that are higher than this during the auto bed leveling between two different calibrations.
I have tried to enable multiple probe sampling and it works everywhere, including z_tilt_adjust, except for bed mesh -_-

Considering my box had some “minor” damage (enough to have the door not connected to the hinge), I am wondering if this isn’t related to the frame being pushed and some lose joints/screws/etc

I noticed my left z-screw always had like 6 teeth left, while the right one only had 2.

Z_TILT_ADJUST routine will automatically try to align the bed going by the middle left and right points in the mesh - they are configured as 5,175 and 345,175.
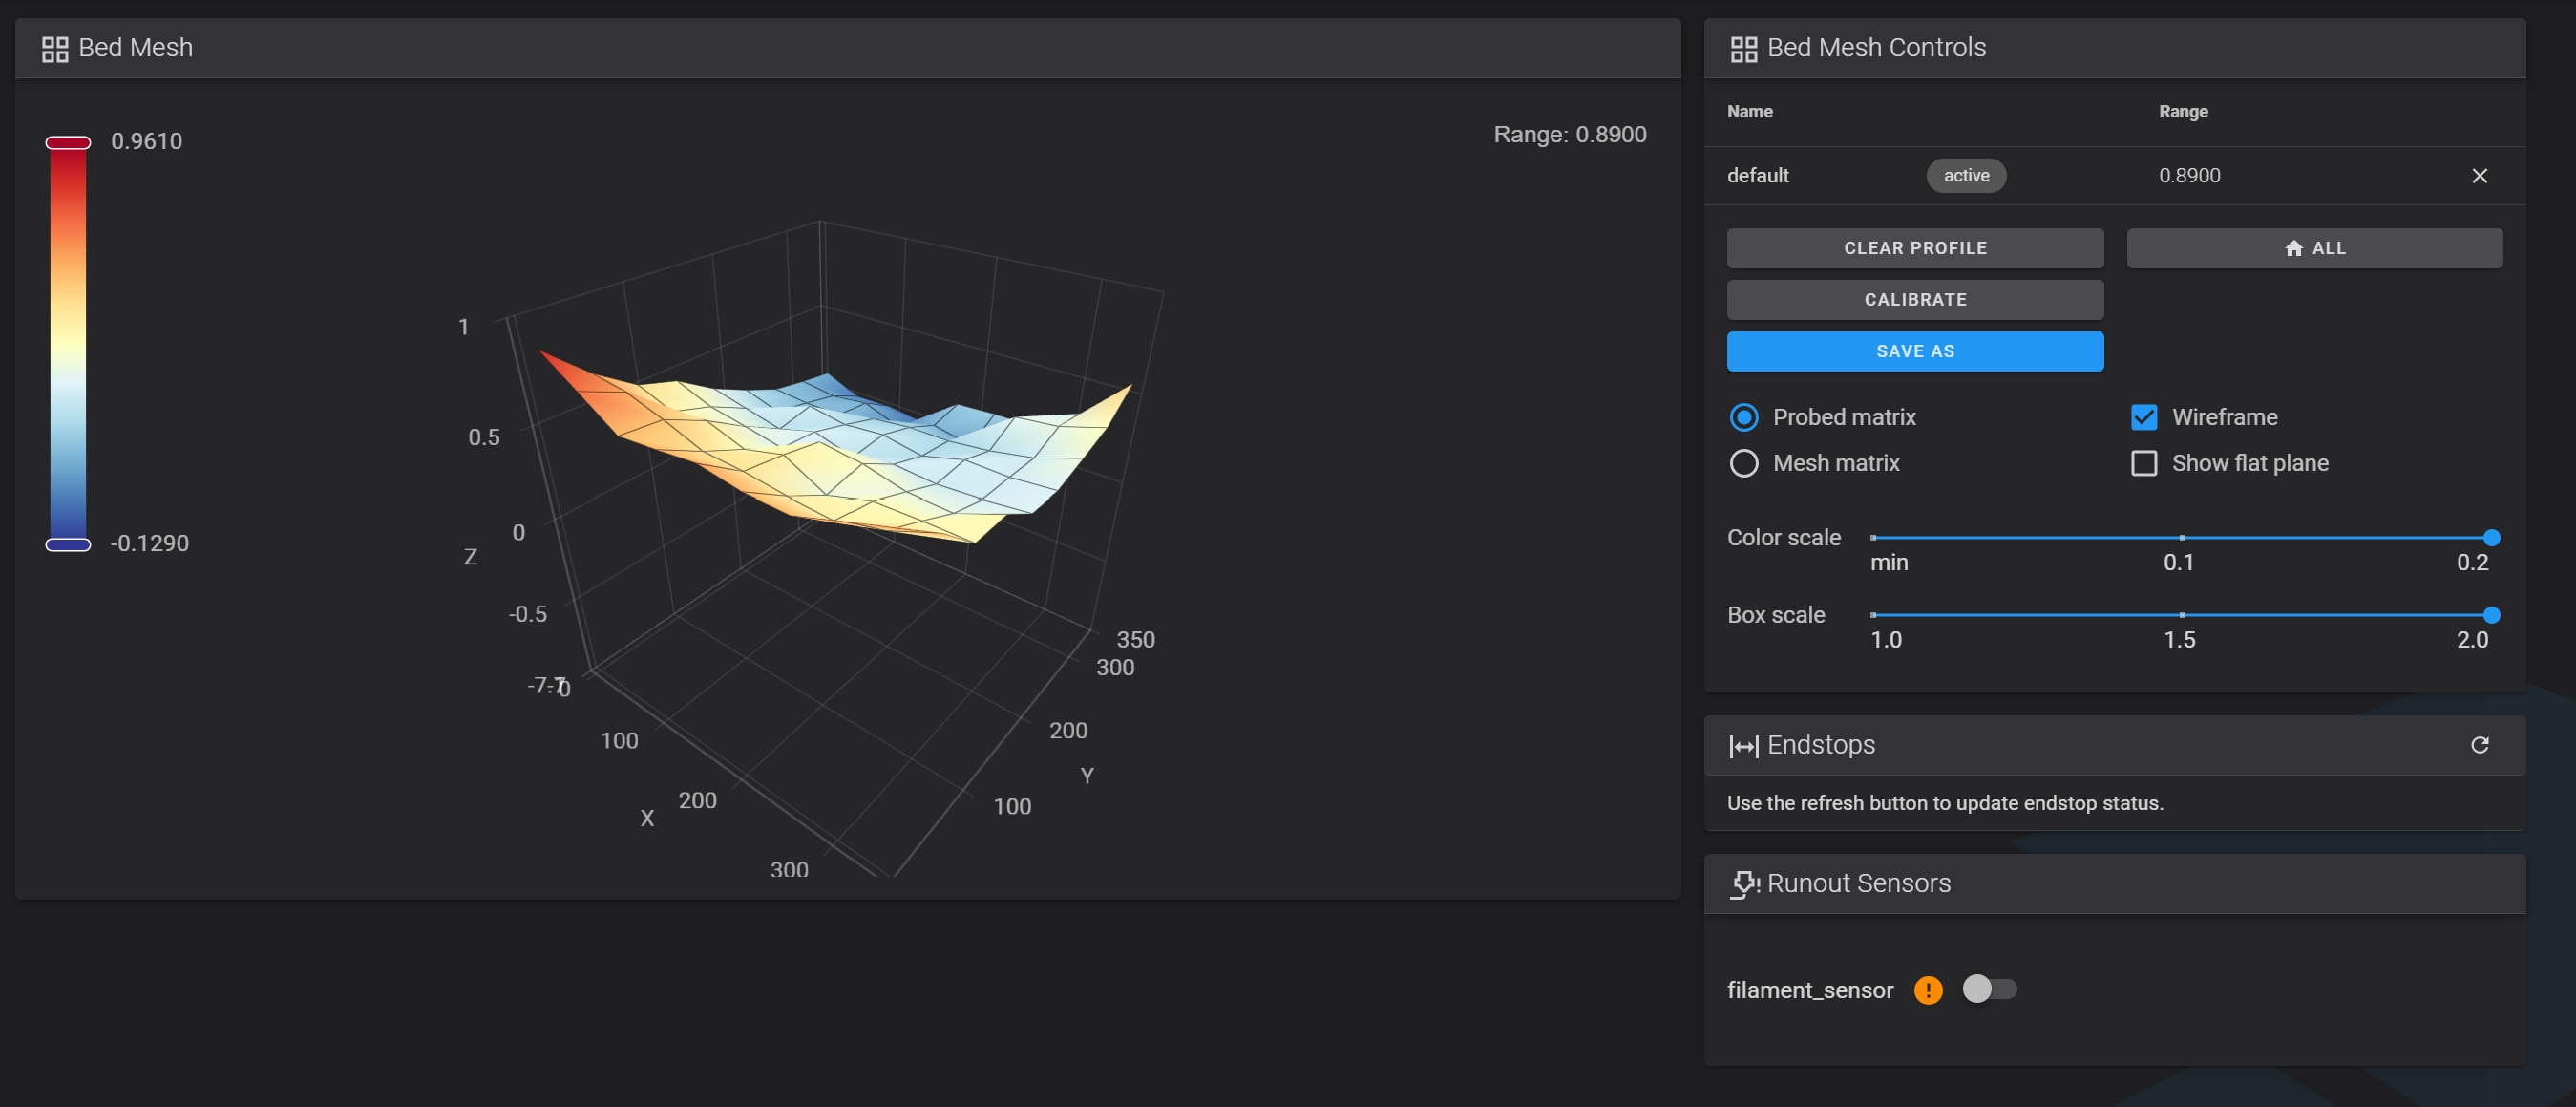
The front right of the bed is higher and the middle right is much lower. There are other points with issues too.

While this doesn’t mean much, it does offer another depth when leveling the bed - you are not forced to ONLY tweak the corner, if you lift the entire left or right side, the other will try to compensate, which got me to get a lower front right.
I did have to compensate slightly with aluminum foil on the right but it got me to something that is temporarily ok; to have consistent prints I would still need to lift several other places in this bed though, as Klipper, weirdly, isn’t being able to compensate.

I have also tweaked some points on printer.cfg to speed up the bed leveling process, have the probe resample some of the data points and, lastly, changed the algorithm factor for calculation of the mesh (some people had success with it, some didn’t)

under [prtouch_v3]
samples_tolerance: 0.01
samples_result: median
samples: 3

under [bed_mesh]
speed: 300
horizontal_move_z: 2
bicubic_tension: 0.5

under [z_tilt]
retry_tolerance: 0.01

klipper, by default, has horizontal_move_z set to 2. Having at at 5 has some benefits, including avoiding a damaged plate if the bed is drasticaly shifted (which can happen with dual Z), but this has been working well for me.

the bed mesh calibration takes 195~ish seconds (slightly faster). There’s also close to another minute for the full routine.

Avoid doing the calibration through fluidd’s interface - the calibration through the printer menu has a few more important steps that must be done before calibrating (including wiping the nozzle and re-leveling the z_tilt).

As a side note, I did have a ticket with support and after being able to talk to an engineer and showing the different pictures of the non-consistent sheets I printed, I will receive a new bed and strain gauge.

2 Likes

This is actually really awesome info to have. My right side is insanely dipped down along the edge and spreading out to the middle. I have been able to get it much closer to real level, but fighting with that has been exhausting, as there is just no way to adjust it without shimming it. I am for sure going to see if i can get the z-tilt adjusted.

But that seems to be a fundamental problem with Creality, I’m also having a lot of trouble and can’t use the printer at the moment because the 1st and 2nd layers are only causing problems. If it really only comes from the bed, I will rebuild the bed in the future if Creality doesn’t want to help, and if the strain gauge can be replaced so easily, I will do that too, if this spare part ever becomes available.

1 Like

Some of the parts are available for purchase on creality’s vipmall:

Creality VIP Mall - some spare parts
Parts - CFS cables, epoxy build plate and heating block kit

I do like this area and how this is organized, the prices are also quite good.

My replacement parts arrived, I was able to replace the Strain Gauge and it made no difference.
While following the intructions to remove the print head from the grantry, I noticed the bottom part of the assembly was broken (the one held by the lower screws on left and right side). It was also almost impossible for me to remove it (fairly different from the youtube video).

My door was also loose when it came and I received a perfect replacement door, when I installed it, the door wouldn’t close. It is almost like my entire printer (the frame) is crooked to the left, so the straigh door was going past its position on the top right and wouldn’t close. I had to be creative with the screws to simply have a working door (again, nothing like the wiki pictures or video).

The heated bed replacement though, that was a disappointment. It came wrapped in a plastic and some bubble wrap. It is damaed, all corner have been smashed against something and are visibly bulging. one mid section is fully bulging by 2mm.
Even the magnetic sheet has damage in the corners.
Overall, this is much worse than my current plate.

Anyway, I have given up since no amount of extra parts have been able to fix my issues. Judging by pictures alone and the door issue, I believe that my printer got some heavier damage than what is visible, which could explain why the bed leveling simply doesn’t work.

It has been a total of 120h trying to debug what is wrong and I am about out of the cheap PLA available to do trial prints. My only option seems to be to return the print.

Thanks for the link
If I were you, I would do it if it was still possible.

It’s just a shame that the heating mat and magnetic foil aren’t available to buy separately yet, then I could use my own cast aluminum plate instead of the cheap aluminum plate from Creality.

And yes, I have the option of making my own cast aluminum plate, milling, drilling, no problem.