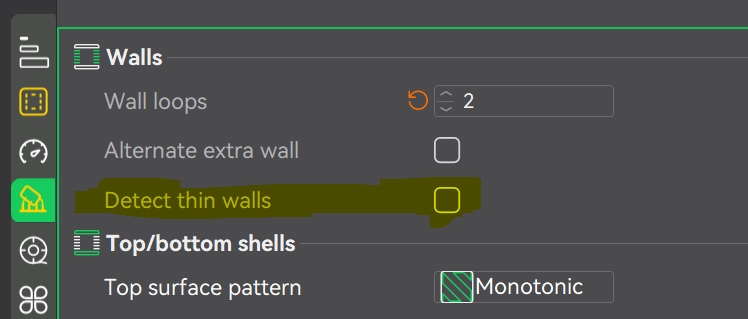
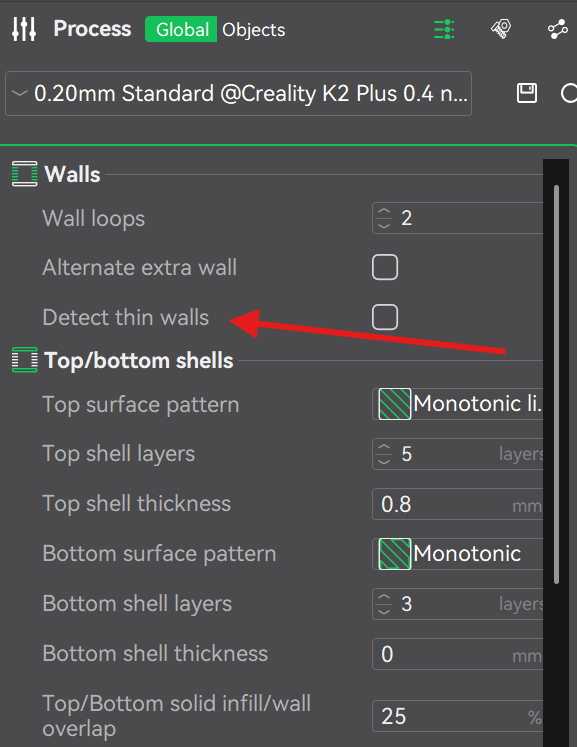
Ok, so the “Detect Thin Walls” option is only available when using the Classic Wall Generator — that’s why I couldn’t see it in my profile while using Arachne.
I’ve now switched to Classic and enabled “Detect Thin Walls.”
Here’s what I’m currently testing with:
-
Sparse Infill Anchor Length: 400% (also tried 200%, no difference)
-
Apply Gap Fill: Everywhere
-
Under Advanced: “Detect narrow internal solid infill” enabled
In the slicer preview, I notice a difference when reducing the outer wall line width, and also that orientation seems to influence how these micro-gaps get filled — depending on the angle, some of them actually close better.
@CREALITY One small UX note: I really wish the slicer would show disabled settings instead of hiding them, with a short explanation of why they’re unavailable. I spent quite a while trying to figure out why that option wasn’t showing up at all — it would save a lot of confusion!
I am printing the model now, will get back to you with the results.
Here are my current settings:
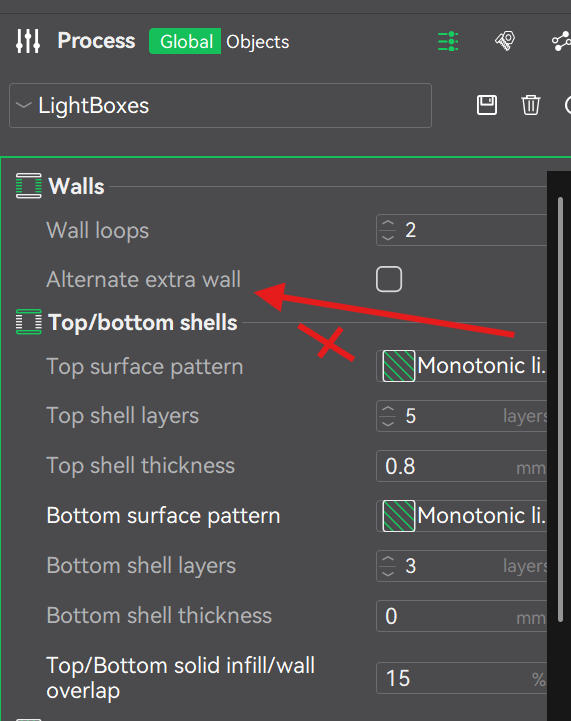
 Creality Print LightBoxes__ Profile
 Section: Quality
Layer Height
Line Width
-
Default: 0.42 mm or %
-
First layer: 0.5 mm or %
-
Outer wall: 0.25 mm or %
-
Inner wall: 0.45 mm or %
-
Top surface: 0.42 mm or %
-
Sparse infill: 0.45 mm or %
-
Internal solid infill: 0.42 mm or %
-
Support: 0.4 mm or %
Seam
-
Seam position: Aligned
-
Staggered inner seams: Off
-
Seam gap: 10%
-
Scarf joint seam (beta): None
-
Role base wipe speed: On
-
Wipe speed: 80 mm/s or %
-
Wipe on loops: Off
-
Wipe before external loop: On
Precision
-
Slice gap closing radius: 0.049 mm
-
Resolution: 0.012 mm
-
Arc fitting: Off
-
X–Y hole compensation: 0 mm
-
X–Y contour compensation: 0 mm
-
Elephant foot compensation: 0 mm
-
Precise wall: Off
-
Convert holes to polyholes: Off
-
Precise Z height: Off
Ironing
Wall Generator
Walls and Surfaces
-
Walls printing order: Inner/Outer
-
Print infill first: Off
-
Wall loop direction: Auto
-
Top surface flow ratio: 1.0
-
Bottom surface flow ratio: 1.05
-
Only one wall on top surfaces: On
-
One wall threshold: 300%
-
Only one wall on first layer: On
-
Avoid crossing walls: On
-
Avoid crossing walls – Max detour length: 0 mm or %
-
Small area flow compensation (beta): On
-
Flow Compensation Model:
0,0;
0.2,0.4444;
0.4,0.6145;
0.6,0.7059;
0.8,0.7619;
1.5,0.8571;
2.0,0.8889;
3.0,0.9231;
5.0,0.9520;
Bridging
-
Bridge flow ratio: 1
-
Internal bridge flow ratio: 1
-
Bridge density: 100%
-
Thick bridges: Off
-
Thick internal bridges: On
-
Don’t filter out small internal bridges (beta): Disabled
-
Bridge counterbore holes: None
Overhangs
-
Detect overhang walls: On
-
Make overhangs printable: Off
-
Extra perimeters on overhangs: Off
-
Reverse on odd: Off
-
Overhang optimization (beta): Off
 Section: Strength
Walls
Top/Bottom Shells
-
Top surface pattern: Monotonic lines
-
Top shell layers: 5 layers
-
Top shell thickness: 0.8 mm
-
Bottom surface pattern: Monotonic lines
-
Bottom shell layers: 3 layers
-
Bottom shell thickness: 0 mm
-
Top/Bottom solid infill/wall overlap: 15%
Infill
-
Sparse infill density: 15%
-
AI infill: Off
-
Sparse infill pattern: CrossHatch
-
Sparse infill anchor length: 400% mm or %
-
Maximum infill anchor length: 20 mm or %
-
Internal solid infill pattern: Monotonic lines
-
Apply gap fill: Everywhere
-
Filter out tiny gaps: 0 mm
-
Infill/wall overlap: 15%
-
Anchor solid infill by X mm: 0 mm or %
Advanced
-
Sparse infill direction: 45°
-
Solid infill direction: 45°
-
Rotate solid infill direction: On
-
Bridge infill direction: 0°
-
Minimum sparse infill threshold: 15 mm²
-
Infill combination: Off
-
Detect narrow internal solid infill: On
-
Ensure vertical shell thickness: All
 Section: Speed
First Layer Speed
Other Layers Speed
Overhang Speed
-
Slow down for overhangs: On
-
Classic mode: Off
-
Slow down for curled perimeters: On
-
Overhang speed map:
-
0 mm/s or % (10%, 25%)
-
50 mm/s or % [25%, 50%]
-
30 mm/s or % [50%, 75%]
-
10 mm/s or % [75%, 100%]
-
Bridge: 50 mm/s (External)
-
Internal bridge: 150%
Travel Speed
Acceleration
-
Normal printing: 8000 mm/s²
-
Outer wall: 5000 mm/s²
-
Inner wall: 5000 mm/s²
-
Bridge: 50% mm/s² or %
-
Sparse infill: 100% mm/s² or %
-
Internal solid infill: 100% mm/s² or %
-
First layer: 500 mm/s²
-
Top surface: 2000 mm/s²
-
Travel: 8000 mm/s²
-
Accel to decel: 50%
Jerk (XY)
-
Default: 8 mm/s
-
Outer wall: 8 mm/s
-
Inner wall: 8 mm/s
-
Infill: 8 mm/s
-
Top surface: 8 mm/s
-
First layer: 8 mm/s
-
Travel: 8 mm/s
Advanced
-
Extrusion rate smoothing: 0 mm³/s²
-
Weight limit speed & acceleration: Set
-
Height limit speed & acceleration: Set
 Section: Supports
- All support options: Disabled for this preset
 Section: Multifilament
Prime Tower
-
Enable: On
-
Width: 40 mm
-
Prime volume: 50 mm³
-
Brim width: 3 mm
-
Prime tower rotation angle: 0°
-
Prime tower enhance type: Chamfer
-
Extra flow for purging: 100%
-
No sparse layers (beta): Off
Flush Options
Advanced
-
Use beam interlocking: Off
-
Maximum width of segmented region: 0 mm
-
Interlocking depth of segmented region: 0 mm
 Section: Others
Skirt
Brim
-
Brim type: No-brim
-
Brim width: 5 mm
-
Brim-object gap: 0.3 mm
Special Mode
G-code Output
Post-processing Scripts
Notes
Filament Profiles
Filament Profile: PLA+_DarkYellow (eSUN)
Basic Information
-
Type: PLA
-
Vendor: eSUN
-
Soluble filament: No
-
Filament for supports: No
-
Required nozzle HRC: 0
-
Default color: Yellow (#FFFF00)
-
Diameter: 1.75 mm
-
Flow ratio: 0.9765
-
Enable pressure advance: 
-
Pressure advance: 0.056
-
Density: 1.23 g/cm³
-
Shrinkage (XY / Z): 100% / 100%
-
Price: 20 money/kg
-
Softening temperature: 53 °C
-
Idle temperature: 0 °C
Temperature Settings
-
Recommended nozzle temp: 205 – 215 °C
-
Chamber temp: 35 °C (active control on, layer 1)
-
Nozzle temperature:
-
First layer: 210 °C
-
Other layers: 205 °C
-
Bed temperature (Smooth/Textured/Custom Plate):
-
First layer: 55 °C
-
Other layers: 55 °C
-
Epoxy resin plate: 45 °C
-
Max volumetric speed: 10 mm³/s
Cooling
-
No cooling for first layers: 0
-
Model fan speed:
-
Keep fan always on:
-
Slow printing for better layer cooling:
-
Don’t slow down outer walls: 
-
Smart cooling zones (Beta):
-
Min print speed: 20 mm/s
-
Force cooling for overhangs/bridges:
-
Cooling overhang threshold: 50 %
-
Fan speed for overhangs: 100 %
-
Support interface fan speed: -1 % (default)
-
Side fan speed: 80 %
-
Special area cooling: (100 % if enabled)
-
Auxiliary fan opening height: 0.5 mm
-
Back fan (air filtration): Off
-
During print: 60 %
-
After print: 80 %
Retraction (Setting Overrides)
-
Retraction length: 1.8 mm
-
Z hop: 0.4 mm (type: Spiral)
-
Retraction speed: 40 mm/s
-
Deretraction speed: 40 mm/s
-
Extra length on restart: 0 mm
-
Travel distance threshold: 1 mm
-
Retract on layer change:
-
Wipe while retracting:
-
Wipe distance: 2 mm
-
Retract amount before wipe: 70 %
-
Long retraction when cut (experimental):
Advanced
Filament Start G-code
;filament start gcode
{if (position[2] > first_layer_height) }
M104 S[nozzle_temperature]
{else}
M104 S[first_layer_temperature]
{endif}

{if(initial_extruder != current_extruder || position[2] > first_layer_height)}
{if (position[2] +0.4  < printable_height) }
G2 Z{position[2]  + 0.4} I0.86 J0.86 P1 F10000 ; spiral lift a little from second lift
G1 X205 Y345 F20000
G1 Z{position[2] } F1200
{else}
G1 X205 Y345 F20000
{endif}
{endif}
Filament End G-code
;filament end gcode
Multifilament
-
Minimal purge on wipe tower: 30 mm³
-
Enable ramming for multitool:
-
Multitool ramming volume: 10 mm³
-
Multitool ramming flow: 10 mm³/s
Filament Profile: Pla_DarkPurple (Voxelab)
Basic Information
-
Type: PLA
-
Vendor: Voxelab
-
Soluble filament: No
-
Filament for supports: No
-
Required nozzle HRC: 0
-
Default color: Dark Purple (#800080)
-
Diameter: 1.75 mm
-
Flow ratio: 0.9405
-
Enable pressure advance:
-
Pressure advance: 0.06
-
Density: 1.25 g/cm³
-
Shrinkage (XY / Z): 100% / 100%
-
Price: 20 money/kg
-
Softening temperature: 110 °C
-
Idle temperature: 0 °C
Temperature Settings
-
Recommended nozzle temp: 190 – 220 °C
-
Chamber temp: 35 °C (active control on, layer 1)
-
Nozzle temperature:
-
First layer: 210 °C
-
Other layers: 215 °C
-
Bed temperature (Smooth/Textured Plate):
-
First layer: 50 °C
-
Other layers: 50 °C
-
Customized Plate: 35 °C
-
Epoxy Resin Plate: 40 °C
-
Max volumetric speed: 14 mm³/s
Cooling
-
No cooling for first layers: 1
-
Model fan speed:
-
Keep fan always on:
-
Slow printing for better layer cooling:
-
Don’t slow down outer walls:
-
Smart cooling zones (Beta):
-
Min print speed: 20 mm/s
-
Force cooling for overhangs/bridges:
-
Cooling overhang threshold: 50 %
-
Fan speed for overhangs: 100 %
-
Support interface fan speed: -1 % (default)
-
Side fan speed: 80 %
-
Special area cooling: (100 % if enabled)
-
Auxiliary fan opening height: 0.5 mm
-
Back fan (air filtration): Off
-
During print: 60 %
-
After print: 80 %
Retraction (Setting Overrides)
-
Retraction length: 1.8 mm
-
Z hop: 0.4 mm (type: Spiral)
-
Retraction speed: 40 mm/s
-
Deretraction speed: 40 mm/s
-
Extra length on restart: 0 mm
-
Travel distance threshold: 1 mm
-
Retract on layer change:
-
Wipe while retracting:
-
Wipe distance: 2 mm
-
Retract amount before wipe: 70 %
-
Long retraction when cut (experimental):
Advanced
Filament Start G-code
;filament start gcode
{if (position[2] > first_layer_height) }
M104 S[nozzle_temperature]
{else}
M104 S[first_layer_temperature]
{endif}

{if(initial_extruder != current_extruder || position[2] > first_layer_height)}
{if (position[2] +0.4  < printable_height) }
G2 Z{position[2]  + 0.4} I0.86 J0.86 P1 F10000 ; spiral lift a little from second lift
G1 X205 Y345 F20000
G1 Z{position[2] } F1200
{else}
G1 X205 Y345 F20000
{endif}
{endif}
Filament End G-code
;filament end gcode
Multifilament
-
Minimal purge on wipe tower: 30 mm³
-
Enable ramming for multitool:
-
Multitool ramming volume: 10 mm³
-
Multitool ramming flow: 10 mm³/s
Filament Profile: HyperPLA_White (Creality)
Basic Information
-
Type: PLA
-
Vendor: Creality
-
Soluble filament: No
-
Filament for supports: No
-
Required nozzle HRC: 0
-
Default color: White (#FFFFFF)
-
Diameter: 1.75 mm
-
Flow ratio: 0.9408
-
Enable pressure advance:
-
Pressure advance: 0.076
-
Density: 1.24 g/cm³
-
Shrinkage (XY / Z): 100% / 100%
-
Price: 20 money/kg
-
Softening temperature: 60 °C
-
Idle temperature: 0 °C
Temperature Settings
-
Recommended nozzle temp: 190 – 240 °C
-
Chamber temperature: 35 °C (active control on, layer 1)
-
Nozzle temperature:
-
First layer: 210 °C
-
Other layers: 215 °C
-
Bed temperature:
-
Smooth PEI / High-Temp Plate → 50 °C
-
Textured PEI Plate → 50 °C
-
Customized Plate → 35 °C
-
Epoxy Resin Plate → 40 °C
-
Max volumetric speed: 23 mm³/s
Cooling
-
No cooling for first layers: 0
-
Model fan:
-
Keep fan always on:
-
Slow printing for layer cooling:
-
Don’t slow down outer walls:
-
Smart cooling zones (Beta):
-
Min print speed: 20 mm/s
-
Force cooling for overhangs/bridges:
-
Cooling overhang threshold: 50 %
-
Fan speed for overhangs: 100 %
-
Support interface fan speed: -1 %
-
Side fan: 80 %
-
Special area cooling: (100 % if enabled)
-
Auxiliary fan opening height: 0.5 mm
-
Back fan: off (air filtration disabled)
-
During print → 60 %
-
After print → 80 %
Retraction (Setting Overrides)
-
Length: 1.8 mm
-
Z hop: 0.4 mm (Spiral)
-
Retraction speed: 40 mm/s
-
Deretraction speed: 40 mm/s
-
Extra length on restart: 0 mm
-
Travel distance threshold: 1 mm
-
Retract on layer change:
-
Wipe while retracting:
-
Wipe distance: 2 mm
-
Retract amount before wipe: 70 %
-
Long retraction when cut (experimental):
Advanced
Filament Start G-code
;filament start gcode
{if (position[2] > first_layer_height) }
M104 S[nozzle_temperature]
{else}
M104 S[first_layer_temperature]
{endif}

{if(initial_extruder != current_extruder || position[2] > first_layer_height)}
{if (position[2] +0.4  < printable_height) }
G2 Z{position[2]  + 0.4} I0.86 J0.86 P1 F10000 ; spiral lift a little from second lift
G1 X205 Y345 F20000
G1 Z{position[2] } F1200
{else}
G1 X205 Y345 F20000
{endif}
{endif}
Filament End G-code
;filament end gcode
Multifilament
-
Minimal purge on wipe tower: 30 mm³
-
Enable ramming for multitool:
-
Multitool ramming volume: 10 mm³
-
Multitool ramming flow: 10 mm³/s
Filament Profile: HyperPLA_Black (Creality)
Basic Information
Type: PLA
Vendor: Creality
Soluble filament: No
Filament for supports: No
Required nozzle HRC: 0
Default color: Black (#000000)
Diameter: 1.75 mm
Flow ratio: 0.9408
Enable pressure advance:
Pressure advance: 0.040
Density: 1.24 g/cm³
Shrinkage (XY / Z): 100% / 100%
Price: 20 money/kg
Softening temperature: 60 °C
Idle temperature: 0 °C
Temperature Settings
Recommended nozzle temp: 190 – 240 °C
Chamber temperature: 35 °C (active control on, layer 1)
Nozzle temperature:
First layer: 205 °C
Other layers: 200 °C
Bed temperature:
Smooth PEI / High-Temp Plate → 50 °C
Textured PEI Plate → 50 °C
Customized Plate → 35 °C
Epoxy Resin Plate → 40 °C
Max volumetric speed: 23 mm³/s
Cooling
No cooling for first layers: 0
Model fan:
Min = 100 % @ 100 s layer time
Max = 100 % @ 6 s layer time
Keep fan always on:
Slow printing for layer cooling:
Don’t slow down outer walls:
Smart cooling zones (Beta):
Min print speed: 20 mm/s
Force cooling for overhangs/bridges:
Cooling overhang threshold: 50 %
Fan speed for overhangs: 100 %
Support interface fan speed: -1 %
Side fan: 80 %
Special area cooling: (100 % if enabled)
Auxiliary fan opening height: 0.5 mm
Back fan: off (air filtration disabled)
During print → 60 %
After print → 80 %
Retraction (Setting Overrides)
Length: 1.8 mm
Z hop: 0.4 mm (Spiral)
Retraction speed: 40 mm/s
Deretraction speed: 40 mm/s
Extra length on restart: 0 mm
Travel distance threshold: 1 mm
Retract on layer change:
Wipe while retracting:
Wipe distance: 2 mm
Retract amount before wipe: 70 %
Long retraction when cut (experimental):
Advanced
Filament Start G-code
;filament start gcode
{if (position[2] > first_layer_height) }
M104 S[nozzle_temperature]
{else}
M104 S[first_layer_temperature]
{endif}

{if(initial_extruder != current_extruder || position[2] > first_layer_height)}
{if (position[2] +0.4  < printable_height) }
G2 Z{position[2]  + 0.4} I0.86 J0.86 P1 F10000 ; spiral lift a little from second lift
G1 X205 Y345 F20000
G1 Z{position[2] } F1200
{else}
G1 X205 Y345 F20000
{endif}
{endif}
Filament End G-code
;filament end gcode
Multifilament
Minimal purge on wipe tower: 30 mm³
Enable ramming for multitool:
Multitool ramming volume: 10 mm³
Multitool ramming flow: 10 mm³/s
Plate Settings
Plate name: (blank)
Bed type: Same as Global Plate Type
Print sequence: Same as Global Print Sequence
Spiral vase: Same as Global
First layer filament sequence: Customize
→ White → Yellow → Purple → Black
Other layer filament sequence: Customize
Layers: 2 to End
→ White → Yellow → Purple → Black
Flushing Volume Matrix
Flushing Volumes for Filament Change
CrealityPrint will re-calculate your flushing volumes every time the filament color changes.
Flushing Volume Matrix (mm³):
| From → To |
Yellow |
Purple |
White |
Black |
| Yellow |
0 |
599 |
1200 |
599 |
| Purple |
1200 |
0 |
1200 |
599 |
| White |
599 |
599 |
0 |
599 |
| Black |
1200 |
1200 |
1200 |
0 |
Notes:
-
Flushing volume (mm³) for each filament pair
-
Suggested flushing volume range: 183–1200 mm³
-
Suggestion: flushing between different filament types > 549 mm³
-
Multiplier: 1.30