Z Banding on tall objects with K2 Plus

Hey Everyone,

I just received my new K2 Plus Combo about 2 weeks ago and I love this thing. I have printed dozens of items with virtually no issues and zero failures up to this point. This thing was awesome right out of the box.

For some background, my first printer was a CR5 Pro H that I bought 3 years ago. It was a disaster right out of the box. On first startup and homing the bed crashed into the print head terribly bowing it up. After a lot of scrathing my head and reading/troubleshooting I discovered the printer had a negative 18mm z offset set in it from the factory?! After fixing that it still was a terrible printer. It was a very frustrating start to 3d printing. After taking many months to learn all I could, I upgraded the extruder, mainboard, drivers, and hotend. Then and switched it over to Klipper running on Pi4 and it finally produces great prints. Needless to say I had a crash course in 3d printing and learned a lot.

So, I decided to buy the K2 Combo because I wanted the ability to print larger Asa, abs, and Nylon parts. Also the speed upgrade and the multi color option was nice a nice upgrade as well.

The slicer I used for this machine is Creality’s slicer, just updated to 6.0 this week actually. In the past I have always used Superslicer, and just recently started using Orca on my other printer.

So all has been well on everything I have printed with this machine. But most parts have been under 150mm in height. Over the past 2 days I tried printing some tall sleeves I designed for a project using polymaker asa (which printed fine on all other prints) and the prints have an issue.

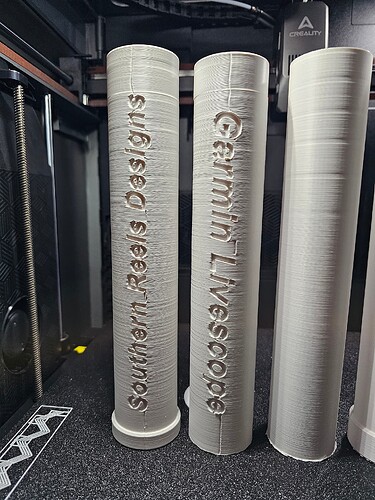
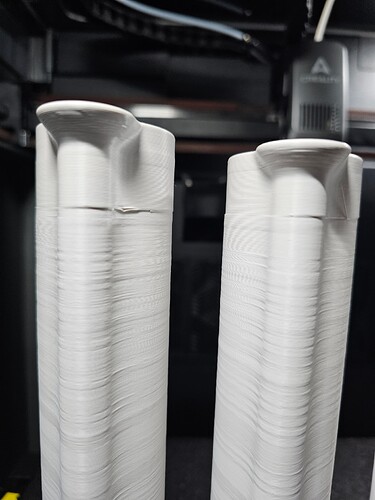
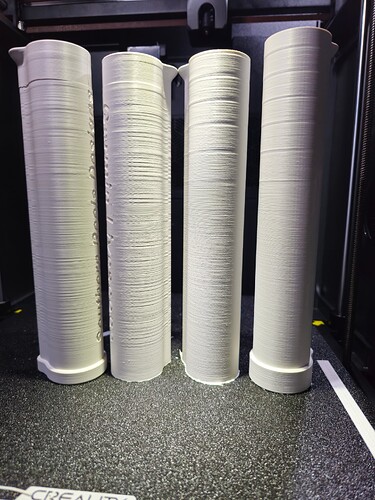
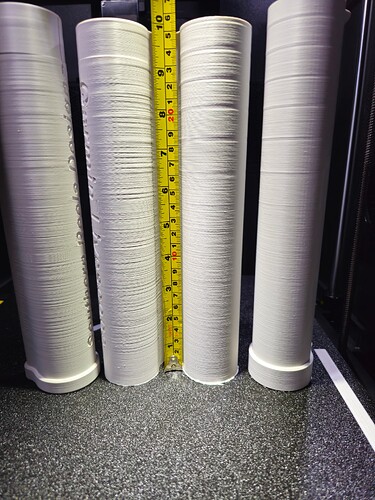
The first set I printed was at 300mms using .2 layer height and I used Crealitys Variable Layer height function set at .50 Quality/speed. I know I was pushing the speed but it worked fine on other prints. The print turned out pretty ugly, with the variable layer height making lots of adjustments through out the print because of some lettering I had designed on one side. Also there was a noticable layer shift at the very top of the print. The print finished sucessfully but it didn’t look good. This set is the left pair in the first picture. I flipped them around in the second pic so you can see the lettering I was referring too.


The next day I made some changes to the model (removed the lettering and slightly increased the height of the bottom coupler on the right print. This time all the print settings were the same other than using .28 layer height, decreasing the speed to 200mms and not using variable layer height.

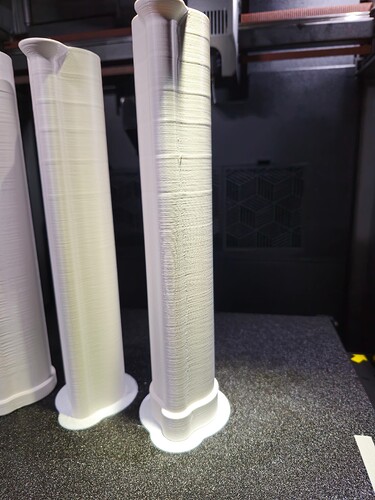
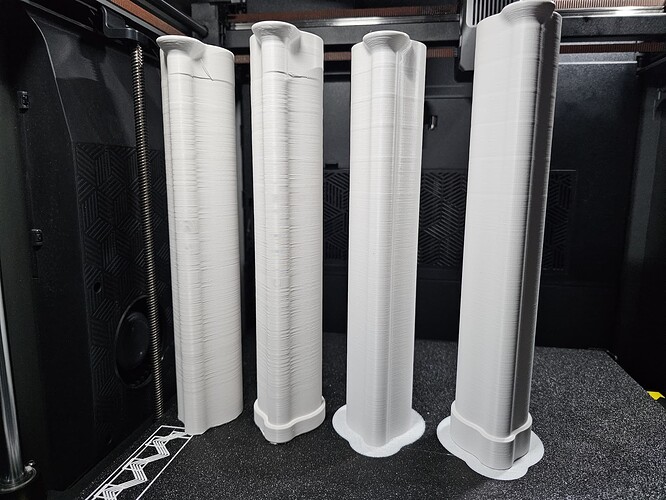
As you can see in the pics the second set looks much better, but there is still this banding pattern that starts at about 140mm in height and repeats in a decreasing distance with increasing defect throught the rest of the print. The banding is decreasing in height 1.5 to 2 mm each time it repeats, with the defect becoming more obvious each time it repeats. The pics below show this very clear because I was using very harsh lighting to show it.

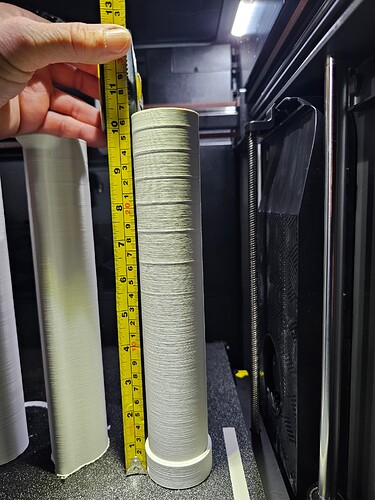
This same pattern was in the first pair I printed as well, (the 2 on the left) but the banding didn’t quite line up with the second sets banding as shown in the pic below. I’m guessing the variable layer height caused this.

I’m curious what you all think may be causing this. I am leaning towards mechanical issues with the printer myself. Maybe some binding in the z axis travel, or a slightly bent lead screws for the z travel. The decreasing height in the banding pattern has me scratching my head though along with the pattern on the first set not lining up with the second. Seems to me if it was a mechanical z axis issue the pattern would match on all 4. Here’s another pic of the group.

I just want to add that bed adhesion was not an issue, I had to pry these parts of the build plate. Also the printer was fully calibrated with it passing all the steps. If there is anything else I can add to this to help just let me know.

Any help would be appreciated
1 Like

I have an Ender 5 plus and suffered from z banding. I fitted WobbleX to the print bed, it takes up any play/slack/dirt in the z lead screws. I don’t know if it can be fitted to a K2+ bit of info, can be found on Aliexpress.

i lifted plastic covers off lead screws and lossened the scews on the coupling so they move a little and its fixed my banding problems

1 Like

intresting though i did see that video…not sure there’s room for them bad boys on the k2 there using the slim type and they look plastic not the usual brass …could be aluminium lol

loosening the screws should give enough play, its what I do on the V3KE/SE. Didn’t think there would be room on a K2. Might look at the smaller Wobblex for my Xplus3 if it develops banding.

1 Like

Some more information.

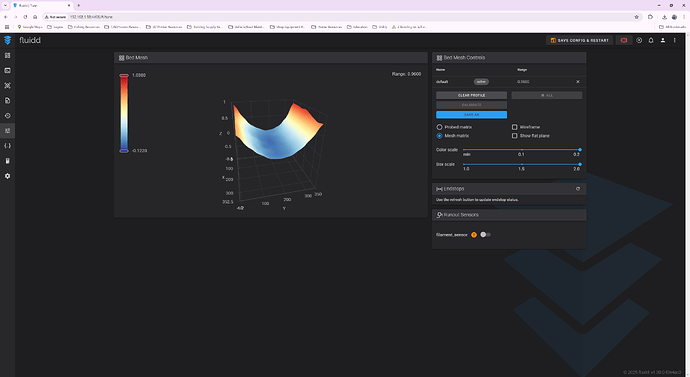
I started having some issues with first layer compression this week. I decided to look at the bed mesh for the first time and I was kinda blown away.

This is what my bed mesh looks like

And this is after spending some time manually leveling the bed to help it out as much as possible. Initially it was like 1.3 mm high in opposite corners.

I was surprised that it printed as well as it did.

I contacted creality support. So they are sending me a new bed now I guess…

The autolevelling software should cope with that range, when it gets closer to 2mm it would be a worry.

Hi. Can you show me what are the screws that you loosened?

On the X gantry where the leadscrew goes through are a couple of M3 screws. Tighten these quite tight, then loosen them 1/2-1 turn. The leadscrew nut floats on the leadscrew. Make sure the POM wheels are properly tightened to the Z gantry extrusions.

Thank you! I opened the last image and looked closely at the bottom, that printer is junk, at 10mm it starts banding/artifacts and just gets worse.
Using Orca Calibration do every step and show us! I just saw your bed mesh, wow.

I had the same issue printing ABS. It was caused by the heated chamber cycling through cooling and heating, warping the part repeatedly during the print. Try disabling chamber temp control. That fixed my banding.

Ive had no problems with z banding so far, though some “messy” intermittent stringing issues with PETG. All throughly dried, same speeds (much reduced from stock). My struggle is the inconssistancy of faults/surface errors in larger prints.

I’m not 100% sure what you mean. Can you do us a favor and provide a picture. Would be highly appreciated!

Can it be the input shaping, when you do calibration your bed is about 14cm down. I was just thinking i am not a expert. Was doing calibration and reading this post.

Ok, you did already some tests and made some changes but I cant see from pictures how thick these tubes are and what the average layer time is.

I completely agree NOT to use adaptive layer height if you want a nice finish.
You also need to make sure not to slow down outer wall and also make sure to print inner/outer in case of 2 walls but maybe inner/outer/inner on more walls.
It looks that the patterns increase on height therefore it seems that the friction when printing a new layer moves the parts (especially round parts are affected by this phenomenon).
I printed very nice parts with my ‘quality’ mode: 0.2mm layer height, 150mm/s outer and 200mm/s inner walls. Some (silk for example) filaments ask for 5° higher temperatures which reduce friction and increase flow, even if you print only @ 12-14 mm²/s flow rates.

Asking for too high flow rates is also very often a problem. Printing 200mm/s on a 0.2mm layer with 0,42 mm wall thickness (my default) is ~17mm²/s. On 0.28mm layer height it would be ~24 mm²/s. This is far too high for all my non-high speed filament!

I just test sliced 3 just round poles of 1mm thickness (3 walls) and 25cm (~10 inch) heigth and sliced them with standards 0.2 layer height and Creality Hyper-PLA settings: It would print in 2h 21 min, then I increased just layer height to 28mm and now it is 2h 1min, on my max of 0.24 it would be only 1h 53 min! Why? The increasing layer height start to reduce the speed because of the flow rates.

Another experience from my prints is that I normally don’t print normally above 0.24mm layer height on 0.4mm nozzle (=60% of nozzle size) because the speed benefit is so small and other negative effects (bad visual quality, flow rate cannot cope, reduced layer adhesion, less strong part) let me print a second or third time and the speed benefit is gone by far (and I used 2-3 times the filament…)!
I have one older Qidi printer setup with a 0.6mm nozzle where I can print such things up to 0.36 mm layer height but speed is then also very limited and will not work on all parts.