Creality shook things up with the launch of two top-notch scanners in April 2024, Otter and Raptor, signalling a major leap forward in scanner technology.
These beasts are a world apart from the earlier Ferret and Lizard series, boasting superior looks, scanning capabilities, and precision. Let’s dive into the details of the Otter and share some first-hand experiences with this game-changing scanner.
- CR-Scan Otter vs. Ferret Series Specs
- CR-Scan Otter Products Details
- How to Use Otter 3D Scanner
- FAQs About Otter Scanner Use
- Best 3D Printers to Work Together
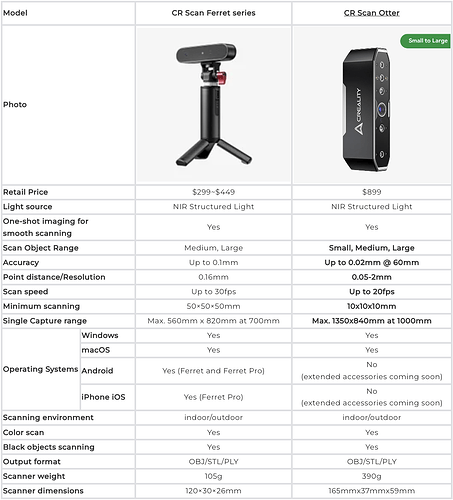
Part1: CR-Scan Otter vs Ferret Series Specs at A Glance
Let’s have a close look at the technical specifications of CR-Scan Otter and Ferret Series, including essential machine details, scan object ranges, accuracy, 3D resolution, suport system and more. Click to know more about other Creality Scanner specs.
Part2: CR-Scan Otter Product Details
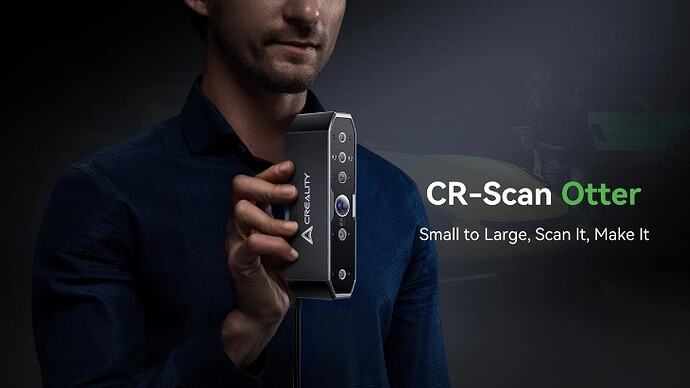
Otter: Small to Large, Scan it, Make it
【Up to 0.02mm Accuracy, Ultra-High Precision, Rich in Detail】
【Innovative Four-lens Stereo Vision】
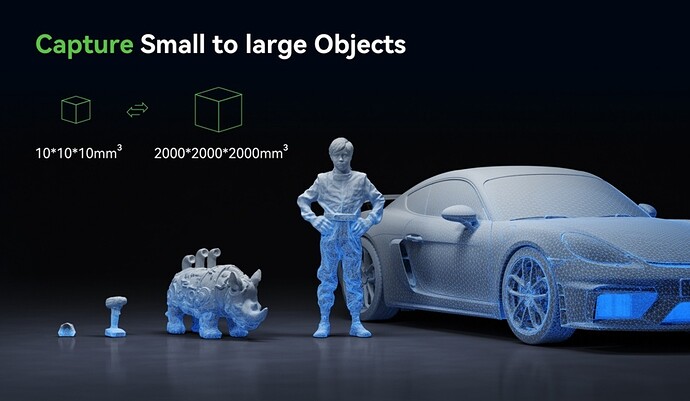
【Objects between 10-2000mm】
【Scan Black/Metal Objects Without Spraying】
【Full-Color Scanning, True-to-Life Reproduction】
【Anti-shake, Smooth and Efficient Scanning】
CR-Scan Otter is a high-precision, handheld, all-in-one 3D scanner compatible with scanning small, medium, and large objects. With a maximum accuracy of 0.02mm. From small screws to human bodies and large automotive components (10-2,000 m³), it can effortlessly scan objects of various sizes. The ability to adapt to objects of various sizes is achieved by its innovative four-eye stereoscopic vision design. This includes a set of large focal length binoculars and a set of short focal length binoculars. The former is used to capture the details of small and medium objects at close range; the latter has a larger FOV and is used to scan relatively large objects, to ensure stable tracking with minimal loss.
This scanner is equipped with a depth computing specialized chip independently developed by Creality, which ensures smooth scanning with a maximum frame rate of up to 20fps. Using unique single-frame 3D imaging technology, it has excellent anti-shake performance. Advanced DOE structured light projection technology enables 3D scanning even outdoors (≤30,000 lux). With professional-grade texture supplemental light, it can smoothly complete full-color scans even in low-light environments, and give objects exquisite and realistic textures.
The all-metal body provides excellent heat dissipation, with a fanless design ensuring noise-free operation. Equipped with touch buttons, interactive indicators, and audible buttons, it makes operation more convenient and effortless.
Note: Since the 3D scanner is a high-precision device, please handle it with care and store it properly. Avoid collisions or drops to prevent a decrease in accuracy or damage.
Part3: How to Use Otter 3D Scanner
1. Button Instructions
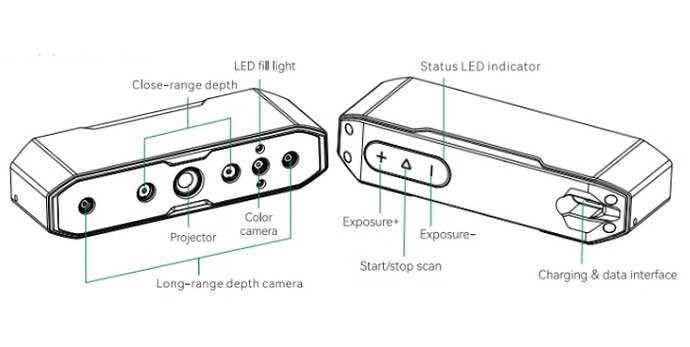
Unlike the Ferret series, the Otter uses three tactile buttons and a ring indicator light to provide live scan status updates. It allows real-time exposure adjustments for easy and intuitive operation.
- Press the “+” button once to increase the IR camera exposure by one level, the indicator light flashes once.
- Press the “-” button once to decrease the IR camera exposure by one level, the indicator light flashes once.
- “▷” button, short press once to start scanning. short press again to pause scanning; long press ≥3 seconds to end scanning.
2. LED Indication Strip
Otter utilizes an innovative four-eye lens stereo vision design, adept at scanning objects of all sizes. Two pairs of dual lenses cater to intricate details and various dimensions. A set of telephoto dual lenses captures rich details for smaller objects, while another set of short-focus dual lenses handles larger objects with a broader range of sizes. Enhanced by 2 white RGB color fill lights for realistic full-color scanning and 8 calibrated point infrared LED fill lights, it boasts superior adaptability to diverse environments.
During scanning, the indicator light color signifies the status and distance suitability:
- Green: indicates normal operation or moderate scanning distance.
- Red flashing: indicates an abnormal state.
- Yellow: flashing indicates upgrade status.
- Orange-red: signifies the scanning distance is too close.
- Orange: suggests the scanning distance is closer.
- Light blue: indicates a longer scanning distance.
- Dark blue: signals the scanning distance is too far.
3. Otter Connection Guide
Method 1: Connect to the computer’s USB 3.0 port using the USB 3.0 data cable (USB 3.0 and above ports are generally blue or red);
Method 2: If the computer only has USB 2.0 ports or insufficient power supplyfrom the USB 3.0 port, use the USB 2.0 power cable for auxiliary power. Connect the USB 2.0 cable to the middle port of the USB 3.0 (as shown in the figure), and the other side of the port can be simultaneously connected to another port onthe computer or used with a 5V charger to provide auxiliary power to the scanner.
4. The Requirements of CrealityScan Software System Operation
Windows Operating Systems
- System - Windows 10/11 (64 bit).
- Minimum Configuration - CPU i5-Gen8 and above, 8GB RAM or higher;
- Recommended Configuration - CPU i7-Gen7 and above, Nvidia or AMD graphics card, 16GB RAM or higher.
macOS Operating Systems
- Minimum Configuration - macOS 10.15.7 and above (Catalina/Big Sur/Monterey/Ventura); CPU: Intel processor (i5-Gen8 CPU and above); RAM: 8GB or higher.
- Recommended Configuration - macOS 11.7.7 and above (Big Sur/Monterey/Ventura); CPU: Apple M1/M2/M3 series processors; RAM: 16GB or higher.
CrealityScan Software Installation
Please ensure that the software version is 3.1.6 or higher to ensure the normal operation of the scanner.
Part4: FAQs about Otter Scanner Use?
1. How to achieve better model details?
① Adjust the exposure time of the IR camera during scanning to ensure moderate exposure. Overexposure is shown as red, while underexposure is shown as blue;
② Try to maintain the optimal scanning distance. Generally, the closer the scanner is to the object without losing tracking, the better the details;
③ During point cloud optimization, use a smaller point distance. For example, when the object size is small, the point distance can be set to 0.1mm.
④ When meshing, ensure that the number of model faces is sufficiently large.
2. How to scan the bottom of an object?
① CrealtyScan provides a multi-project merging feature, allowing you to obtain the complete model of an object through different orientation and merge together.
② Scan the visible part of the object first to obtain a partial model, pause the scan, then change the object’s orientation, and continue tracking the previously scanned part to get the complete model.
3. When do you need to use a scanning pad?
When scanning smaller objects (such as wireless earbuds, medals, etc.), you can randomly place 3mm diameter marker points on the scanning pad and select the marker point mode for scanning.
4. When do you need to use the USB 2.0 power cable?
- When the computer cannot connect to the scanner due to an insufficient power supply, you can use this charging cable to connect an external charger to power the scanner.
- When the scanner is connected to a computer’s USB 3.0 port and has sufficient power supply without using a docking station, you generally do not need to connect an additional power cable.
5. When do you need to use the marker point mode or texture mode?
When the geometric features on the surface of the object are not prominent, you can apply the reflective marker points included in the package to the object and use the marker point mode for scanning. When the surface of the object has rich textures, you can directly use the texture mode for scanning.
6. When is calibration necessary?
Calibration is necessary when the device has not been used for a long time (such as 3 months), or when the device has been accidentally bumped.
Note:The 3D scanner is a high-precision device, please handle it with care, and avoid collisions or drops to prevent damage or degradation to accuracy.
7. Can calibration cards be swapped for each other?
Each calibration card is unique and corresponds to each scanner. They cannot be swapped. When using a calibration card for the first time, it needs to be scanned once to bind to the scanner using the QR code on the back, Otherwise, it may affect calibration accuracy.
8. What should be noted when storing calibration boards?
After each use, please carefully store the calibration card in its original box for proper storage. Avoid contamination, scratching, or heavy pressure on the calibration card to prevent loss or damage.
9. How to perform calibration?
Connect the scanner to the computer, open the CrealityScan software, go to the 【Device】 interface, click on 【calibration】, and perform calibration by following the animated instructions.
Part5: Best 3D Printers to Work Together
Seamlessly connect 3D printing and scanning with ease.
Otter scanners quickly create accurate, printable models without the need for tedious manual modeling in complex software. Export scanned models via CrealityScan in .STL format for direct upload to Creality Print. Then connect your Creality printer to print the model and bring your creation to life.
Conclusion
In conclusion, the Creality CR-Scan Otter is the high-end 3D scanner offering not only impressive scanning accuracy but also exceptional scanning ranges. Take action now and pick the best 3D scanner and 3D printer for your specific needs and preferences.


