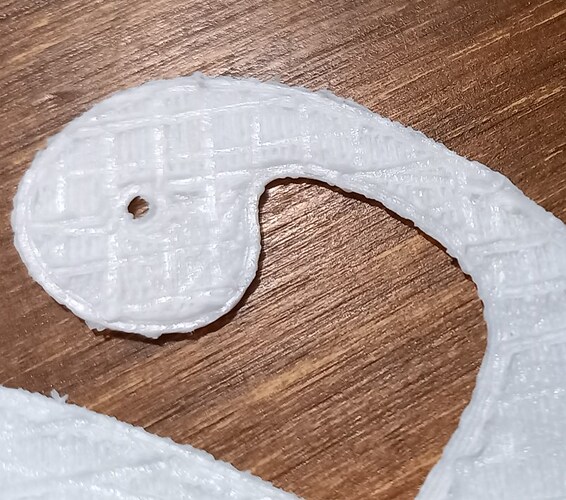
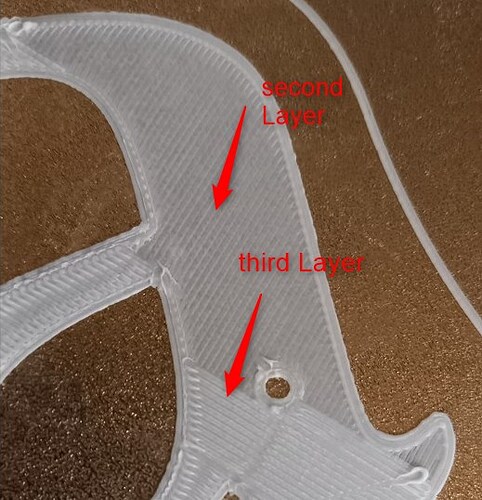
I just have created and printed a test part. 8 layers, each 0.2mm high. The print looks very good, not rough. The same settings, as the failed print before.
The meassured heights are 0.3, 0.6, 0.9, 1.1, 1.3, 1.6, 2mm.
Why does that part work and the previous failed ?
From the same roll of filament…?
Yes, the same roll about 30%RF. I am totaly confused, I tried a “big” part, 4 pieces, summary about 200x200mm, hight 5mm - failed after ca. 3 layers (picture above).
Now I tried one single piece of this, 100x90mm, worked, with the same settings.
The next “single” part, 70x70x5mm, failed, with the same settings !!! Whats wrong, what can I do ???
After one part was printed korrekt, the next part failed, with the same settings !.
I sliced the failed part with original Creality-Slicer, standard-settings, with exact the same result, rough surface and a heavy scratching nozzle. I lost my motivation…
There’s definitely a part on there not doing what it’s supposed to. I wonder if the stepper motors that control the z axis are working intermittently or overheating or…???
Just going back to the basics… Hmmmm… ![]()
I checked all, Bed leveling (number 50), then back to the basics. Many people said, the standard settings for this printer are ok, so …
I took Cura 5.5 with just the standard quality, ->layer 2 rough, from layer 3 on you can hear the nozzle scratch. Stop.
Next, used Crealtity-slicer with standard quality, the same result, I stopped at layer 4.
Next, Creality slicer, Standard, but Flow reduced to 80% → the same !!!
Next, Cura-slicer, Super-Quality (no changes), the same, I stopped at layer 2.
HELP !!
I am glad to hear reducing the layer height helped. I still have a feeling this issue may be due to damp filament as all the symptoms point towards the same issues presented by damp filament rolls.
Hello Nikoli, i do not understand your answer. I did not reduce the layer height and it didn’t help. I do not have one correctly print. The damp is about 22% (less than 30% for the whole week), can not be the problem. the first 2 layers are perfect, evenly and smooth, every next layer it get more and more worse.
Reducing the flow for test to 70% does make any change, the same result.
I would recommend drying your filament at 50c for 3 to 4 hours and then test again. Just because your room humidity is around 30% does not mean that the filament is dry. Filament absorbs moisture from the air over time and even the smallest amount of humidity can over time cause the roll to become damp.
I would also recommend posting a picture of just the first layer so we can see exactly how the first layer looks without layers on top.
A friend of mine gave me a link to download a testpart, I did and the print was perfect, a little bit smaler (measured), is ok, cause i reduced the flow. So I have spended the afternoon to get more information. Finished part (stl) seems to work, my one does not.
I got the information to check the parameters for stl-export. I did, changed the stl-export to recommended settings, after that to extreme settings. Nothing helped.
Why does examples, finish parts (Rabbit, downloaded testpart) work, my own failed ?
The test files are always pre-tuned to work perfectly with the printer to show its capabilities. You can always open the sample files in a text editor to see what speeds, layer heights and temperatures they are using. If you are unsure how to decipher it by all means post the gcode file here and someone will happily check the file over to see what the settings used were.
Looking at your photo above it does look like the printer is using incorrect parameters somewhere as the layers look rough which tends to point towards over-extruding which could be caused by incorrect flow rate or incorrect line widths/height settings.
The Testfile is STL and I sliced it with cura, Flow 90%
I made many tests with the flow rate from 100% in steps to 70%, always the same result. Line height is 0.2, width is 0.4
Just now I tried the Prusa slicer, first did Repair STL than scliced with Standard settings.
The same… I lost my motivation !!
The only suggestion I have is for you to run the calibration tests to ensure your extruder is actually pushing the correct amount of filament as this could all be caused by an incorrect esteps value on your extruder. If you run the calibration tests posted previously you should be easily able to tell if your extruder is actually feeding the correct amount.
In case you missed it before here is the link…
After two weeks and 3 whole days of trying, testing hundred of settings, despair on my CAD-system, i opened the Printer, took a look at the chip and made an firmware update. — The first and second part after that were printed correkt.
Tomorrow i will do some prints in hope that the problem is shure solved.
I got the printer in early October, I do not understand, that the firmware from February is newer than the printer and are I the only one with this problem ??
… the promised preview in display does not work correkt, I have now only the same standard-picture for all the files. Thinking back to the last two weeks, I am not so happy about this all. I consciously didn’t wanted to buy a cheap product… My Garbage is full of failed parts. Hope the Problem now is solved for ever.
I sure hope so too… ![]()
Now i am getting a little bit angry…
The last 2 weeks i did a couple of printings, after the firmware update all print were ok.
Now, today, i printed the same part as last week and the same s**t happened, as before the update, 4 layers perfekt, than you can hear the nozzle scratch and one layer later the print is rough (damaged, see pictures below). I guess, small parts 5x5 cm are ok, bigger 13x10cm there is a problem with the Z-axis.I have printed these parts with the same settings.
Are you using any z-hop and retraction?
yes, increased to 0.8mm. I did several test with this parameters, didn’t help.
I have always the same, Layers 1 to 3 are perfect, than it begins…
I ajusted the Z-Axis, reset settings of the printer, bedleveling manually and automatic,
two times, to make shure it is correct. → a little part – failed, layer 4 so rough, ended in tear off.
I tried everything during the last 3 weeks, 3 diferent slicers, every idea, I got from several forum, more than 100 failed parts, about 600g filament in trash, 20 good parts, 10 of them are test-parts for measurment, (these are perfect in surface and dimension). I will end with creality printers !!

