Senior Newbee here. I’m having trouble with the print head hitting the object that I am printing. I believe that I am performing all the startup steps properly. Leveling done before printing. Plate temp-60,Nozzle temp-200. Speed 100. Etc.
The stock item that came with the printer is a cat. When it prints about 1.25" high, something starts to hit the object and knocks it loose of the bottom plate. This problem has gotten worse after every print I have done over a week, 4 different items. I checked all the bolt and screws for tightness. I am using files that my son has printed with hi 3 v3 se. Anyone have any ideas as to what might be the problem? Thanks.
Hi
the main cause I have found for a failed print is the print nozzle hitting the printed item and knocking it off the bed. Really frustrating when it is 75% done!!!
I would check all your belt tensions firstly, this seems to be a common problem after a few prints, perhaps the belts stretch a little
then watch this video https://www.youtube.com/watch?v=XKfBrdIKFyQ.
When you do a bed level calibration do you have a lot of deviation between the test points? If you have a lot of difference try tightening the 4 bed screws under the magnetic plate.
Also worth checking the Z offset, after a calibration mine was always around -2.13, I changed this to -2.17 and it made a big difference to the first layers.
This is a lot to take in I know, but if you change things one at a time you will then find what made the improvements. Dont forget if you make a change redo the calibration.
Good luck these printers are a tinkerer’s delight.
1 Like
Thank you!!! My KE bed was pretty flat front to back, but way off right-to-left. The X-axis leveling adjustment in the video you linked is just what I was looking for. So much easier than trying to shim the bed.
Hi again. I followed the video and made the proper adjustments. Both sides are now level. I tightened the belt and all the screws I could find. I went so far to check the level of the print bed and shimmed up the rear of it. The level calibration now shows all readings in the green with very, very slight variations in the numbers. STILL NO GOOD! At 50%-55% of printing the nozzle hits the project and knocks it free of the Bed plate. Up until that happens the print is perfect. I gave the file to my two sons to print on their Enders and they had no problems. Can anyone think of what I should try next? Thanks
Hi
I can only think this is an issue with the Z axis, something is sticking as the printer head goes up.
Look at the 2 screws which raise the print head, the Z axis lead screws.
where the screws go through the X axis (printhead) support you will see at the back 2 bolts either side of the screw both sides which secure a lead screw bearing.
It is important that these bolts are NOT tight, they just need to be snugged up.
This allows for any wobble in the lead screws to be compensated for, it could be the cause of the failed prints.
You only need a tiny amount slippage on the X axis to cause the print head to not raise sufficiently.
Also have you used any lubrication on the Z screws? These benefit with a light coating of a good quality grease, I use SuperLube with PTFE.
Hello @rc-arty …! ![]()
Welcome to the Creality Forum…! ![]()
I assume you are printing PLA and Creality Print..??
A couple things to try in addition to what the other members are suggesting…
It wouldn’t hurt to bump up the temp a little. Even try 220°C or a little more…
Also check your flow settings. If you are too high you will have extra filament that might get in the way of the nozzle.
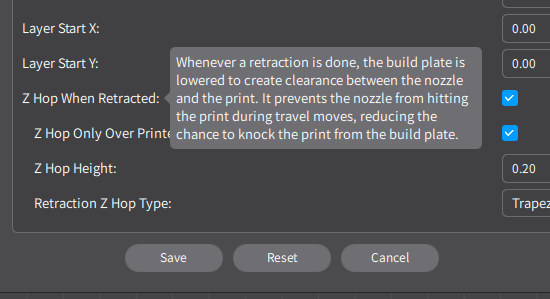
Try the Z hop setting. Make sure that is on…
Try a test print of a flat one or two layer square to see how that first layer looks. Maybe take a pic and post here so we can see how it looks..
Thanks guys. What is the Z hop setting? I’ll try those suggestions and get back to you.
Hi All, I’ve tried all of the suggestions and it’s still no good. I checked with a few friends who have been printing for a while now and after checking their ideas, nothing helped. Between both my sons, who have the same machines, we came to the conclusion that the problem was my machine. With all my frustration I have been going through with it I decided to either give it to my son for a Boat Anchor or return it in exchange for a different unit. Naturally common sense kicked in and I sent it back. My new unit will be here tomorrow so we will see what happens. I have my finger crossed.
As a side note, I was printing 3.5 " x 4" airplanes to give to the young children that come out to my club’s RC flying field on Sundays to watch us fly.
One thing I would like to do is put the club’s letters on both sides of the fuselage of the plane, “PBRCA”. How would I accomplish this? Thanks
That’s a pretty cool idea. I think the kids will like that… ![]()
One way if you are laying the parts side ways to put together each half then using Creality Print or TinkerCad might be an option.
If you are using Creality Print:

It’s a little cumbersome but can be done.
I too had a print head issue, I was printing a tool holder downloaded fronm the creality site, and had noticed that the bed level touch sensor had gotten bent out of shape from being hit by the printed object. These sensors are suppose to be above the print nozzle and should never come in contact with a printed object The sensor of course was damaged,so recently had to return printer back to the store and am awaiting a new one.
My Ender 5 + had that problem, the BLTouch probe was too low, I think the new nozzles I bought were a tad shorter meaning the probe was too low and hit the print. Quick redesign of the mounting bracket to lift the probe up fixed it.
Thanks everybody. I returned the printer for a replacement unit. The new one came yesterday and after setting it up we printed six airplanes. So far, so good. My son sent me a STL file of the plane with outside text on it. I opened the program, sliced it and printed it. He walked me through the steps to add text to another file of the plane and I’m in the process of attempting it now. I’ll let you know how I made out an post a picture of my project.
1 Like
That’s good to hear… Sorry you had to return one to get a good one… ![]()
Your son sounds like he’s pretty good at designing. What programs does he use…?
My son made the file in Creality. I just finished a file of the plane, with text, in Creality. I’m goling to print it after I make myself some lunch.
So i know you gave tour printer to your sons. But i want to help them. Use a carpentry square from the x axis to top of frame. I found using glue stick to and to bed to be no good. My frame was tight but not square. So use the square up top. Loosen the screw on the z rod adjust till even then check bed with the stick. If your frames not even your gonna bind and higher the print worse it gets. Had the same issue fixed it on 2 of my printers hope this helps
Thanks for your advice for my problem. I will keep it in my files for the future. I returned that printer as a defective unit and received another one. So far, so good.
Just out of curiosity where did you buy your printer at and would you recommend buying from that vendor…?
Sorry for not getting back to you sooner. My son is a big “A” buyer for the fast shipping.
Not a problem…
Big A is good when you need to return something… ![]()