Hi all,
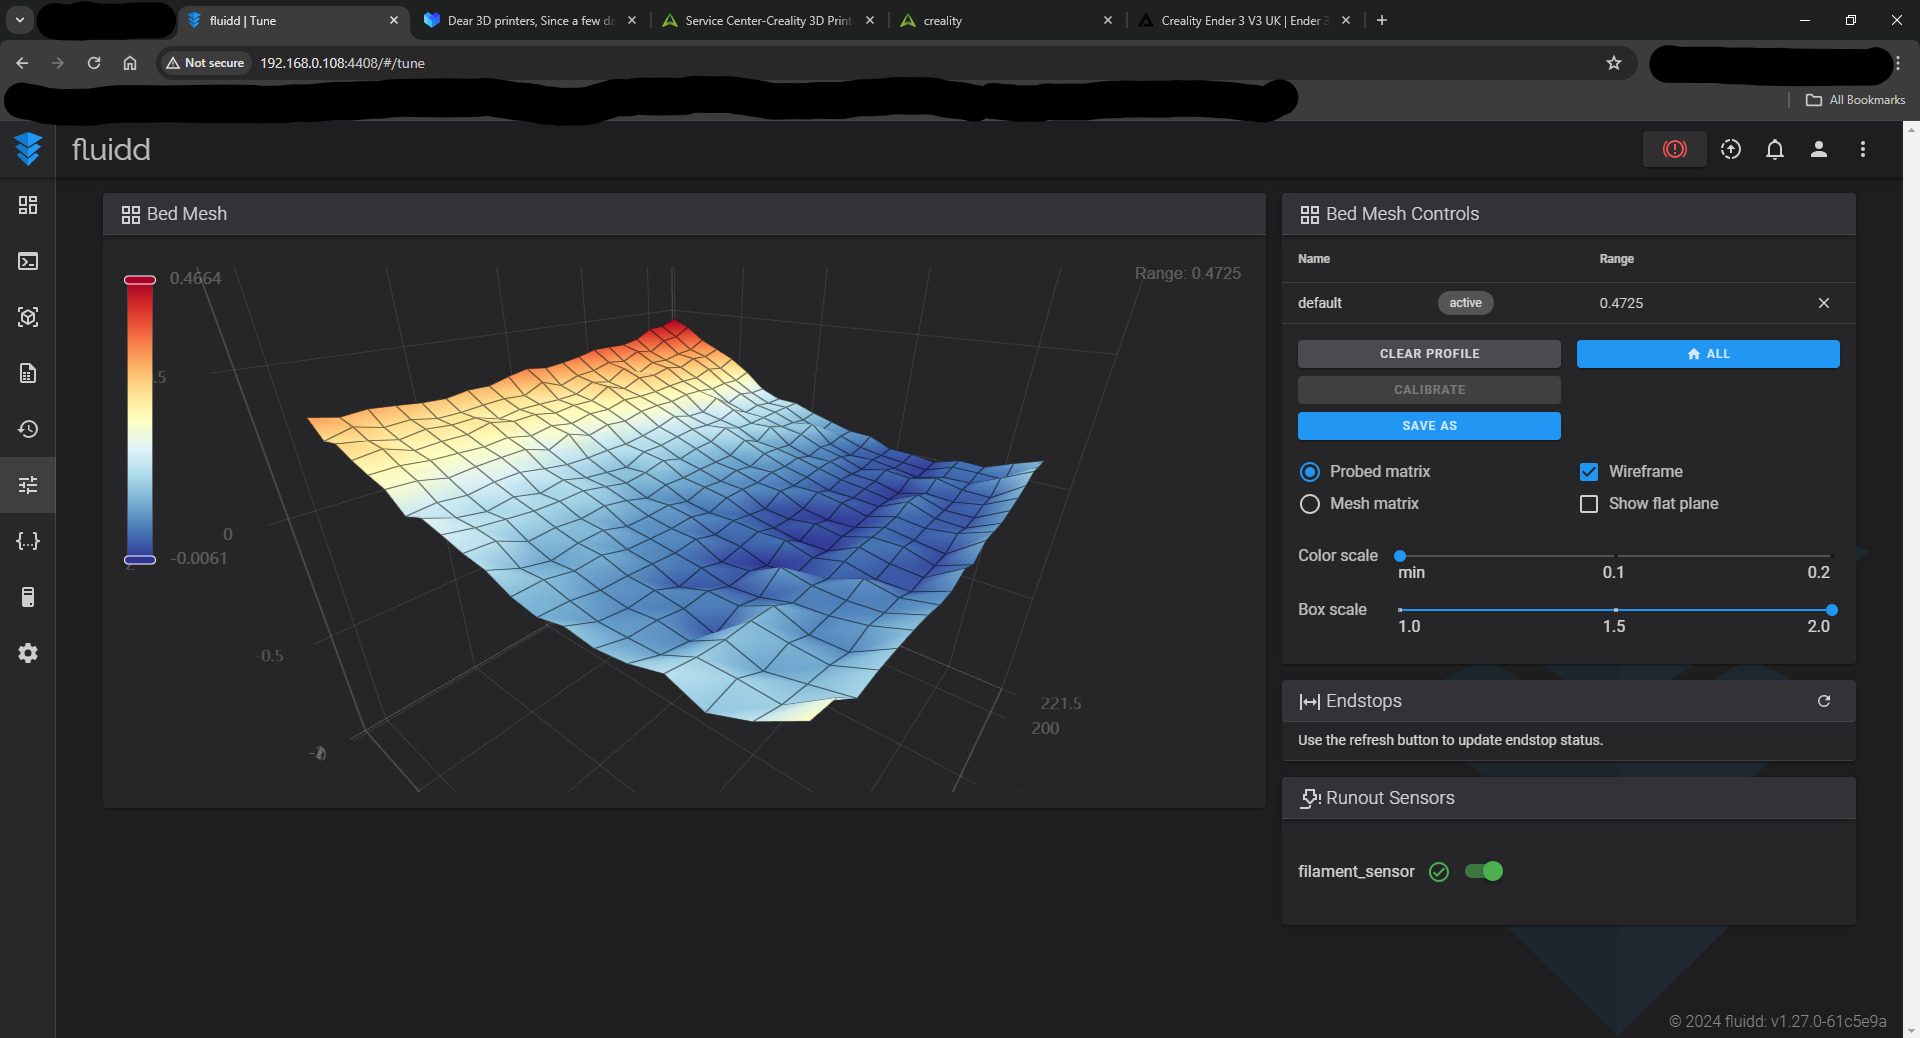
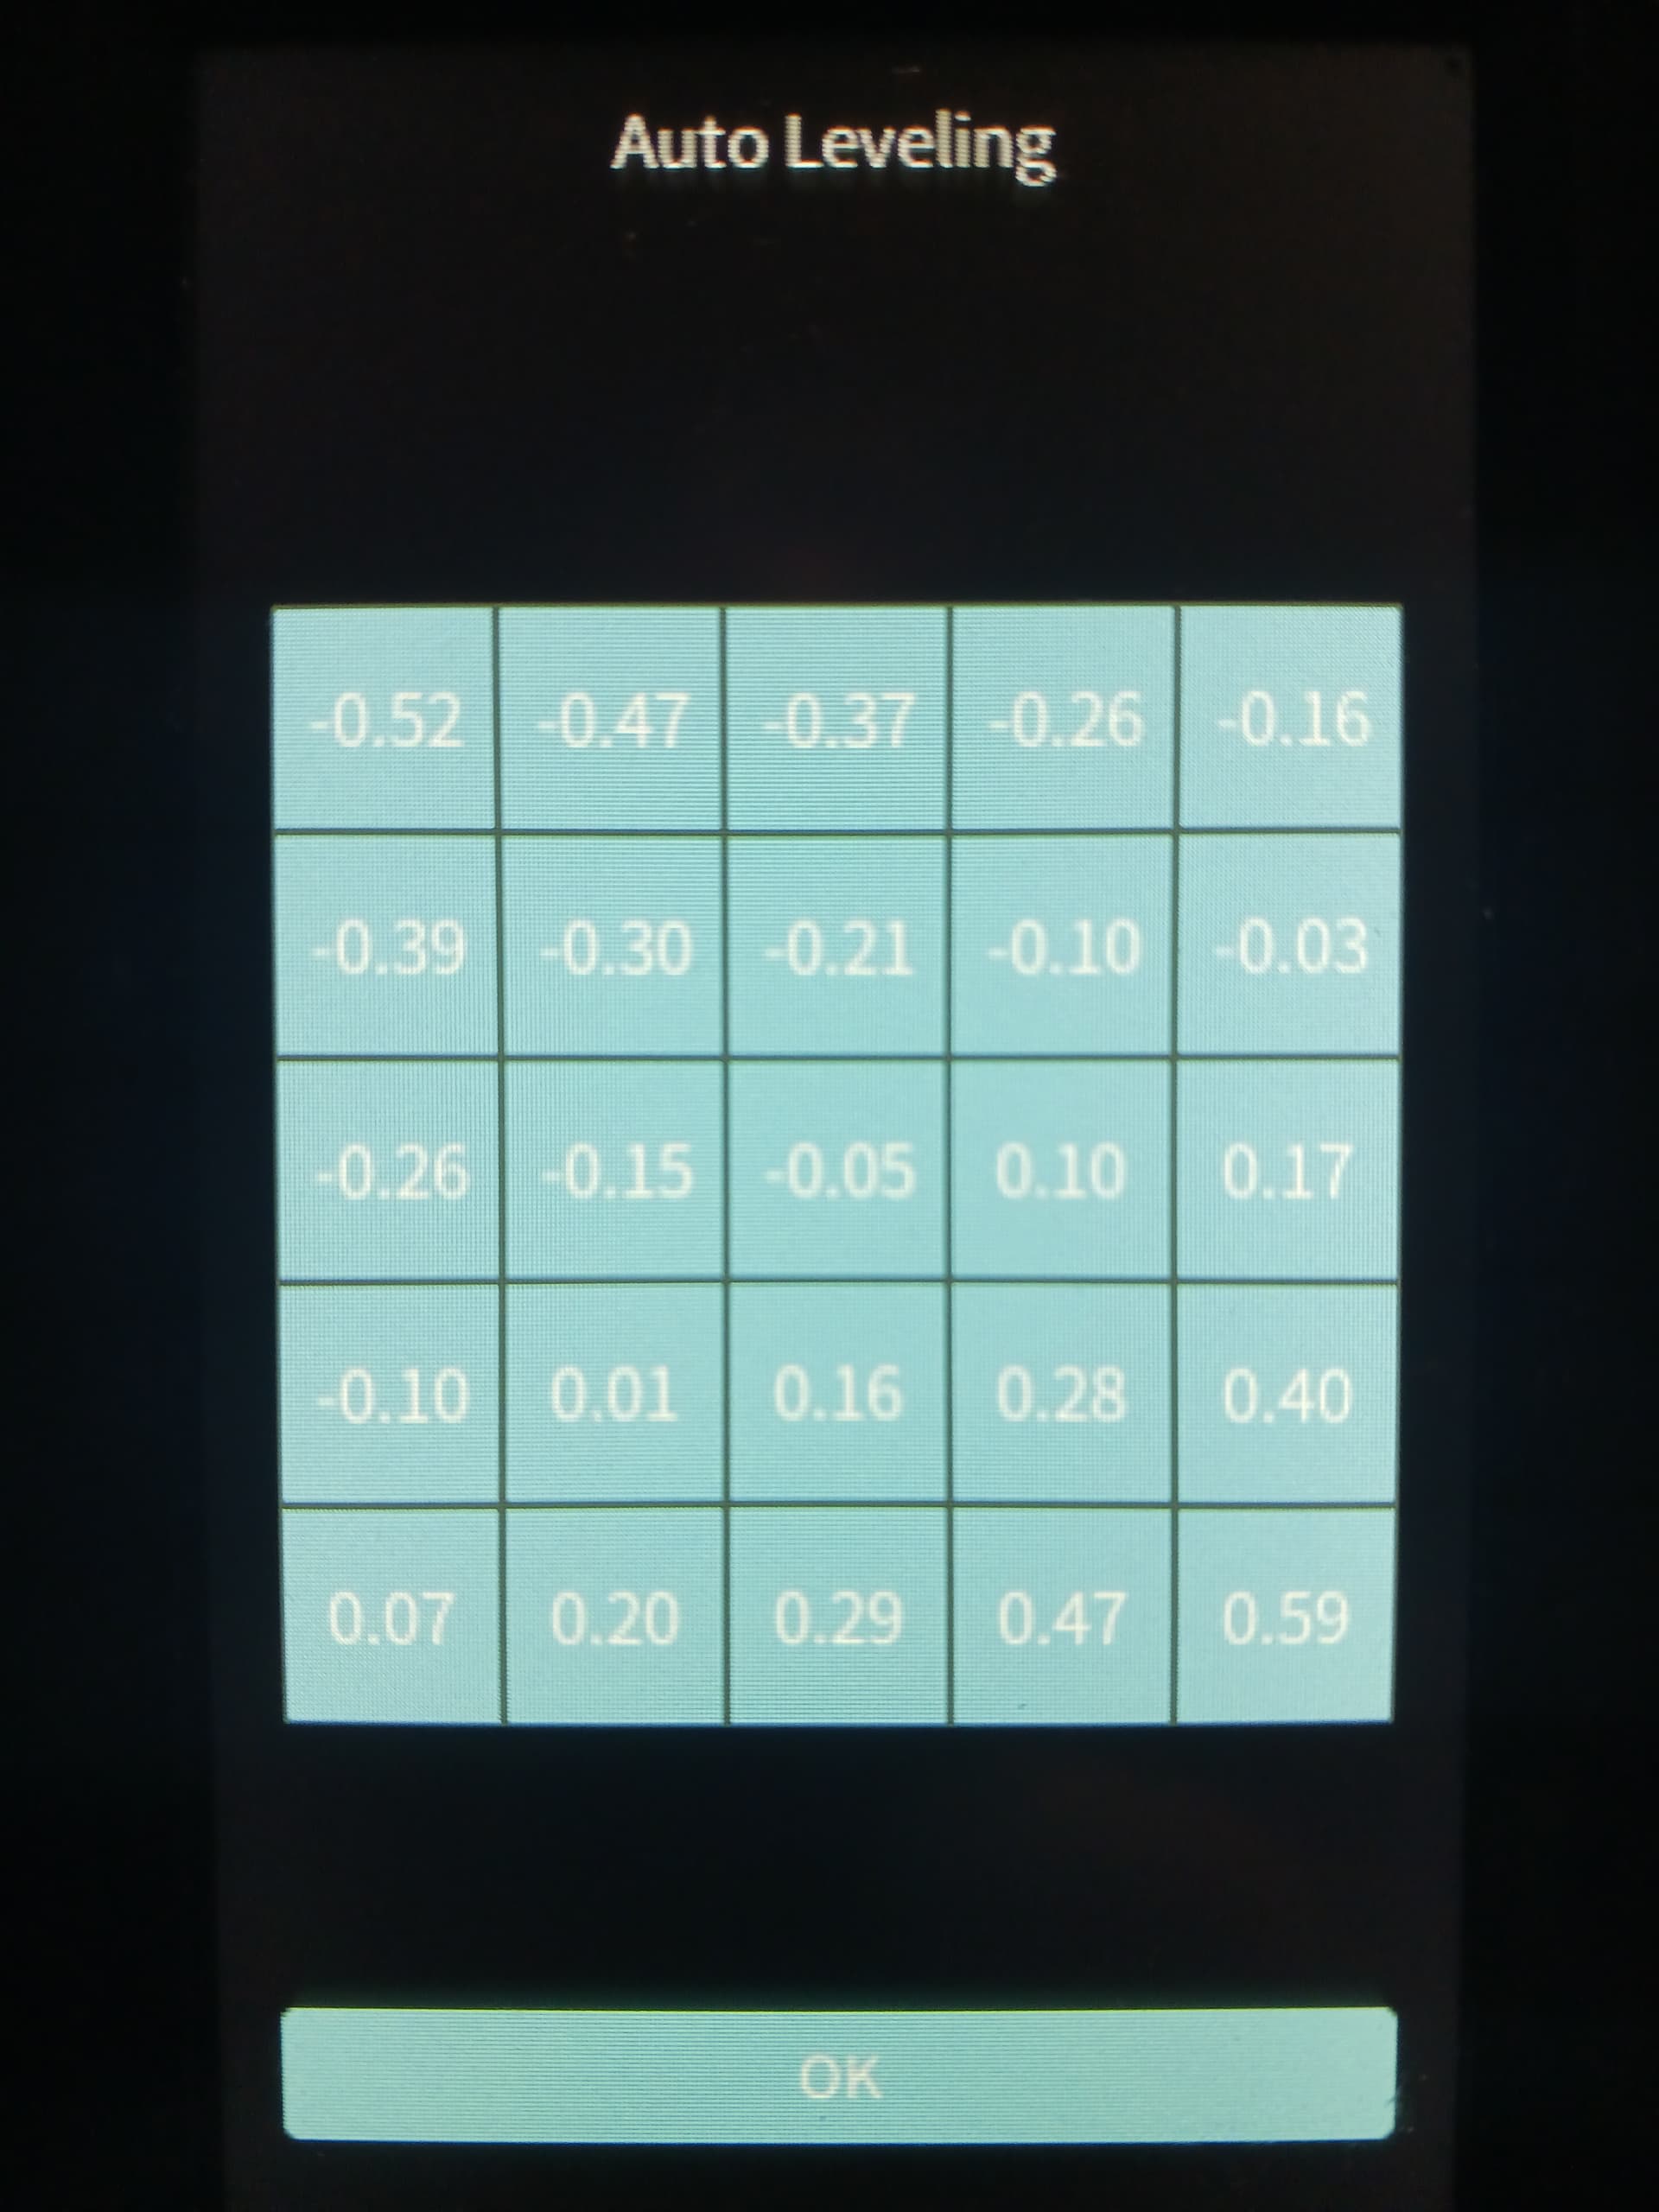
I’ve include a screenshot of the bed mesh i did on my brand new Ender 3 V3. I used 20x20 points to get the most detailed idea of my heated beds levelness and it doesn’t look good at all. The range is 0.4725mm from highest to lowest point.
Seeing as how it isn’t possible to adjust the corner height on the bed I would have expected that the quality of the beds would be higher than on previous versions, especially since the Ender 3 V3 is meant to be the new flagship bed-slinger from Creality. That doesn’t seem to be the case though.
I wonder what Creality have to say about this.
NM
How are your prints turning out…?
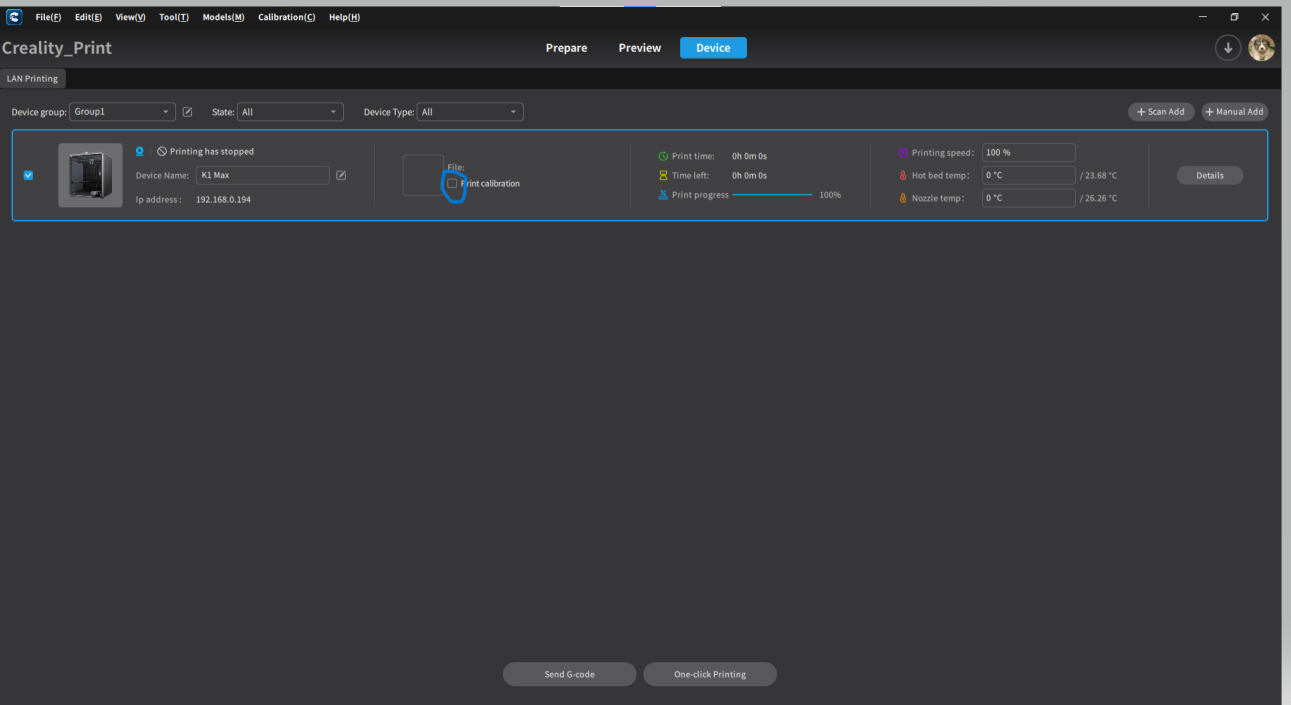
As most beds are not perfect the printer uses the mesh data to compensate for the nozzle height during a print when you check this box in Creality Print.
(Pic shows K1 Max but the same for my Ender-3 V3)
Hi,
The bed mesh does a good job but not good enough. With a bed warped like that I’d need a far more dense bed mesh to get perfect first layers and I’m already using a 20x20 bed mesh. I have two other Creality printers and their beds are nowhere near as bad as this bed is.
I’ve been thinking of using some layers of aluminium tape on the low spots of the bed to level it out by sticking the aluminium tape on the magnetic sheet. Not sure if that will affect how well the magnet works though. I’ve seen other people do it on YouTube and it can work.
NM
That’s a good idea.
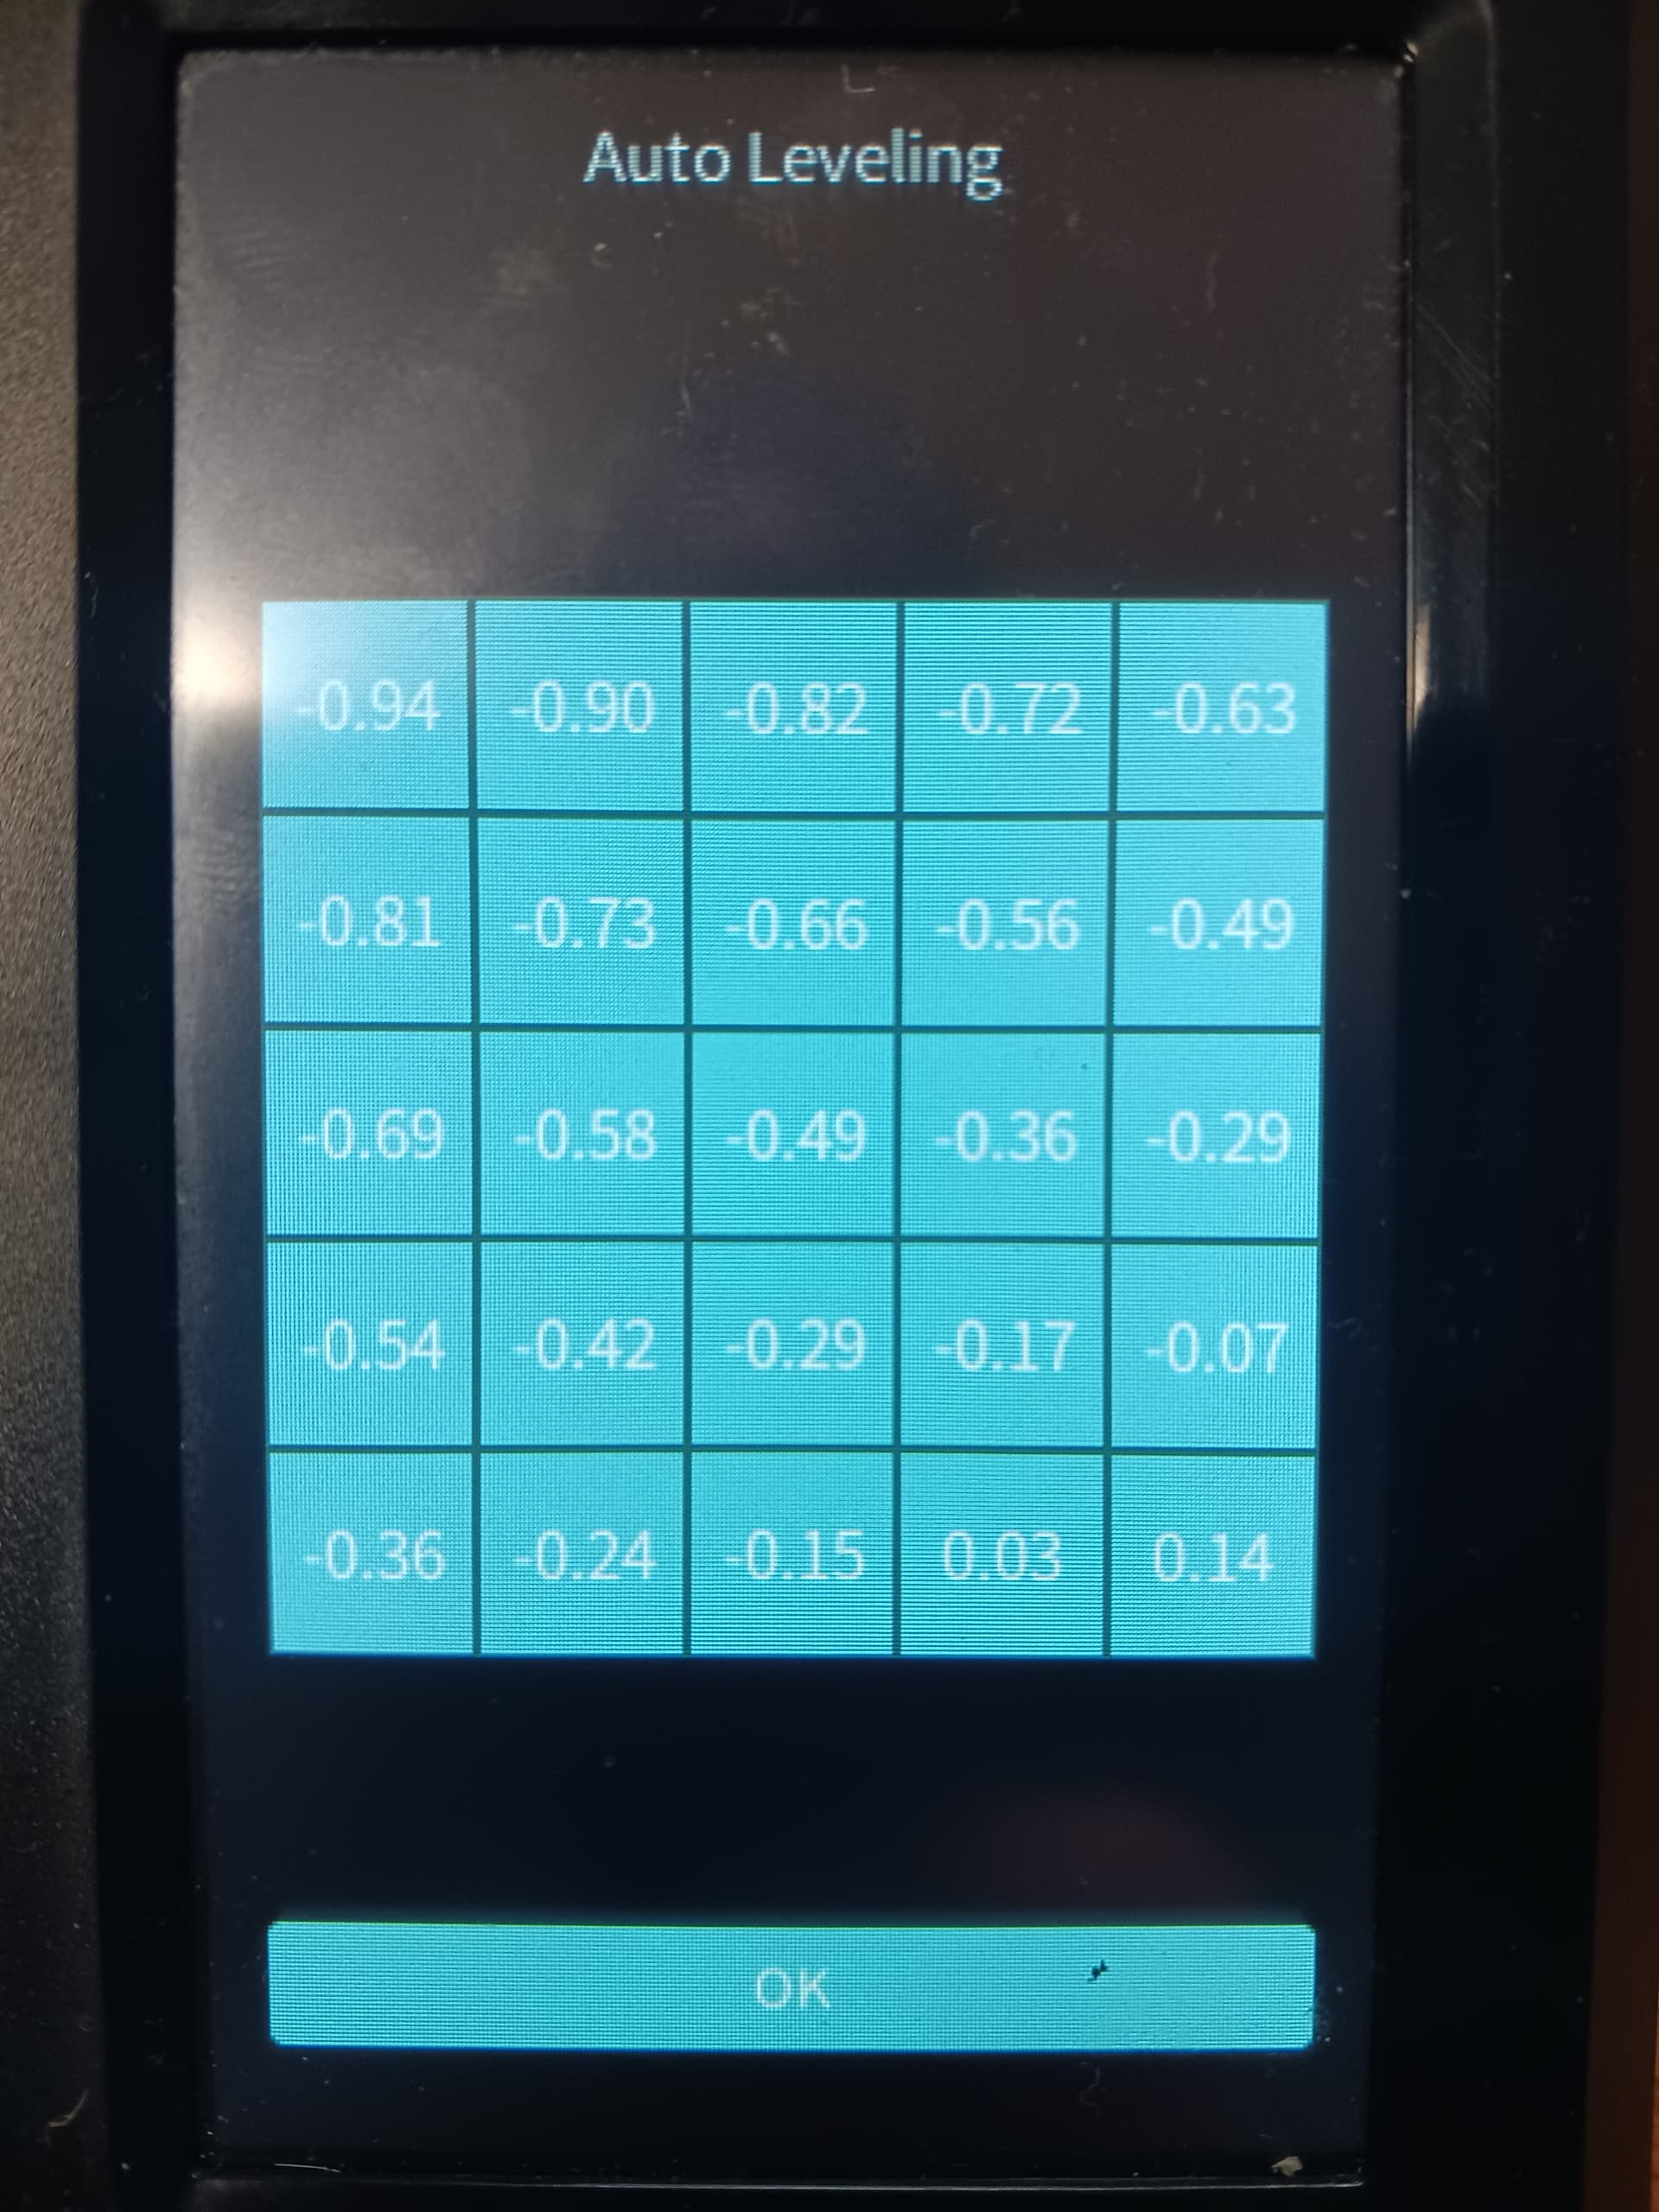
Using the printer’s screen on the Ender-3 V3 to do calibrate it uses a 25 x 25 point grid.
Also, I’m using fluidd not Creality Print. Much better interface.
You can see the port number to use in the screenshot.
http://192.168.0.???:4408
Although your ip address will be different you can use
:4408
after it to access fluidd.
NM
2 Likes
Thanks for that info. I like the information it gives out…
Take me some time to understand it all though… 
Today I had level issues on my V3KE after a very good run of successful prints. I had 4 consecutive (almost) identical prints print great and the 5th one failed miserably. None of my settings were changed at all. Luckily I caught it early otherwise it would have been return of the Blob.
After trying 4 times and failing 4 times I decided to run another auto cal. I studied the mesh numbers and placed strips of 0.1mm copier paper in the low spots and while there was definitely a noticeable improvement in the problem areas, it threw the fine areas off.
@NuttyMonk I don’t think it’s possible to achieve near perfect mechanical level by shimming because it’s so sensitive. Hopefully I’m wrong and you will level it perfectly and post your results and method!
I’m wondering why the 5th print failed after behaving on the others…?? 
Are you checking that calibration box to see how that works…?
I don’t know if this does anything useful but out of habit with my PC I reboot the printer once in a while. Maybe it slowly loses it memory (mind  ) and has to refresh…?
That is a mystery to me. The only thing I can think of is that I forgot to uncheck “print calibration”. Checking that almost always ruins prints by totally recalibrating the bed and Z (which is always too high).
I am still 100% confused as to the function of the “print calibration” check box in Creality Print and just exactly what it does. I can’t find any real explanation from Creality and like I mentioned before, I always thought it would apply the auto calibration parameters so the first layer would be “perfect”. Well, such is not my experience. I usually turn off my printer a the end of the day and when I go out so I guess that counts as rebooting(?) It may very well be it looses its memory and subsequently makes me loose my mind! 
I totally agree…! Mysterious machine… 
Maybe try using fluidd like I mentioned above
http://192.168.0.???:4408
Although your ip address will be different you can use
:4408
after it to access fluidd.
fluidd is a better interface and if you save your bed mesh as “default” it will reload automatically every time the printer starts so you don’t need to worry about it after it has been done once.
NM
That works great on my Ender-3 V3 but for some reason Fluidd doesn’t want to connect with the K1 Max. I am able to connect with just the IP or Creality Print.
It might not be installed on the K1 Max. They might not have fluidd or Mainsail installed at all but if you want to try Mainsail you can use 24 instead of 4408. That is the port for Mainsail which is basically the same thing as fluidd with some slight differences. It could be worth a try.
NM
0.427mm, less than half a millimetre? I would be really happy with that. My SE is ±0.4mm so a total of 0.8mm, the autolevel takes that in its stride. Before I modded my KE I think that was almost 1.5mm across the corners, still printed ok.
When you say “modded” do you mean adding those linear rails?
Also one question: Does the GCode saved on the nebula pad include the Z offset adjustments made on the pad itself or just the slicer settings? I’m trying to figure out why now I went from about 6 successful prints in a row to where I can’t even print a test “X” and I changed absolutely Zero settings!
Amazing, this is exactly what I needed! Thanks for posting this!!!
Have you got enable Z offset enabled in the slicer? I think that that becomes cumulative unless you do a calibrate every print. I do a full bed levelling from scratch, then manually add/subtract that Z offset, I will do that on a skirt and when it get to the first layer look to see if it chews a little, if it does back it off 0.01mm until it it just right. It pretty much stays with that setting then.
No I keep Z offset off in the slicer. Your leveling procedure seems identical to mine. As of yesterday I haven’t had one successful 1st layer. It behaves very weird. I can get a skirt or brim down and the print start fine but when it hits a low spot there’s no compensation and everything is a mess.
I did disassemble the bed and found the left rail is solid and doesn’t move at all but the right rail has some play which probably contributes to my issue. Everything is tight so I believe that rod is slightly bent or warped or the seating it’s in is a-normal. My money is on the rail.
Didn’t want to have to but I guess my next step is to mod it like you did.
It’s like having toddler running around: One minute nice and calm and the next all over the place.
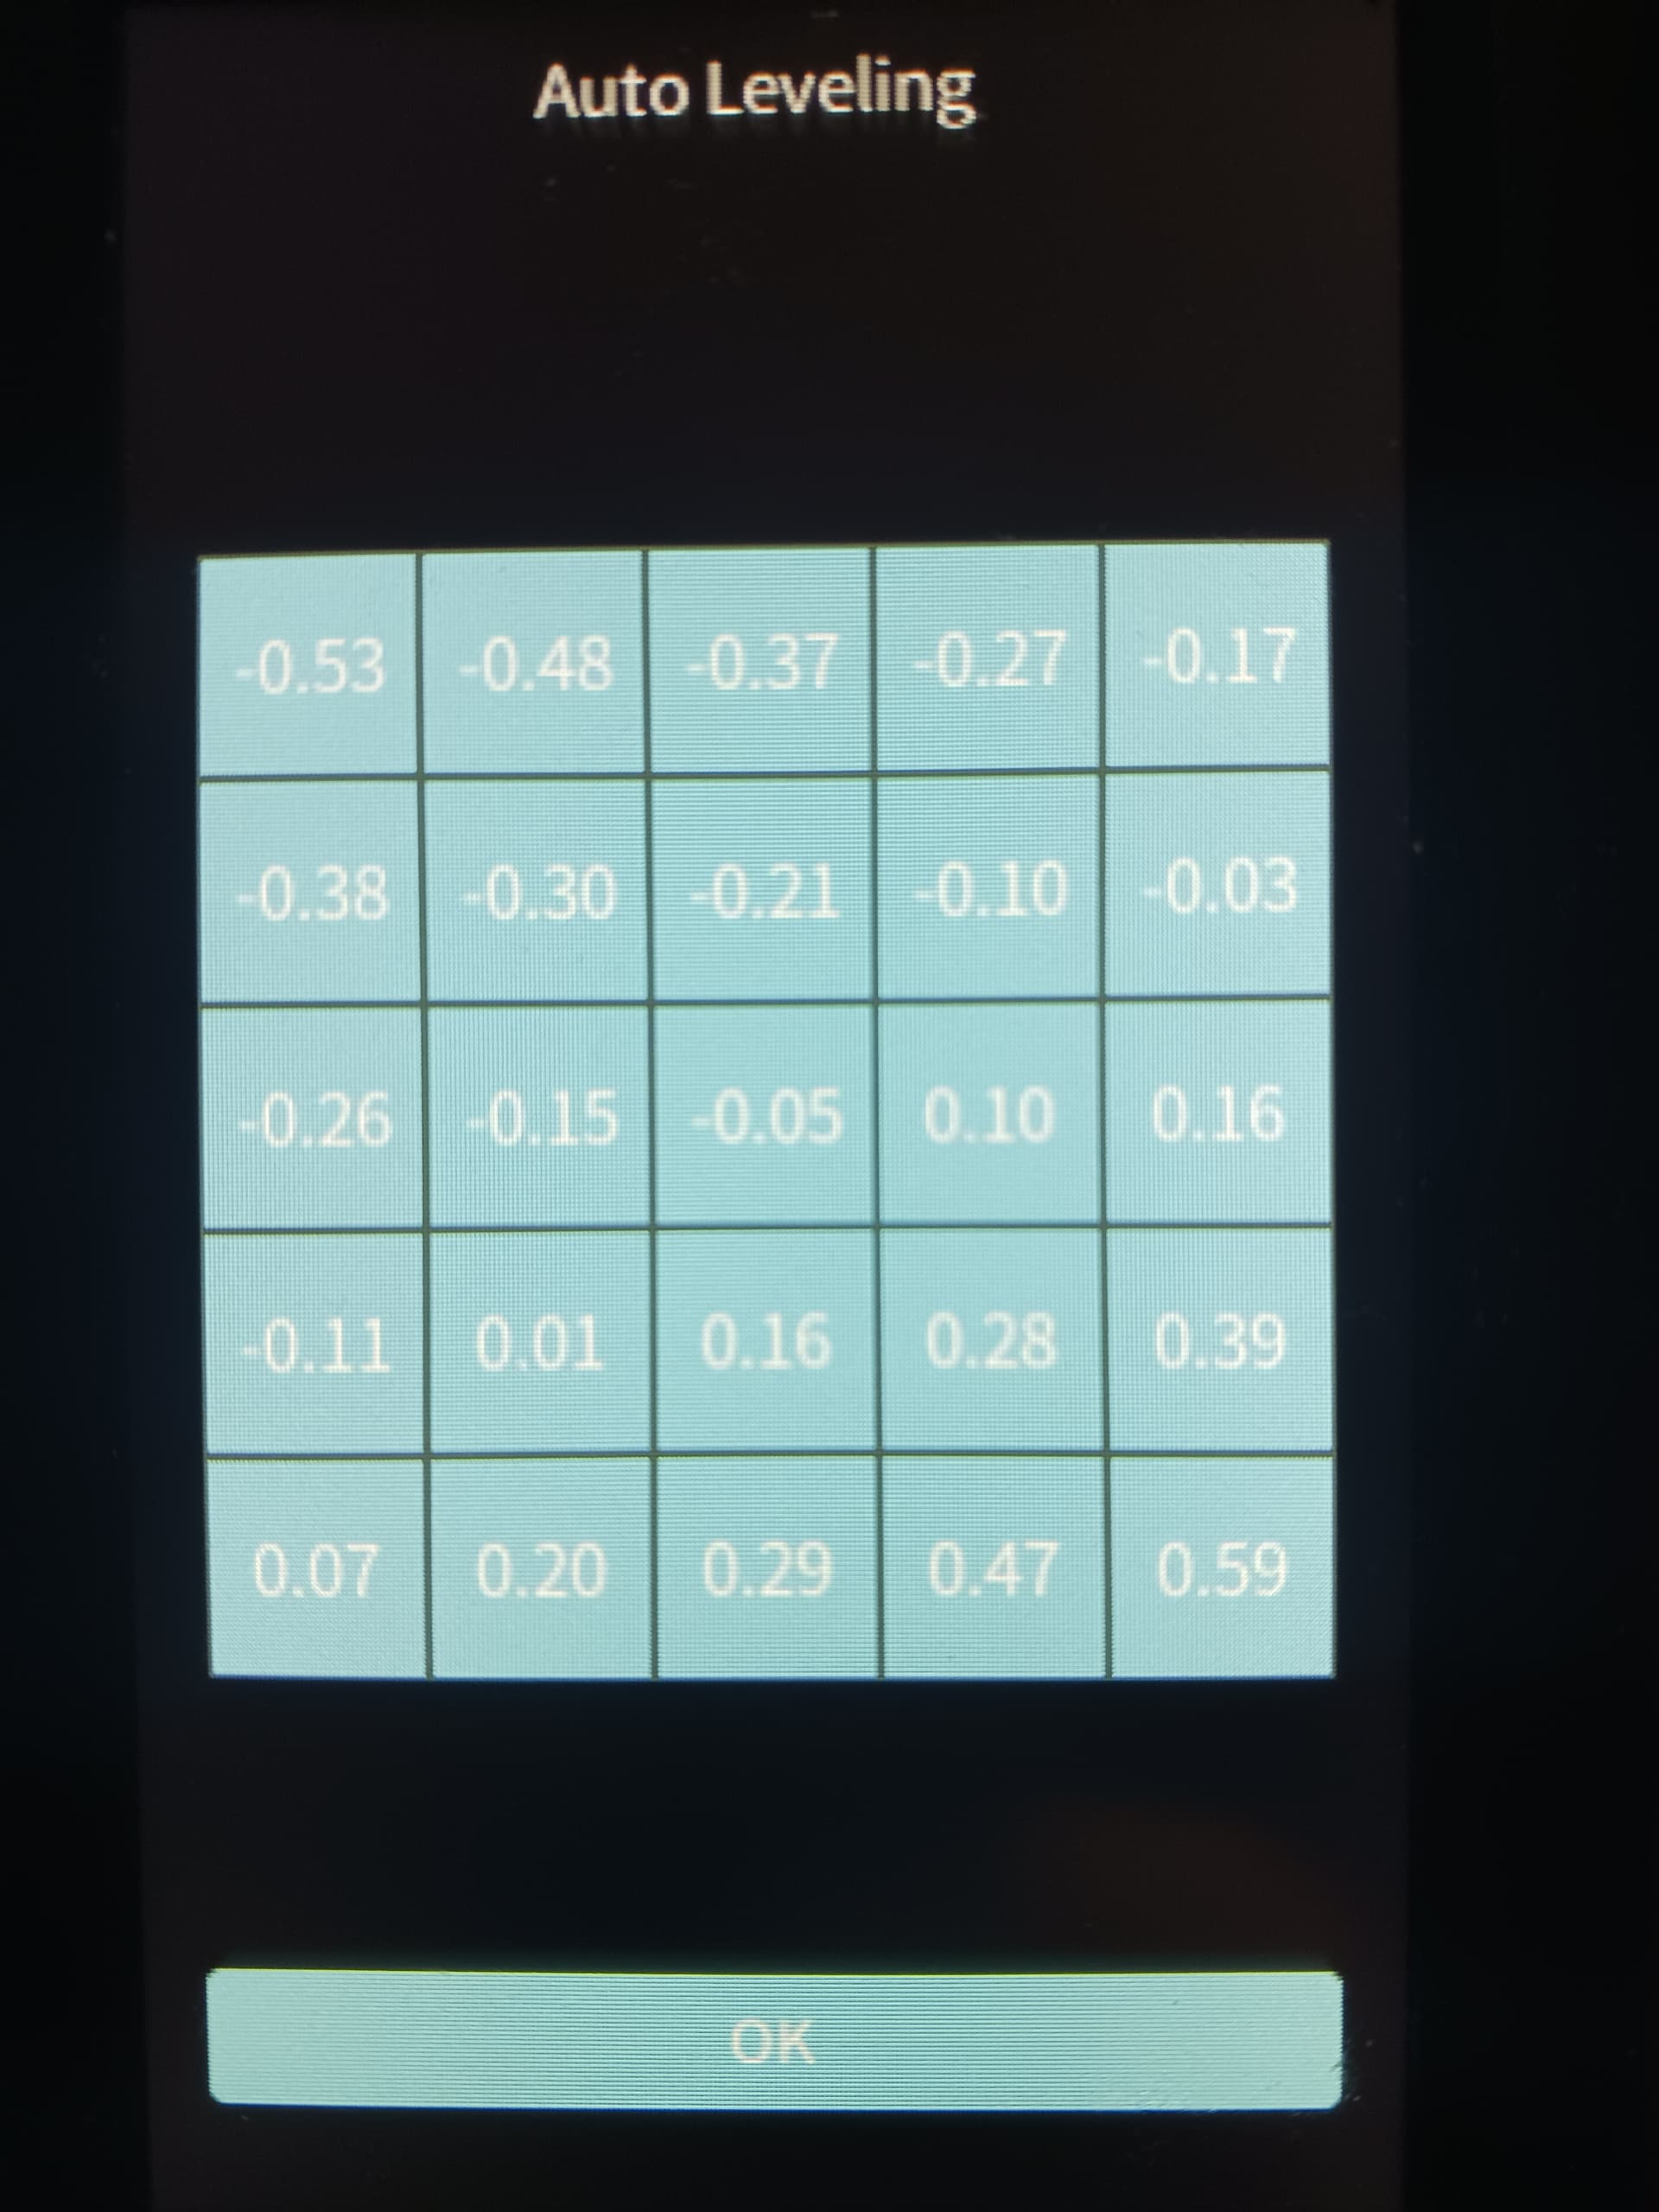
3 consecutive days of lost printing due to level issues. I just did three consecutive auto bed & Z levels . Notice the huge difference between the first one and the other two. I’m not sure what’s going on there but it’s preventing successful first layers. Maybe my CR Touch is (sporadically) faulty? Not sure how I would go about testing that.
Very Strange UPDATE:
For “laughs and giggles” (more like tears & pain) I decided to rotate my build plate and print the same exact test 4 times (90°) each print to see if that had a bearing on my fails. Well, what did I find? The fails were in the exact same spot regardless of the plate on the bed. So I (once again) cleaned the bed and specifically that area with IPA and placed some adhesive in the problem spot. When I laid down the adhesive in that specific spot you could see a part where the adhesive would not stick as well to the area. I ran another print and I’ll be darned that solved the problem. Now in fairness to me, I clean that plate with IPA every other print. I guess this is another notch in my builders belt.