If anyone wonders why the K2 Plus has issues with the first layer

Since I have never been able to achieve a consistent first layer on my K2 Plus, I decided to conduct a small experiment, which you can see in the video.

When printing PETG, the printer’s calibration starts after approximately 4 minutes, informing the printer about the deviations of the build plate.
After around 6 minutes, the print starts. When you look at the time-lapse of the build plate approaching the nozzle, it’s not difficult to understand why the crucial first layer never turns out well.

Creality now acknowledges that they have issues with the heated beds and says they are working on a solution. The question is, how long do we have to wait…

1 Like

I’m also facing issues with the first layer, basically what you described. I’m with the machine for 3 months, started really using it an month ago and they just sent me a strain gauge to replace. I read somewhere else the guy was able to replace the strain gauge with a cartographer and this solved all his issues with it.

I just received a new strain gauge from Creality but I’m not confident it will solve anything. But it seems reasonable to think this bed mesh / compensation system is the culprit.

Some prints work, and when they work it is great. But it is always a hit or terrible miss. When it fails it is not a simple fail, it clogs the nozzle or something.

Hey Ching! :wave:

First off, thanks for sharing your experiment. I know it can be frustrating when the first layer just won’t behave, and I can tell you’re digging in to figure it out.

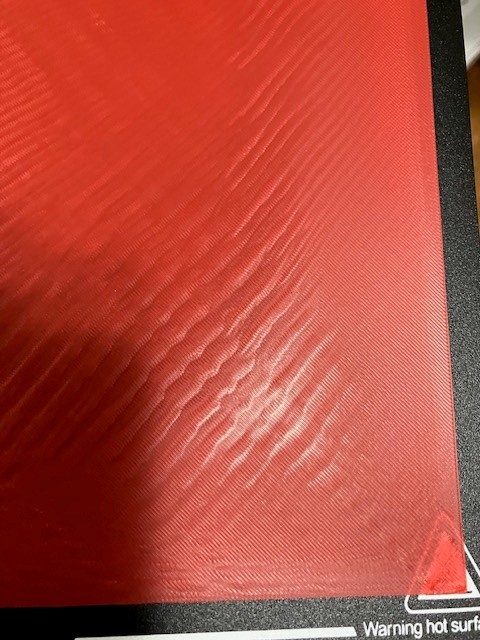
That said, what you’re capturing in your video is actually totally normal behavior called thermal deformation.

Let me explain real quick:
Aluminum is used in most heated beds because it’s great at conducting heat and relatively affordable. But with that benefit comes a tradeoff… aluminum expands when heated. Your bed is going to grow in size as it warms up, and since it’s bolted down, the expansion has nowhere to go but up. That’s the “bowing” effect you’re seeing in your time-lapse.

When folks suggest “heat soaking,” they mean manually preheating your bed before starting the print. For PETG, I usually preheat the bed to 70°C, let it sit for 10–15 minutes, then calibrate the mesh. That gives your bed time to fully expand and stabilize before calibration kicks in. You can do this in Fluidd, or on the printer itself, before sending/starting your print.

Your video noted that PETG takes around 4 minutes to heat before calibration begins. That heat-up process is enough time for deformation to set in, and if you haven’t pre-soaked, it can throw things off as you captured. So the trick is just get to your final temp first, give it time, then calibrate.

Extra Notes from the Trenches:

High-temp filaments like ASA, PPS, or PA bring another fun challenge: gantry deformation! (Don’t worry, that’s a future rabbit hole :sweat_smile:)

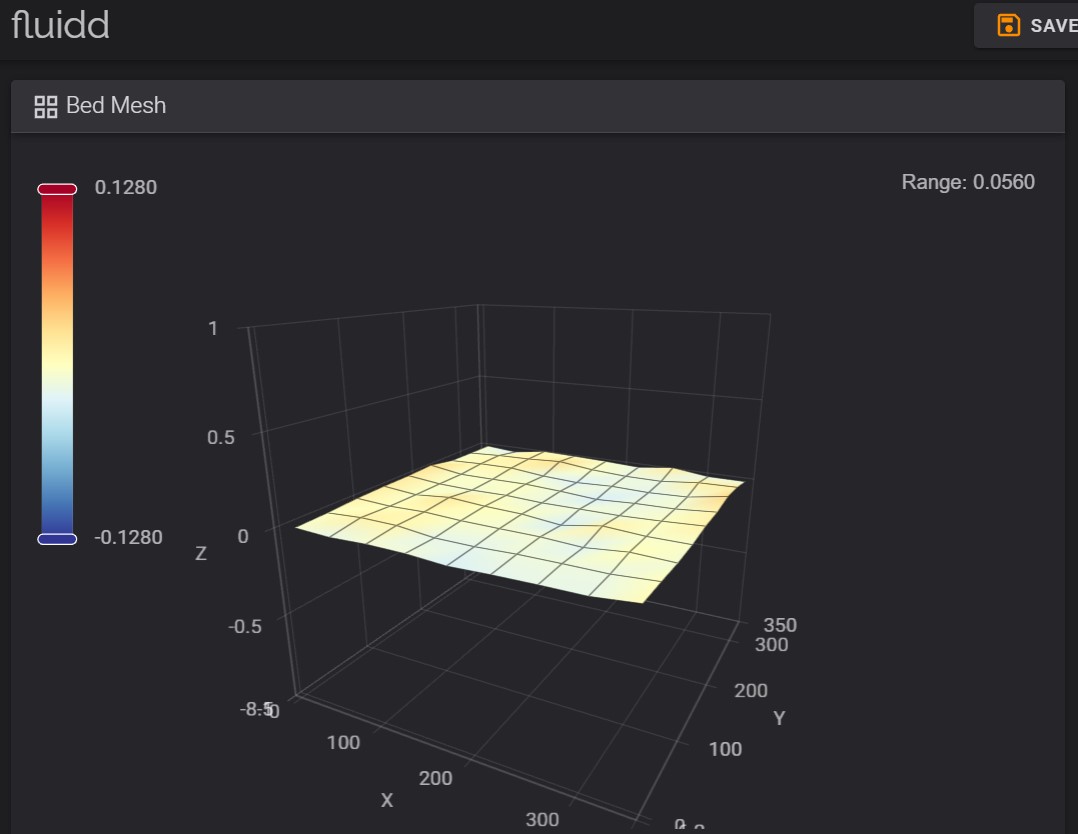
And yeah… I get it. It’s easy to hyper-fixate on these tiny inconsistencies (I’ve been there). That’s how I ended up designing the IRON3D Grid Daddy leveling kit and a dial indicator mount. One of my K2s is dialed in to a bed mesh deviation of .05mm, the other to .07mm at 50°C… but even then? First layer isn’t perfect. Just very, very good.

And fun fact: my Creality Hi actually gives me more consistent first layers! Mostly due to size and mechanics.

Z-offset also shifts with different materials. Heck, I had to adjust mine just between Hatchbox and Zyltech PETG. It’s all part of the game.

My Suggestions:

  • Preheat your bed to full temp first, then calibrate.
  • Try not to obsess over first layer perfection… With K2s, edge to edge perfection is a myth unless you’re using borosilicate, CNC-milled beds, or graphite plates. Not saying a grade A- or a A isn’t achievable.
  • Reach out to Creality via WhatsApp instead of email - faster response, and still gives you a paper trail.
  • And give yourself some grace. These machines are incredible but not magic. You’re learning, and that’s half the fun.

Also, I’ve had the homing issue too! Once was enough for me to never forget to rehome again after powering off mid-print :man_facepalming:The sound it made nearly required me to change my pants. HA!

You’ve got a great machine, don’t give up! Happy printing!

Josh (aka Iron3Dad)

Did he solve this issue with a cartographer?
Creality has sent several strain gauges that I have tested, but unfortunately it has not helped.
I did another experiment by printing PLA on a cold build plate, and even then the printer failed to get a good first layer. This makes me suspect that the software is not optimized enough. So, a warped build plate combined with non-optimized software are not good conditions.

I agree, the printer produces really good prints when it works. It’s just that it fails to do so too often.

I’m probably not as enthusiastic as you are about this printer, as I’ve mostly had issues with error messages and poor prints. It’s not fun at all, just frustrating!
I didn’t buy the printer because I think it’s fun to experiment, but because I need a reliable machine that can eventually replace my old Prusa.

What I normally print is completely dependent on a good first layer. It doesn’t need to be perfect, but the way this printer functions, the first layer is not even close to being acceptable.
What I tried to explain in the video was that I have preheated the bed up to an hour before calibration without any improvement. It’s not until after about an hour and a half that it becomes somewhat stable for calibration and printing, but even then it’s not acceptable. Even if the prints after such a long preheating would be good, I will never accept such a long preheating before a print.

Furthermore, I believe that if a manufacturer cannot keep the deviations of the build plate under control, they have chosen the wrong path.
Of course, aluminum expands when heated, but if you cannot choose the right manufacturing technique and eliminate stresses, you get the kind of side effects seen in the video.
A deformation of 0.52 mm in the heated state is not what I would call normal for a 3D printer build plate, which Creality now also acknowledges and will develop a solution for.

I did the same experiment with my Prusa i3 MK3S and that build plate stayed within 0.02 mm during the same time period as the K2 Plus.

If you buy a machine with this print volume, you should be able to assume that you can utilize that volume without having to compromise the quality in certain areas of the build plate. Otherwise, why would you spend money on such a machine?

Yes, he claims to have solved the issues.

He said it is much faster and much more precise to create a 100x100 probe mesh. Problem is it needs a kernel hack/custom firmware.

Hey bro, you gave me some hope. I don’t need super perfect first layers, just good enough. I tried heat soaking but the mesh was even worse. Anyway I calibrated 100C (I’m using mainly ABS) .

Whatever you can tell me to try to get something working I would be really grateful. I’m trying big prints (the reason for buying k2 plus), but because of the inconsistencies regions of the bed will smash the filament and even make it clog. I just need it get past the first 2 layers good enough. When it happens, prints look great. I have just replaced the strain gauge and will try a new print. I don’t know what else to try next.

Thank you!

1 Like

Thank you for the information about the cartographer. Very interesting!
However, it is lamentable that one has to take such drastic measures to get the printer to function as it should.

We’ll see if Creality finds a solution to the issue with the heated bed, otherwise I’ll have to retire the K2 for perhaps future experiments and buy something that works right from the start, like my Prusa, which has been reliable from day one.

I have just changed the strain gauge and then I also did something else and I was able to print the model I couldn’t. First layer is still not perfect for the whole bed but it improved enough for this.

1- I made my bed mesh better by increasing the grid from 9,9 to 11,11 - I still want to try 13,13 (slow) and maybe increase interpolation points from 2,2 to 5,5 . This is where the cartographer shines - it can do a 100x100 grid in less time then the stock probe can do 15x15, and having a high resolution mesh seems to really help more in compensating.
2 - I added a 0.2 z-offset

The first attempts I made at z-offset were too big and I was not patient to test 100 times. This time to find the right one I sent the first layer test and changed z-offset on the fly through the printer menu in gear > expert > z-offset so I could test quickly in small 0.01 increments and I could already see how it responded during printing.

Hey Ching. I was finally able to print a good first layer test

The z offset strategy did not work for everything and I had to keep changing it depending on the size of the print. So I gave up zoffset.

I finally changed my bed mesh resolution to 13x13 with 3x3 interpolation. Then I calibrate for every print. This adds time to the print but at least I was able to print a good first layer across the whole bed, even though my bed deformation is around 0.95.

I hope it helps. I swear it brought a tear to my eye.

Note: I tried changing the mesh resolution many times and thought it was getting stuck when trying to print after the change. The thing was that my bed was 100C for calibrating and Creality print has a start routine that makes it wait for the bed to be at 50C to do anything . I didn’t realize that and thought it was broken and rolled back to the previous grid every damn time, and it seemed to work because it took so long the bed was cold already and the print started faster. Just in case you go through the same.

2 Likes

Hi JP11!
That’s great to hear! :slight_smile: I hope it remains consistent between prints.
The problem I’m having is that what works for one print doesn’t always work for the next. Even though I preheat the build plate, the first layer is rarely the same, even when printing in the same spot.
I’ve also tried the 13x13 mesh resolution, but that didn’t improve anything, the procedure just took longer, for natural reasons.

So your bed need to cool down to 50°C before the printer calibrates it? Perhaps it’s because you preheat the bed to 100°C?
I always preheat my bed to 70°C since I mostly use PETG, and the bed maintains the same temperature from preheating through the completed print.

Where is the mesh resolution?
I’m trying to dial my bed in. Last calibration I ran after manually adjusting the four bed screws claims 0.3-ish deviation. That’s at the standard temps, as I’m currently testing with Creality Hyper PLA.

What I see, is that I get diagonal ripples or ridges (not certain how to describe them) when I do the full plate single layer print. I asked Creality support about this, posted some pics. Printer is less than a month old, and arrived without any obvious damage during shipping.


Here are a couple pics, you can see the ridges/ripples…

I was having problems with inconsistent first layers and found if I used the generic PLA preset in Creality Print I was able to finally able to get consistency. I adjusted Z offset and first layer line width to get perfect first layer. I have tested this on SILK, PLA HS and matte PLA all using the generic PLA preset and all were perfect. I have a roll of Esun PETG HS that I am going to try today on the generic PETG preset.

1 Like

PETG worked great.
To explain further I use Esun filaments exclusively as they work well in CFS and are easily obtained and priced well. Initially I was using the hyper PLA preset as the Esun PLA is High Speed (HS). This was causing inconsistent first layer test prints. My PETG is also HS but tested on the generic PETG preset. I hope this maybe helpful to others as I had a lot of frustration trying to get Z offset correct and spent a lot of time and filament before finally getting a good result.

1 Like

Check out extruder calibration in the wiki:

1 Like

Thank you… I’ll check into that.

I ran the calibration last night. I think it helped, though hasn’t eliminated the issue completely.

I also saw improvement, but not elimination, of the diagonal “waves” when I ran the calibration a while back.

Thanks. I’ll continue to check into things.