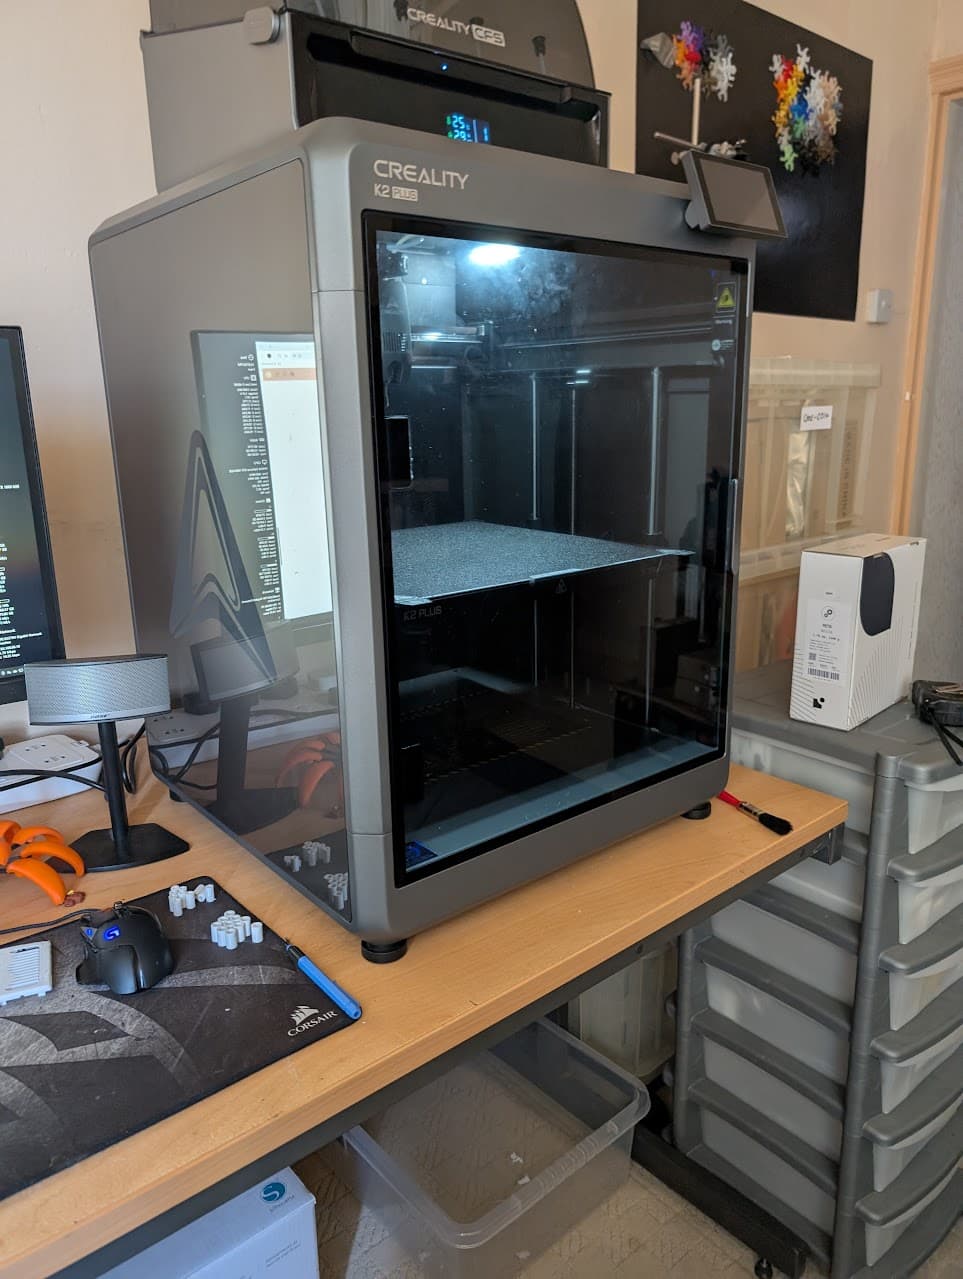
The desk my printer is on is sturdy, but supported asymmetrically - the metal uprights are only about 15cm from the back wall, but 60cm from the front of the desk. As a result…yeah, things move a bit when the K2+ is getting it’s freak on. I am thinking this is Not A Good Thing (Winnie the Pooh capitalisation intended).
I was thinking of bracing it with some timber parts, or maybe threaded rod. The printer wouldn’t move from it’s current position. Would I have to run Input Shaping again on the modified, hopefully less bouncy desk?
I would run it again once finished, the “different” platform will react differently. I moved my Qidi Xplus3 to a different desk and it was totally different in how the printer reacted to the movement in that desk. It is now back to my proper welded workbench, you could stick a big old Myford super 7 lathe on that and it wouldn’t move.
Yeah my options for new support surfaces are limited; small terraced house…so even if I COULD manhandle something upstairs, it has to 1. fit the narrowest, steepest stairs in the world and 2. not go through the floor!
Sure…the issue is there’s not really any fixing points so I’ve either got to drill through the metal (which is very hard, I’ve tried before) or create some sort of channel to fit around the metal box section. Timber was my first thought, but that changes dimensions with temperature and humidity…that’s why I wondered about some sort of heavy duty threaded rod which would enable me to adjust and allow for changes. There of course might be some 3D printed parts involved!
Even though the printer sits to the far right of the desk, I was thinking I’d have to mirror the support on the left hand side too for it to be completely effective.
I don’t think you would have the problems with Merbau wood.
That desk is not really the best design to use for something that heavy and vibrating.
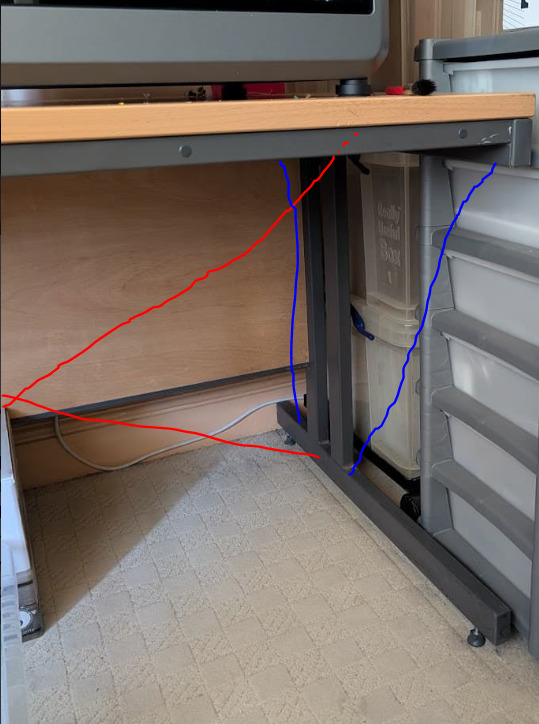
I don’t see front struts ??
A cross bar at the back and in the front would help also.
If you are good with wood, you could make some 90deg brackets that attach to the wall and come just past the 2 uprights, with a hole in it between the uprights to use a bolt that goes through another piece the other side of the uprights and they clamp together.
I do have a bit of experience from an engineering perspective on this challenge. I am not going to stake my 35 years of experience on this fix though, lol.
There are some other anti bouncy bouncy at your place (Monty Python) options.
As you noted, the timber that would be needed is big and subject to dimensional change but that would not matter too much. Desk carcass is steel and looks to be reasonably rigid in Z. Not to bad in Y (fore and aft on the desk). X sucks. The desk could be lagged to the wall but fair warning, I did this and on certain prints, one floor above it can sound like distant thunder. If the printer happens to hit the resonant frequency of the wall it is attached to, you may get some not so good vibrations (Beach Boys). By the light switch in the picture, you appear to be in Europe where construction is MUCH more solid as a rule. My tympanum wall is 2x4 stud lagged to a concrete floor, drywall on the other side. If you can lag it to a concrete or brick wall you may be in luck. Attach an angle or similar robust bracket to the steel carcass of the desk and lag that to the wall in at least two places, below the printer legs would be optimal. X and Y will be anchored and the printer does not have much tendency to jump so Z should not be an issue.
If you have a Jack Sparrow response to that option (stop drillin 'oles in my wall!):
The Y axis can be stiffened by adding blue threaded rods (1/4" to 3/8" or metric equivalent, should be more than sufficient). Desk top would have to come off and angled holes drilled with top counterbores. Print up some wedge washers for the tensioning end at a minimum. Or 10 or more self tapping sheet metal screws into a sheet of 15mm ply “cheek plate”. A square/rectangular piece of ply screwed to the outside of the leg. If you paint it, it could look like it belonged there.
My bets are issues with X, across the build plate parallel to the door glass when shut is the worst. The red threaded rods will fix that but impede getting a chair under the desk. One set where the verticals may be enough. One set front and one set aft would be more rigid but may actually bend the desk if tightened too much. You could put the rods through the ply near the steel carcass too and not have to drill as much steel.
I have used a dynamic pulleyed cable tension system in the past but they are finicky and expensive. Anchors, then threaded rod. Be warned though, I think you have it on carpet and as rigid as you make the desk it will shuffle on the carpet a bit. Anchoring the top of the desk carcass to the wall is one of the best ways to immobilize it. From experience, it does not move at all, it just hums a treble bass tune on occasion.
All good ideas. I’m reluctant to use the wall as it’s a a single brick wall with neighbours bedroom on the other side.
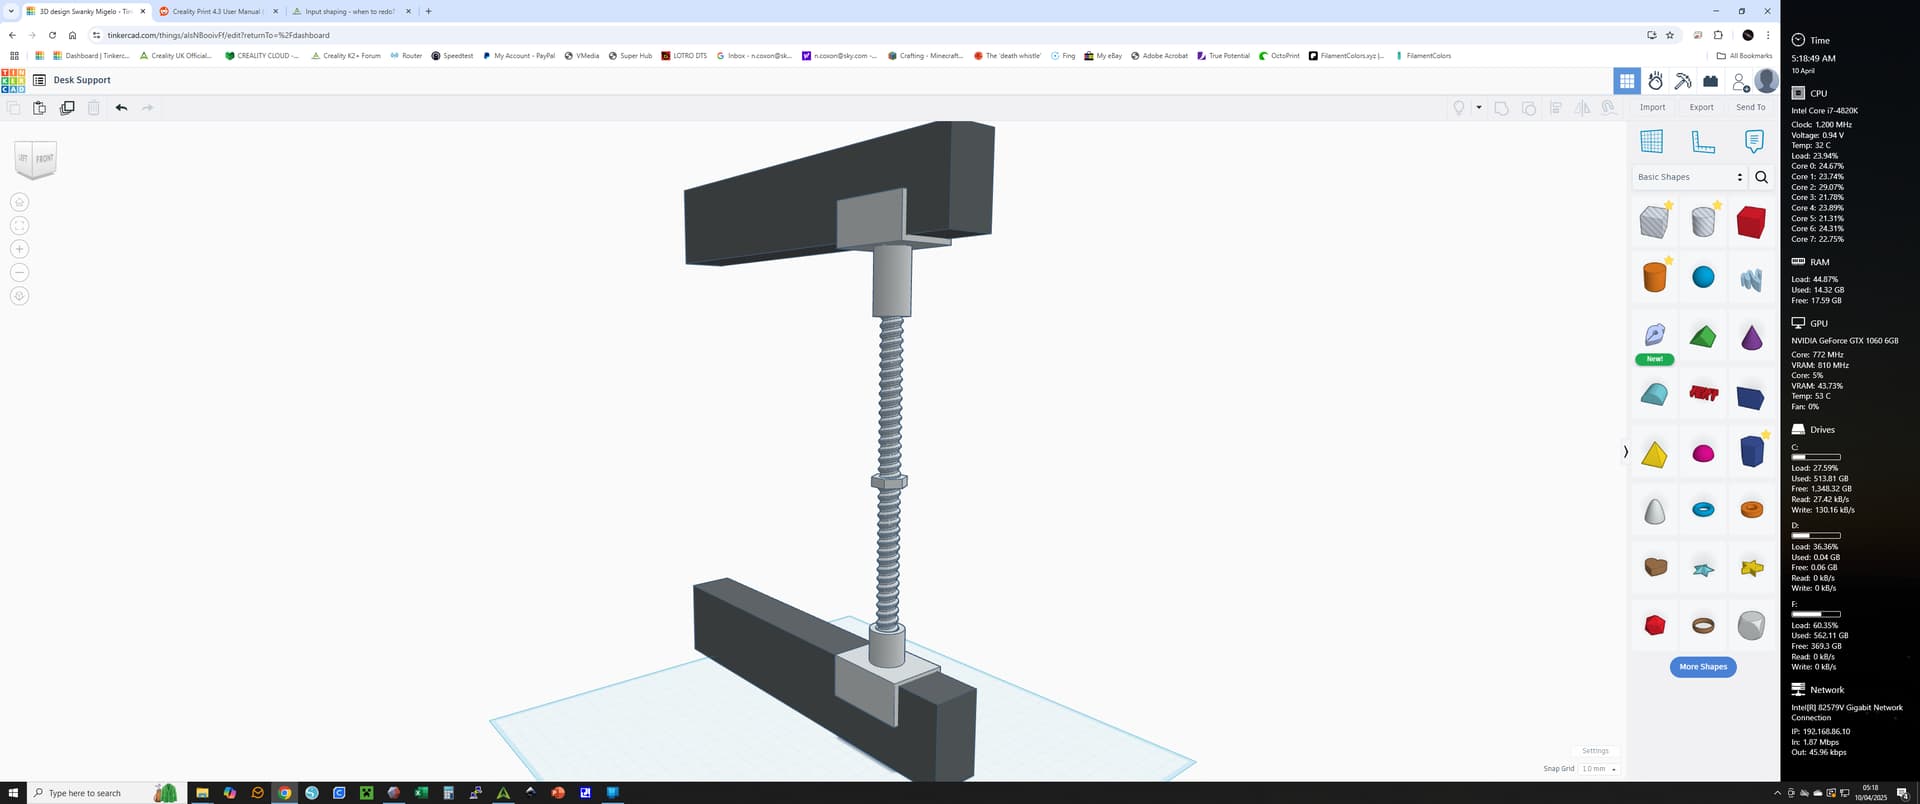
I’m thinking aluminium channel, threaded rod and a threaded cylinder at the top, plain socket at the bottom. The nut in the middle is either welded or epoxied in place so when you turn it the whole bar turns (in the unthreaded bottom socket, but engages the internal screw thread in the upper cylinder to expand or contract the distance between the two brackets.
Seriously, I think that is a GOOD idea and am sure will help greatly !
If you don’t have what is needed on hand, maybe your local hardware store might either have all the bits or at least suggest some company that can do it.
Otherwise, take a 12 hour flight here and I will knock a couple up for you
Yeah in fact, I’m an idiot. No news to most I’m sure. I went to bed immediately after posting that design and woke up this morning thinking…"Channel? CHANNEL? Why did you buy a 3D printer if you’re still going to spend money on CHANNEL?
Obviously I’ll need a wearing surface for the rotating bar, but I have an idea about that…and replacing my idea of a single nut welded to the bar, since Screwfix only sell the stud connectors in packs of ten…I’ll just lock two of them together.
I don’t see anything wrong with the general idea.
The 2 horizontal struts (bars) I would use metal metal or aluminium box type.
The vertical adjusting strut I would have on at each end.
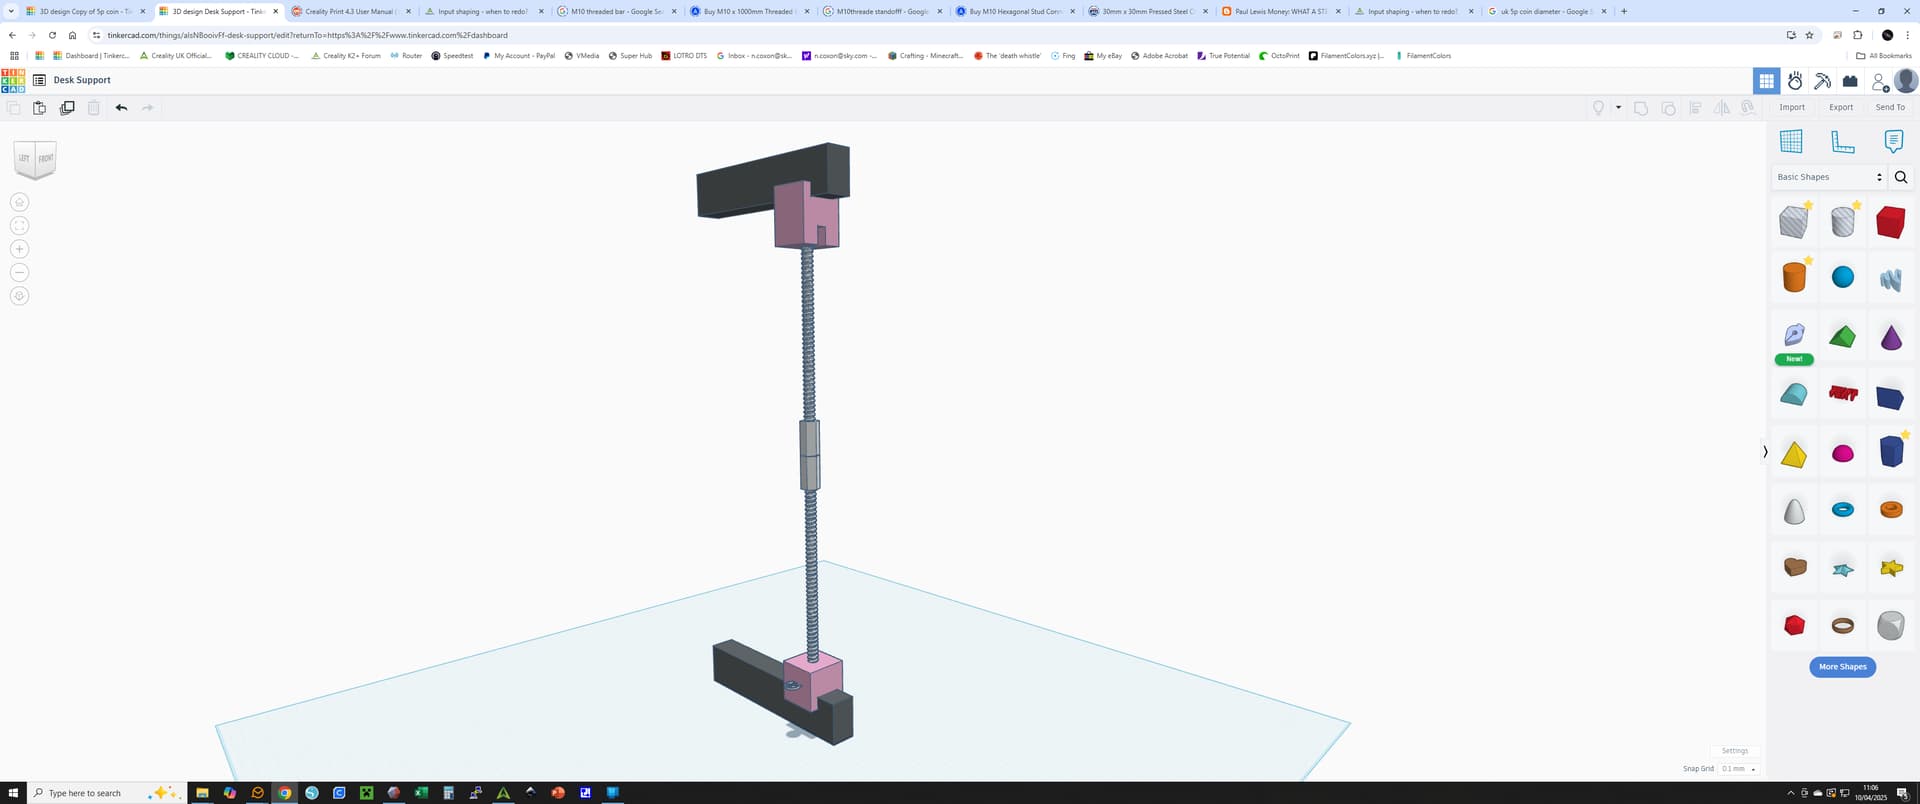
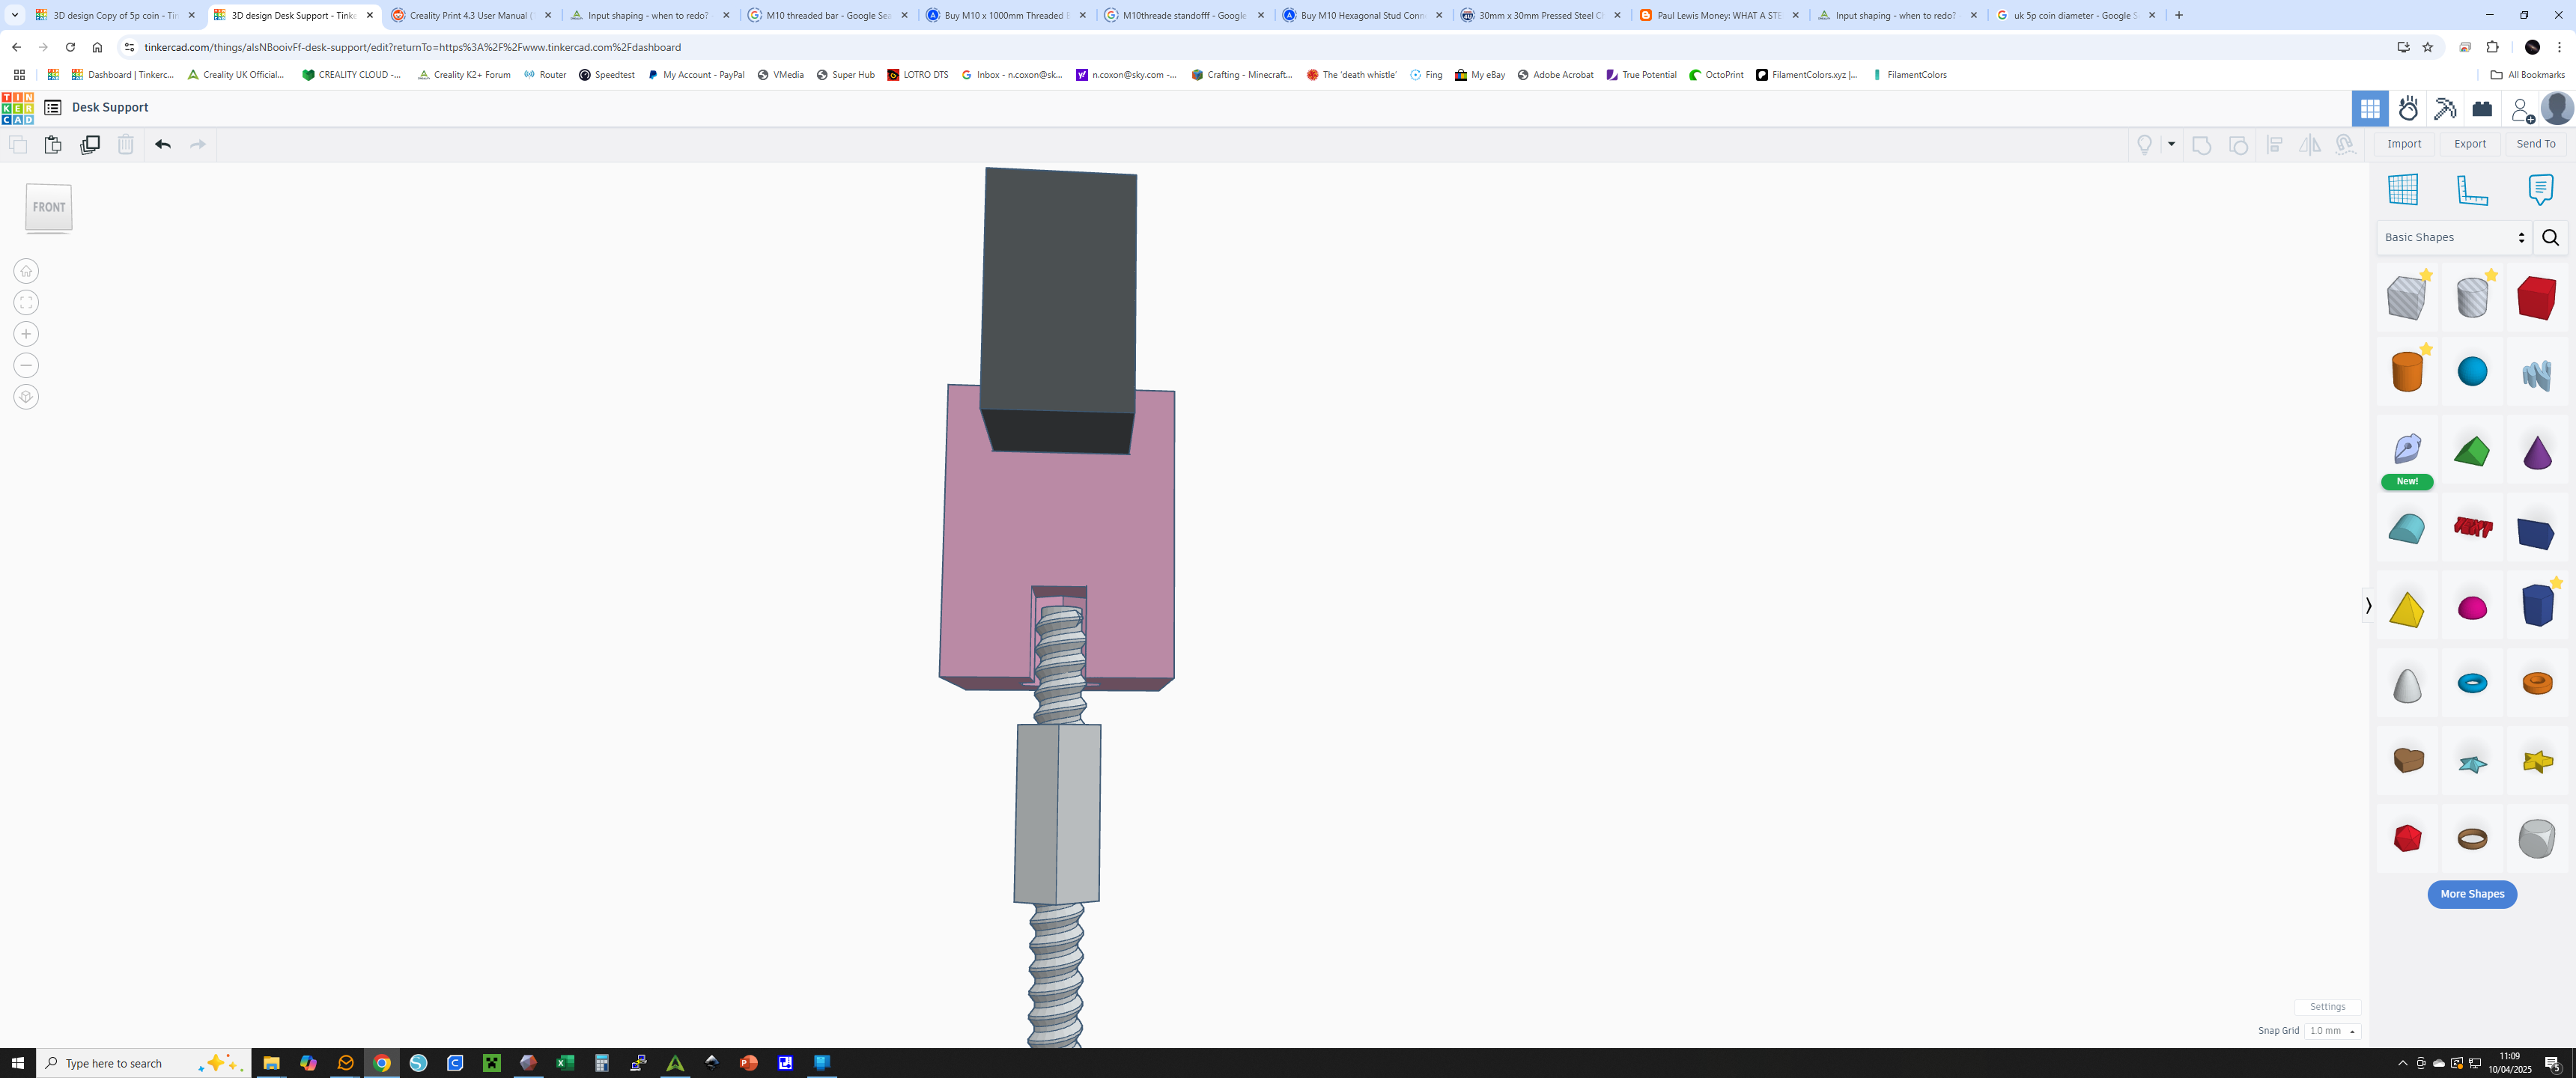
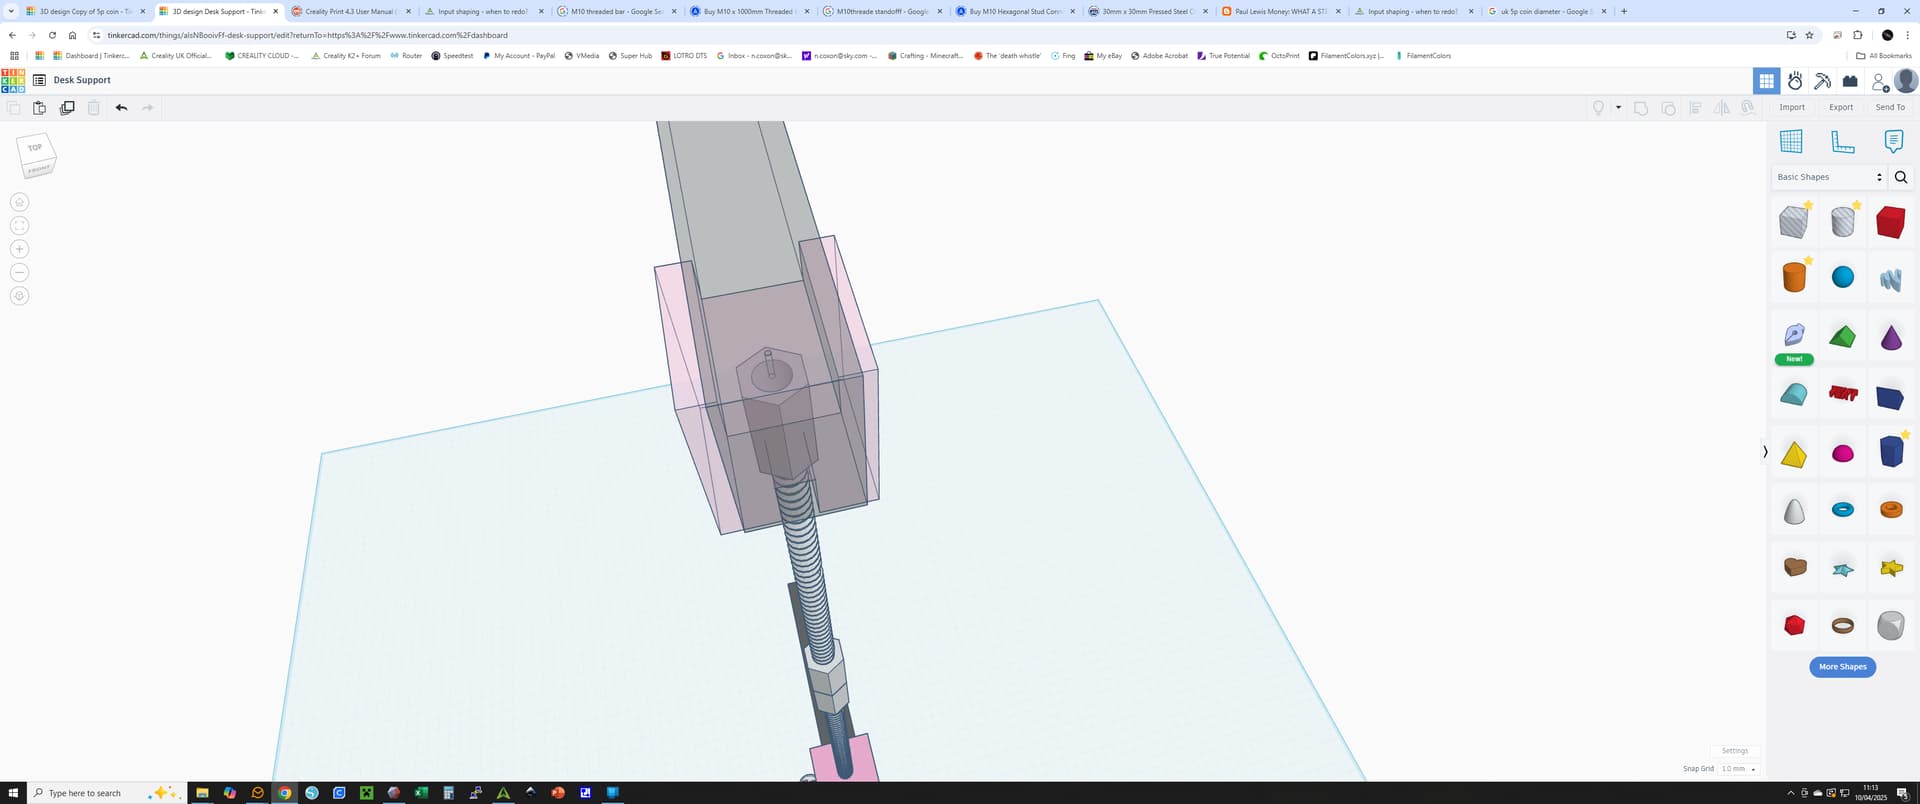
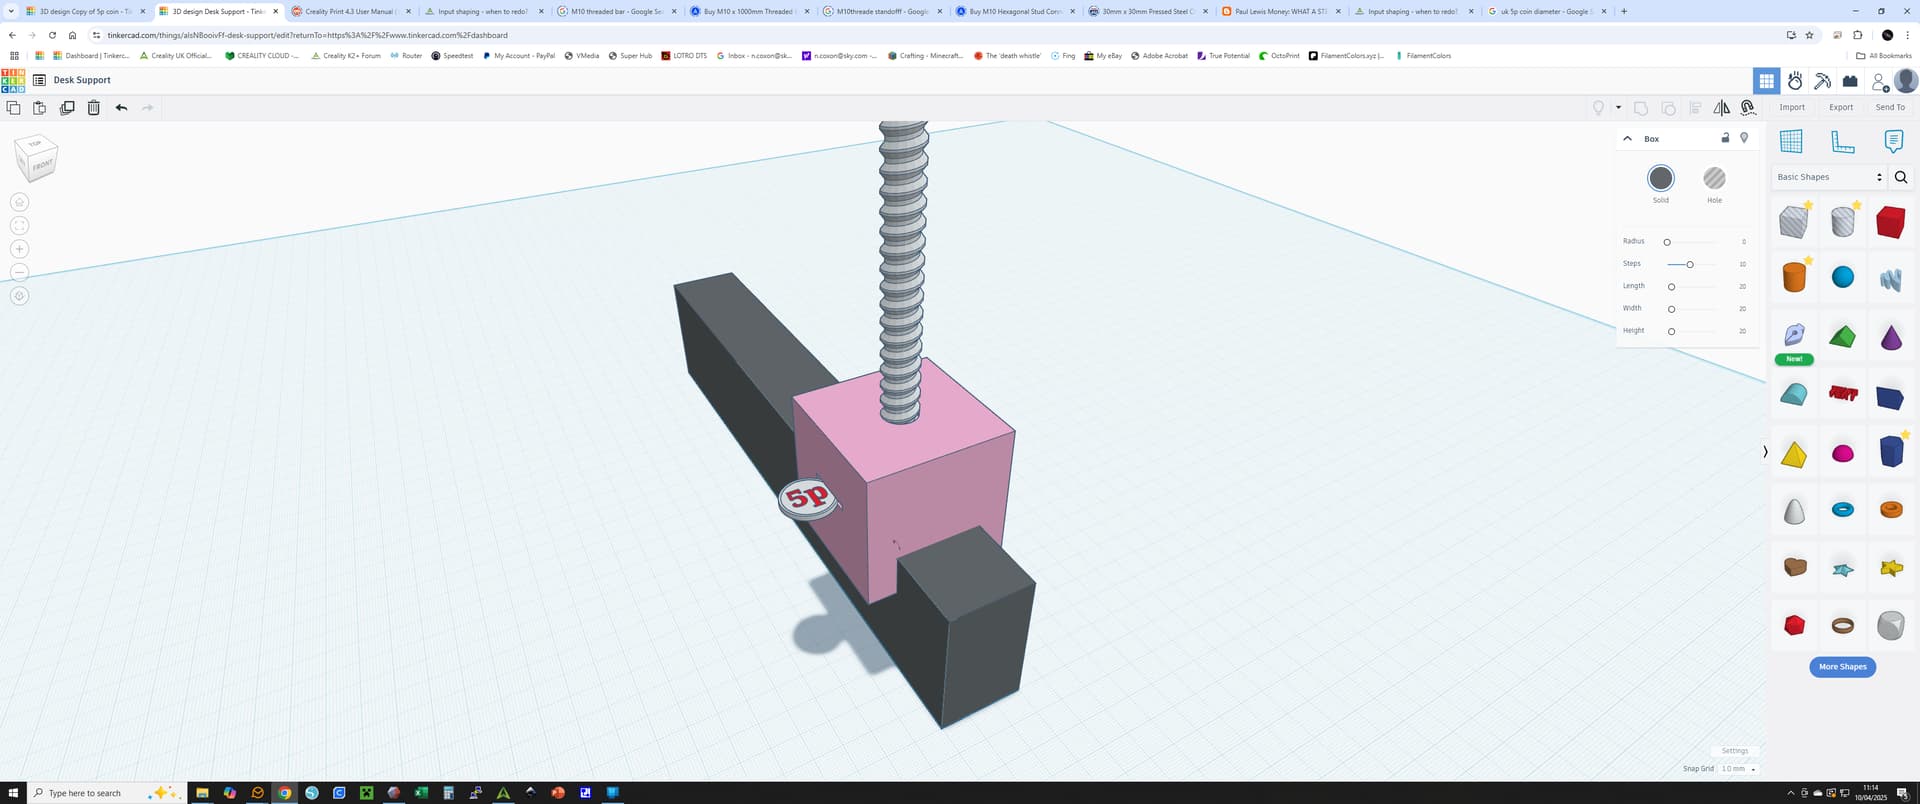
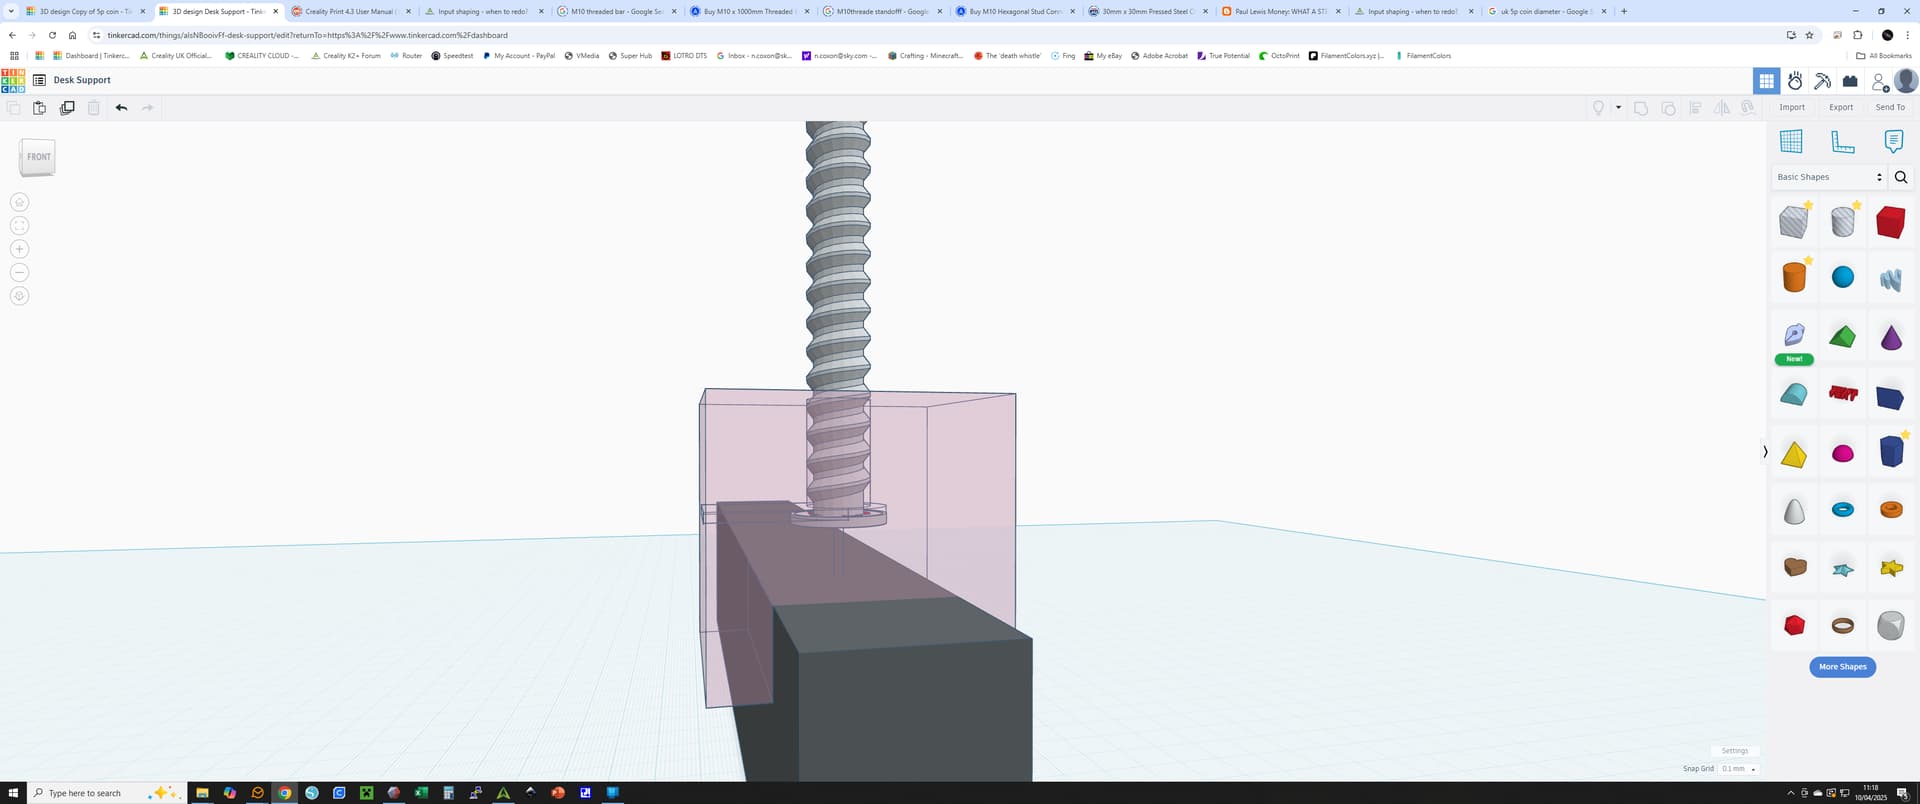
The dark grey bars are the spars on the desk. The pink blocks (I call it “prototype pink”, and I use it to make details stand out) I will print from PETG, probably in grey. The threaded bar (on nipping down to my local hardware store I decided M10 looked too weedy and upgraded to a more chunky M12) needs to be 530-535mm. Those big chunky stud joiners are 40mm long, so I have 20mm play either way.
The slot allows me to push the bar in from the side then by turning the top of the locked pair in the middle clockwise, the threaded rod will push the stud joiner at the top into position.
I’m feeling quite smug about this…obviously if I’m twisting a metal rod on a PETG block, wear is going to be an issue…but that’s where the 5p coin comes in…
The coin pushes in from the side and then drops into a circular depression. Again there’s a 2mm hole so I can push the 5p coin out of the block if I need to.
The only issue I’m going to face is orientation when printing…I’ll need
to print without support as there’s no way I’ll get it out of those tiny voids, but at the same time to give the brackets enough strength my printing orientation is pretty much dictated. I’m just about to export them to Creality Print for a play around…there will be no hacksaws applied to my threaded bar unti lI’m sure the PETG brackets can be printed (in fact have BEEN printed).
If you’d like to replace that 5pence with an American nickel adorned with Trump’s face on the front, I might be able to make that happen. When fully loaded, can call it “tariff tight.”
I can replace the 5p with any small coin…the 5p is 18mm diameter, 1.7mm thick. I’d just need to know the measurements for a nickel…in fact thinking about it I could have even used a plate washer…
The possibility of screwing Mr Trump hard in the face is intriguing…him and his tariffs have cost me £50,000 in a few days (my pensions pot is linked to the stock market)…
I think I’m gonna start keeping my money under the mattress…it worked for my grandma.