Recallibrate or reset to factory
People, HEAT SOAK THE PRINTER for at least 25 minutes. This is a large bed and it continues to change the shape for some time.
I thought this would be a common knowledge but there are some many posts about the same thing.
Thanks a lot for the tip. I’m new to printing, and still happily learning. I’m assuming just crank the nozzle/bed/chamber to temp and wait 25 minutes before starting the print?
Exactly. The bed continues changing shape as it hears up and slowly settles. In case of K2 this is multiplied by the size of the bec so you must be more careful than with smaller printers.
The bed construction of the K2 must be significantly different than my Ender 5 plus, a bigger build plate yet doesn’t suffer from “warping” no matter what temperature it is at.
With all due respect I don’t think this is true. Rolled aluminum have the tendency to curl more in either direction with the temperature. That is why some aftermarket companies make cast aluminum beds. Those are less prone to warping but more expensive. I doubt that Ender 5 has a cast aluminum bed but who knows.
Run bed leveling on a cold machine, save the bed mesh screenshot. Heat to 110C and wait half an hour, do bed leveling again and compare the bed mesh with the cold one. You should see the difference.
Its not a casting, its 3mm sheet aluminium so that is possibly the difference.
Looking good, quite some progress from the start of the thread. You could have made those panels in the slicer, add a primitive cube, resize it to the dimensions you need, create some copies and autoarrange ok it isn’t practicing CAD skills but it is how I created the 50x50x0.2 test squares at the start of this thread. Not used TinkerCAD as I have access to my Autodesk Inventor license from work, nice little bonus from the Covid WFH era.
Is your ender5 enclosed?
If not, then that’s the difference
Kris.
I’m really not sure what is happening with your printer, but part of it may be expecting too much. before you gain experience. They are temperamental things and need a good knowledge of printing and it’s problems to get the most from it. I highly recommend
3D Printing Failures (2022) by Sean Aranda
ISBN 9798784041258
You should find it at Amazon. A couple of things I would reiterate from others here or add are the cleanliness of the bed plate.
- If you haven’t got one, get yourself a spray bottle of pure Isopropanol (Isopropyl Alcohol). It is invaluable for cleaning and degreasing things like the bed plate.
- I never go near a glue stick, I find them horribly uneven.
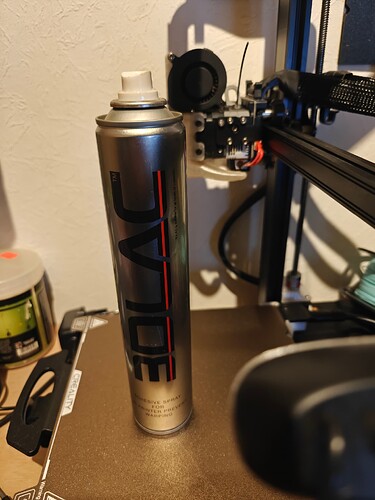
- I use a spray can of 3DLAC and apply a thin layer after clean and degreased plate.
- I never remove a print and then print again straight away. I apply a very slight spray to the area of the last print and then print.
- When I have print 3,4 or more prints, I will clean the bed and respray it. 3DLAC is easily removed with water. I run it under hot water, then scrub it with a small brush (nail brush) and a few drops of dish washing liquid. Rinse it well in hot water and wipe it with paper towel. It dries quickly, then wipe it paper and isopropanol. When it’s dry spray a light coat of 3DLAC and you’re ready to print again.
- Before the first print after coating I always do the full calibrate/resonance/test thing, but I don’t bother leaving the Calibrate box checked for each print.
- Keep your vertical leadscrews and horizontal slide bars clean and lubricated. Oil is not the right thing for this application, it can drip on your print bed. Clean with isopropanol then apply white lithium grease, sparingly on the horizontal slides and a bit heavier of the vertical leadscrews. It’s very tenacious and you can see it!.
- Before you print, Extrude a bit of filament through the head and wipe the tip of the nozzle before it cools too much.
- Preheat your cabinet. My K1MAX does not have a heater so I set the bed plate to whatever temperature that filament wants to print with and I leave it half an hour to warm everything up.
- Do a Cold Pull. (see 11.)
- Read Seans book cover to cover
- Last but most important, dry the filament thoroughly and keep it dry while you print. I dry at 50C (122F) for most things until down to about 22%RH then turn the dryer down to 40C (104F) and print with the filament going from the dryer to the printer, in a tube if possible.
Good luck and be patient!.
NOT rubbing alcohol, it is 70% isopropyl and “other” stuff, its the “other” stuff that can screw up bed adhesion. Get the purest isopropyl possible.
Anything over 96% is perfect. Rubbing alcohol can contain perfumes or antiseptics, neither of which are good for bed adhesion.
Thanks for the correction. My poor knowledge of Americans showing through!.
He use the stuff in the picture you can spray you plate with wd40 and then 3DLAC most of the time your print still stick.
Just basing it on what us Brits call rubbing alcohol
3DLac, do they do a PP version? Trying to get some Magigoo Pro PP for printing PP, Amazon don’t have it, packing tape is an alternative but doesn’t last.
Think the call it 3dlac plus im not 100% sure
Never heard the term rubbing alcohol used here in my life, but we do seem to import more and more Americanisms all the time.
I don’t know of a specific version for PP, I have yet to do battle with Polypropylene.


