I am big into RC cars, and there are a lot of ways I could use a 3D printer to help with certain projects, so, I bought a refurbished Ender 3 V3 SE, but I know literally nothing about 3D printing, so I joined here hoping to educate myself, because doing it though places like Reddit, Fb and other 3D printing forums just completely confuses me. The biggest issue is not really understanding a lot of the terms that are used when people talk about it, like z-axis and how to set it. It took me a couple hours to even figure out what the Z-Axis is, and how to manually move it, for example. I’m still nervous about manually moving it, because I’m worried I’ll go too far and damage something.
1 Like
Welcome. Ask all the questions you like. and, by the way, you are right to fear the z-axis. Good news is Creality Print-6 is pretty good about warning you before you go too far.
I finally got comfortable enough with the auto leveling, and using the paper trick to set the Z-Axis, but, when I did a test print, it looked off to me, so what did I do wrong?

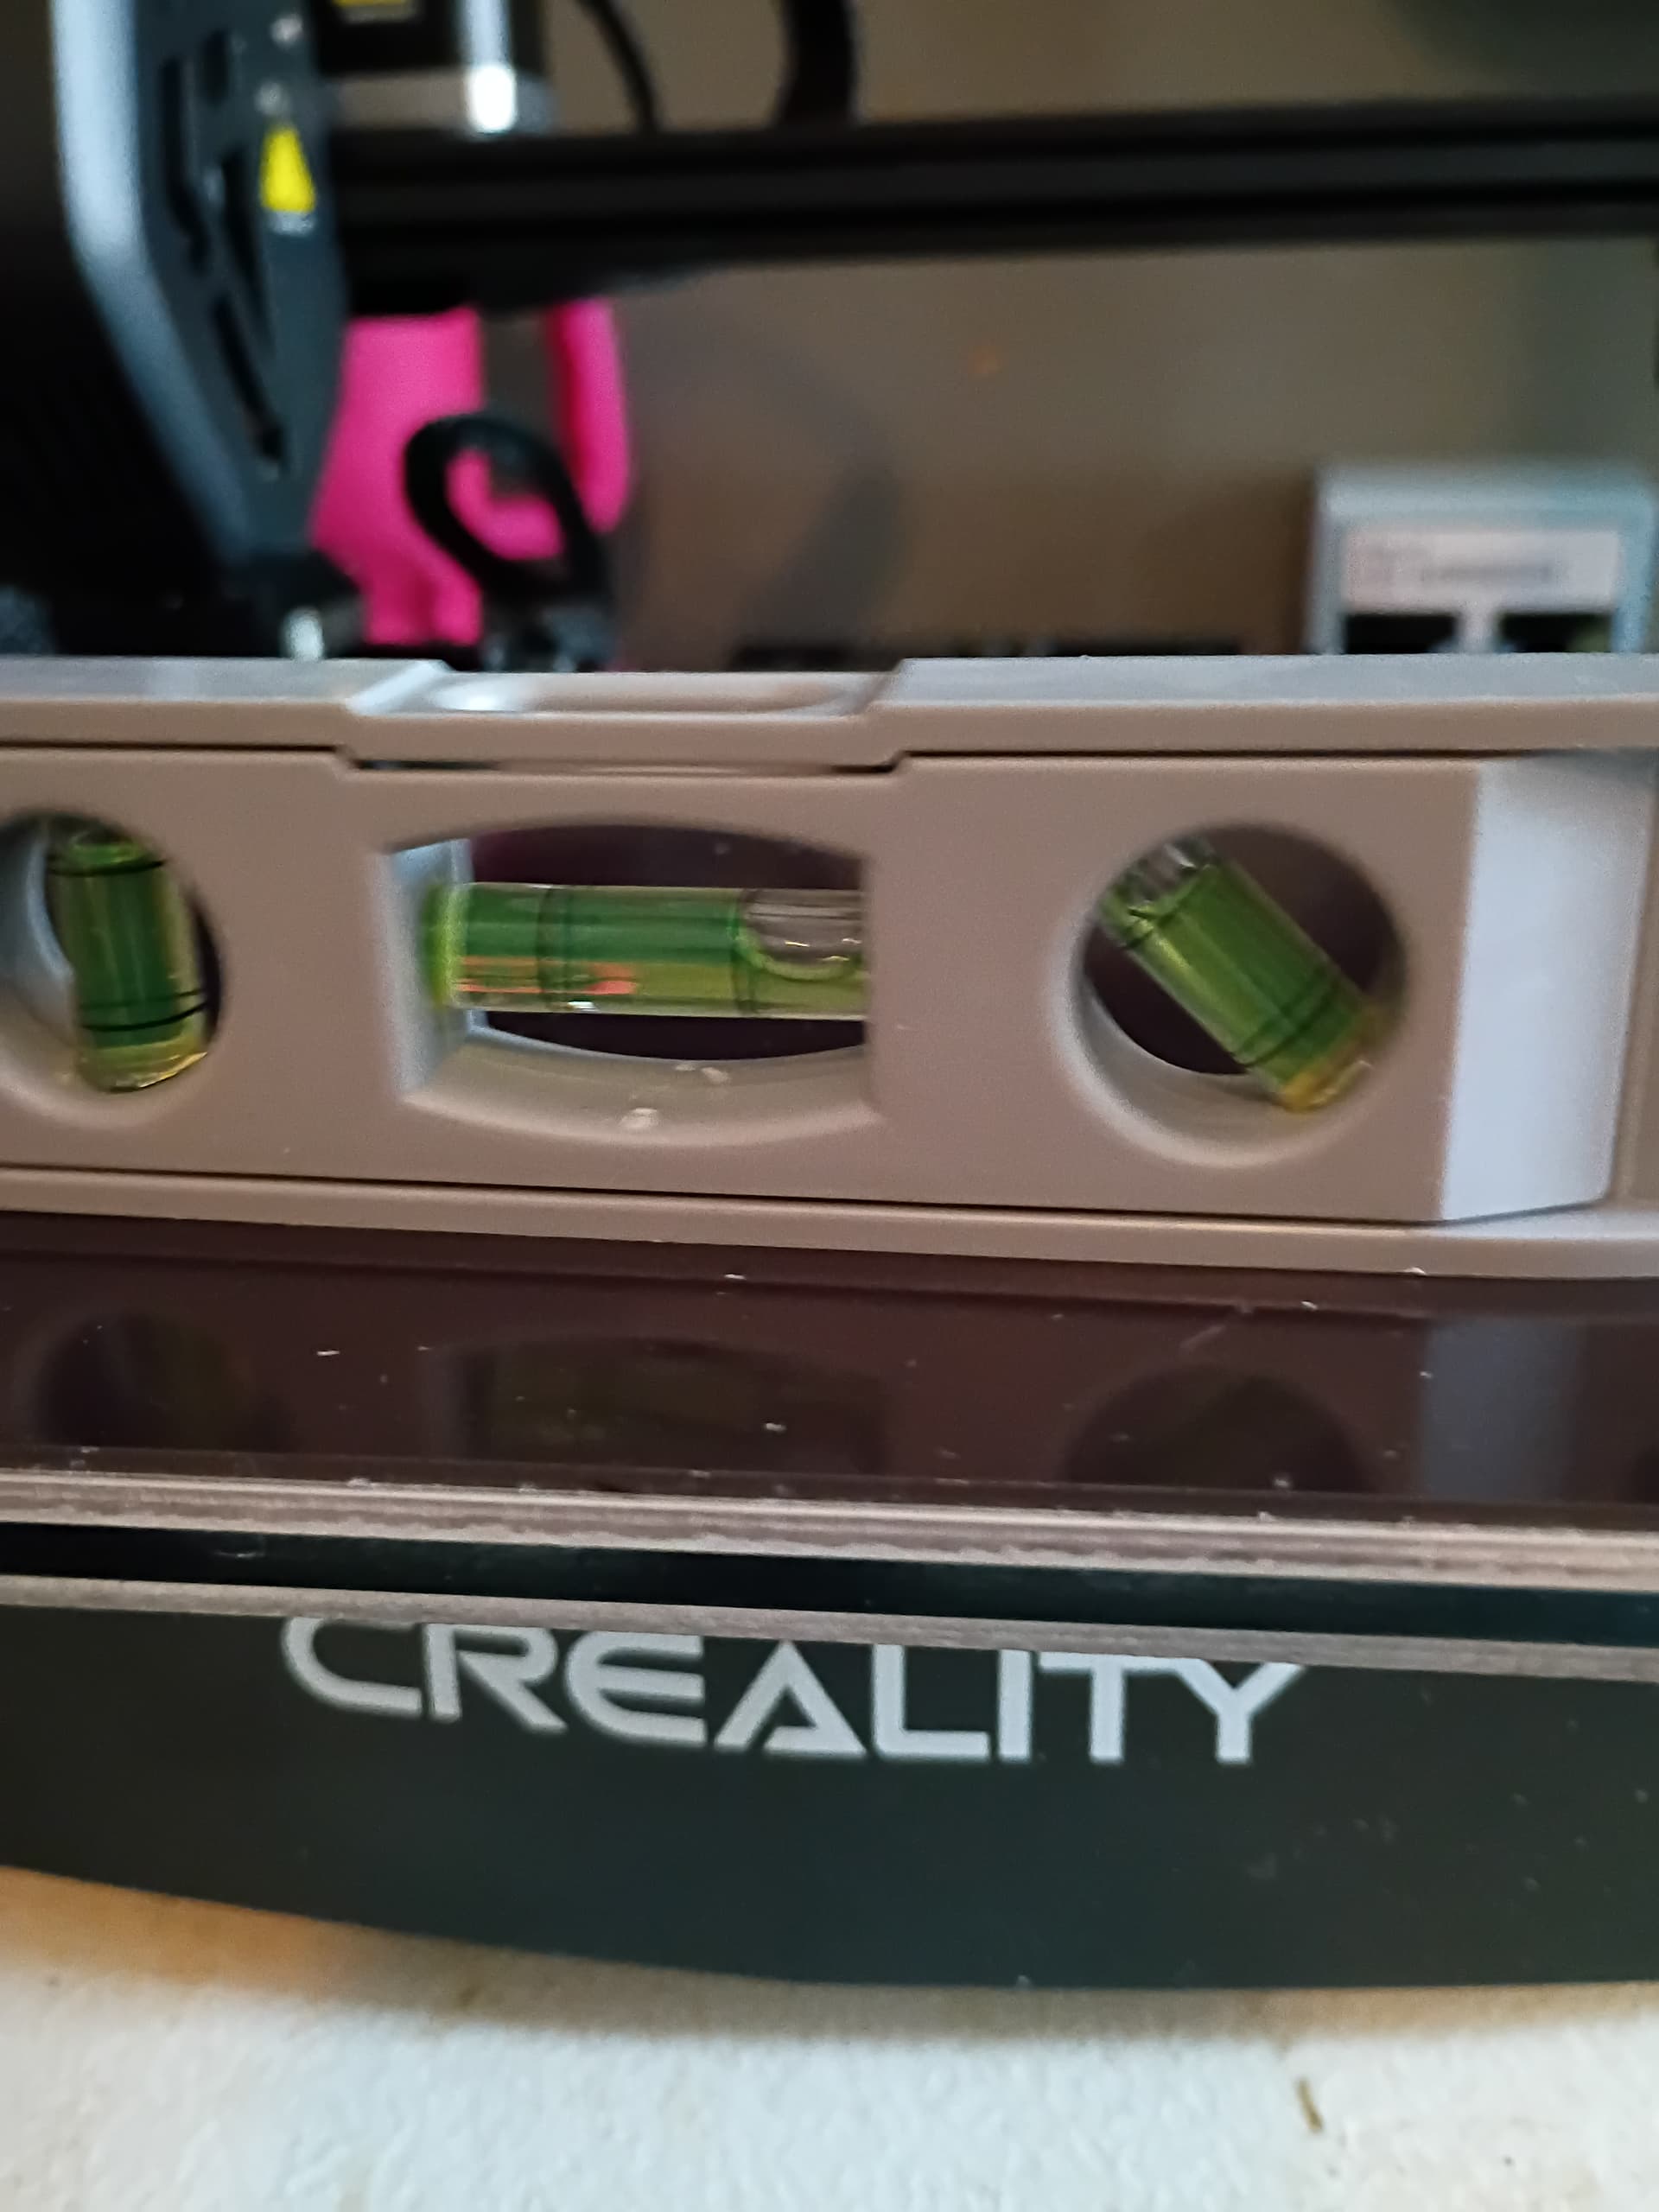
I’m not on an Ender, so the menu’s aren’t familiar to me. However, if there is a way to manually level the build plate, the auto leveling looks like it is sloping down to the back.
It is entirely auto leveling. There are no adjustments to the bed at all. It sits on plastic spacers. However, putting a level on the bed today, the left side is nearly 4MM lower than the right, so I’m trying to find out if that is normal or not. Front to back is nearly perfect though.
You might already know this but the level only shows if the machine is level. The machine could be perfectly level but the build plate could be warped and need leveling. Leveling meaning totally flat.
Actually, I figured that part out. The table I am using is a plastic folding one (only thing I have currently), and, unless the printer is dead center on the table, it’s off level. I finally got it to print the Benchy test print, mostly. It got to roughly 90%, and it came loose from the bed, because the table was moving too much, so, after securing the table to the wall, I ran the auto leveling again, double checked the nozzle height with the paper, and then ran into another issue. Now, trying to do a second print, it tries to print before the nozzle and bed are even heated up, so the filament just comes out in a blob, so, now I’m working on figuring that out. I also noticed that the bed temp was only 50, instead of 60 (I’m using PLA), but, even changing the bed temp to 60, the nozzle was at 176, and the bed at 48 when it started trying to print, and the filament just came out in a small blob.
1 Like
That’s just wrong. ![]() I wish I had a helpful suggestion for that other than try to reset to factory…?? and see how that goes…
I wish I had a helpful suggestion for that other than try to reset to factory…?? and see how that goes…
I just noticed you said the printer was a refurbished so we don’t know it’s history.
Make sure it has the right firmware as it shouldn’t be changing temps like that..
You can search on this forum and find a lot about the Z and how to set on different machines. I’m not familiar with yours.
1 Like
I figured out the issue with it just printing blobs. I had to remove the filament and trim the end. After securing the table, and trimming the filament, I have finally done a completed print. It was just another Benchy, but, it turned out perfect, and, then, a friend who is ex Navy asked me to do 3 more, one each in blue, black and yellow. As for the software, the very first thing I did after assembling it was upgrade to the latest version, because even the eBay description recommended it.
1 Like
Welcome to a great hobby and one that will fluster the living daylights out of you.
I started on the Ender 3 Pro, upgraded to the Ender Max, to the S1, and then to the K1C. Everything you learn on the open bed printers will apply as you upgrade.
I started with using glue sticks on the build plate with mixed results. A wise person told me to wash the build plate in hot soapy water, dry it, take it outside and spray it with a heavy coat of Auqnet hair spray (unscented) and let dry. I have used the hair spray on every build plate type, including glass plate with great success. I still use Auqnet hair spray on my K1C. I pop a print off, give the build plate a shot of hair spray where the print was and print again. I clean the build plate every three or four months
I had a really wrapped bed on one printer, which I fixed by going to the hardware store and buying a piece of single pane window glass and using large binder clips to attach it to the bed.
Keep asking questions and slowly you will become an expert like all the rest of us. ![]()
![]() Good luck and have fun.
Good luck and have fun.
You are absolutely right about how frustrating it can be. My latest issue, no matter what I try, I can’t get the filament to stick to the bed. I have washed it with warm water and dish soap, then, after drying it, used isopropyl alcohol, and it still won’t stick for some reason. Either the bed won’t heat up enough, or there is a draft in my room, even though I don’t feel anything like that. Either that, or I don’t have the nozzle height right. I have even tried running the auto leveling again, and same results. It starts to print, and then peels the first layer off, and it gets stuck on the nozzle.
I’ve been using glue and it works good on my Ender V3 KE. I’ve also upgraded the bed bearing to linear bearing then redid my z-offsets. It was still a little tilted towards to back right corner so I printed some shims of different thickness starting at .2mm up to 1mm. Determined what shim I needed in the corners to get my bed perfectly level. Did a single layer 4 square test print (PLA) with each small square in each corner and one in the middle and they all came out perfect. I never use auto-z-off (if your printer has that feature) and just use the same z-off every time using the value I came up with in all my testing.
I still use glue every print for insurance. Also clean my bed with hot HOT water and soap. Then wipe the bed with IPA with the bed heated up to evaporate the little water that is in consumer rubbing alchol.
Tech tip - do all your testing and setup with the bed at temp, 60 in my case and let it heat soak before doing auto-level for 5 minutes or so. That way everything has expanded due to the heat. I also heat my nozzle to 200 and let it heat soak as well. This will give you more accurate readings having the bed/nozzle at printing temps when checking level.
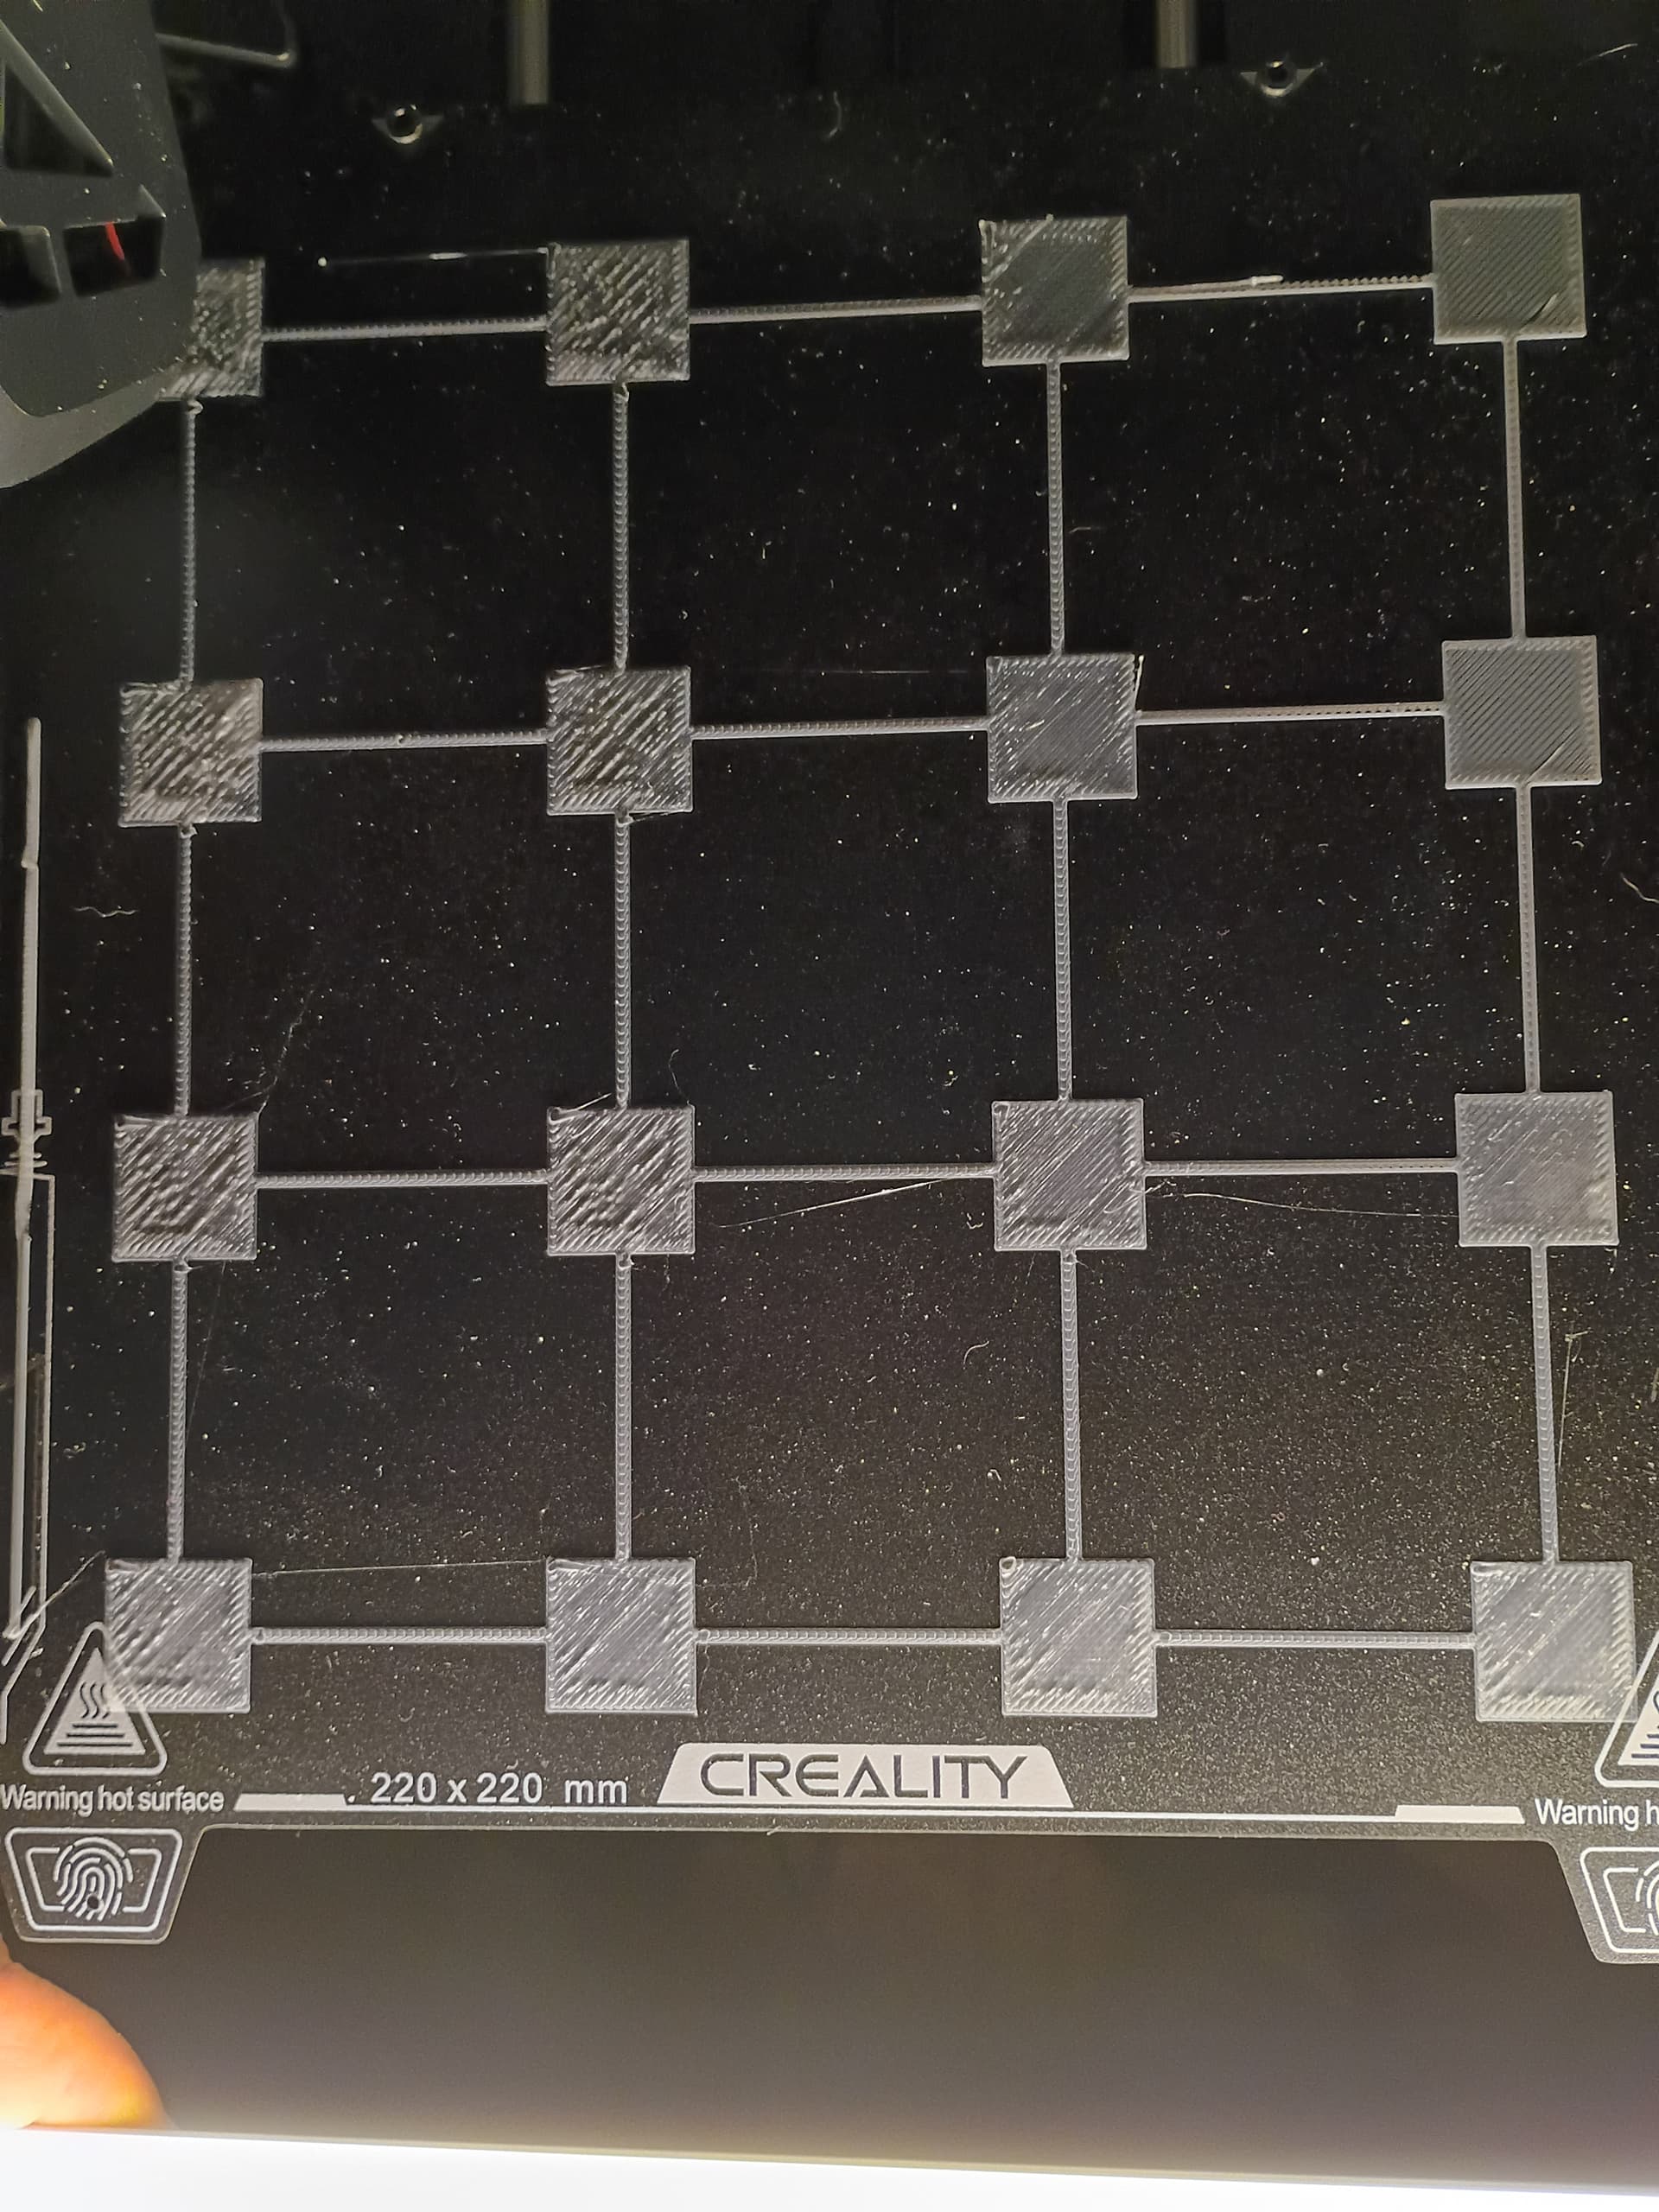
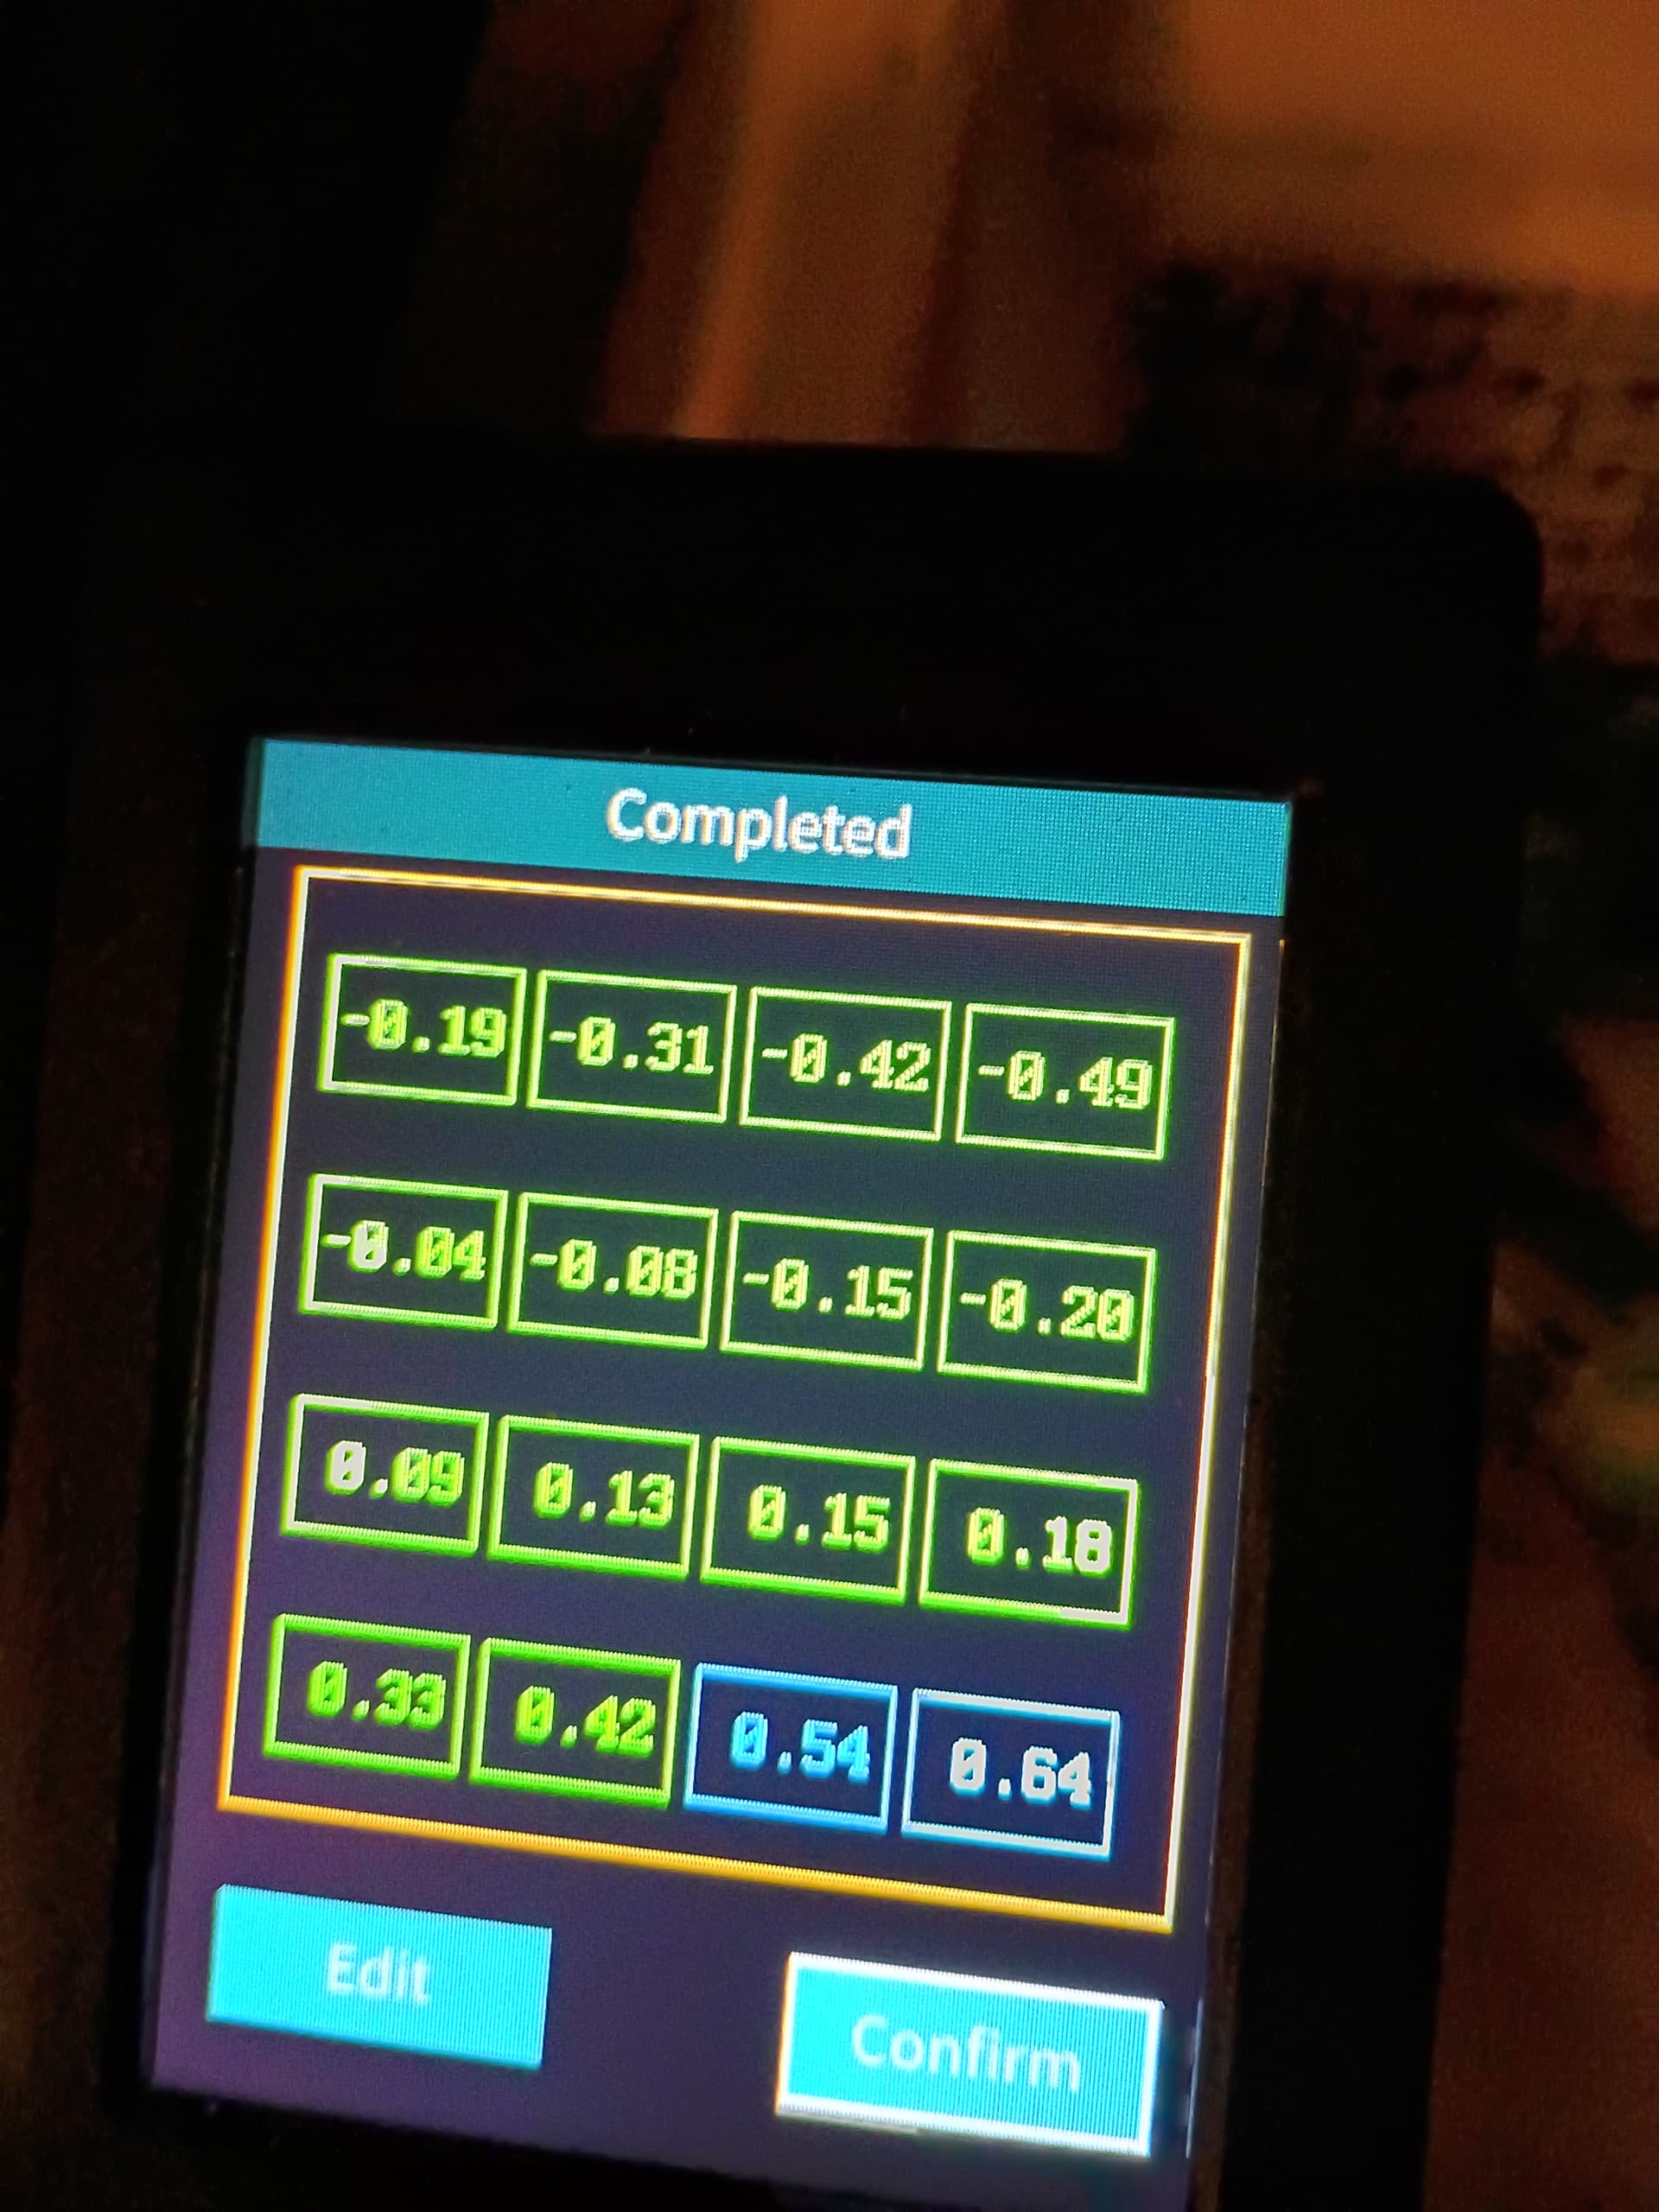
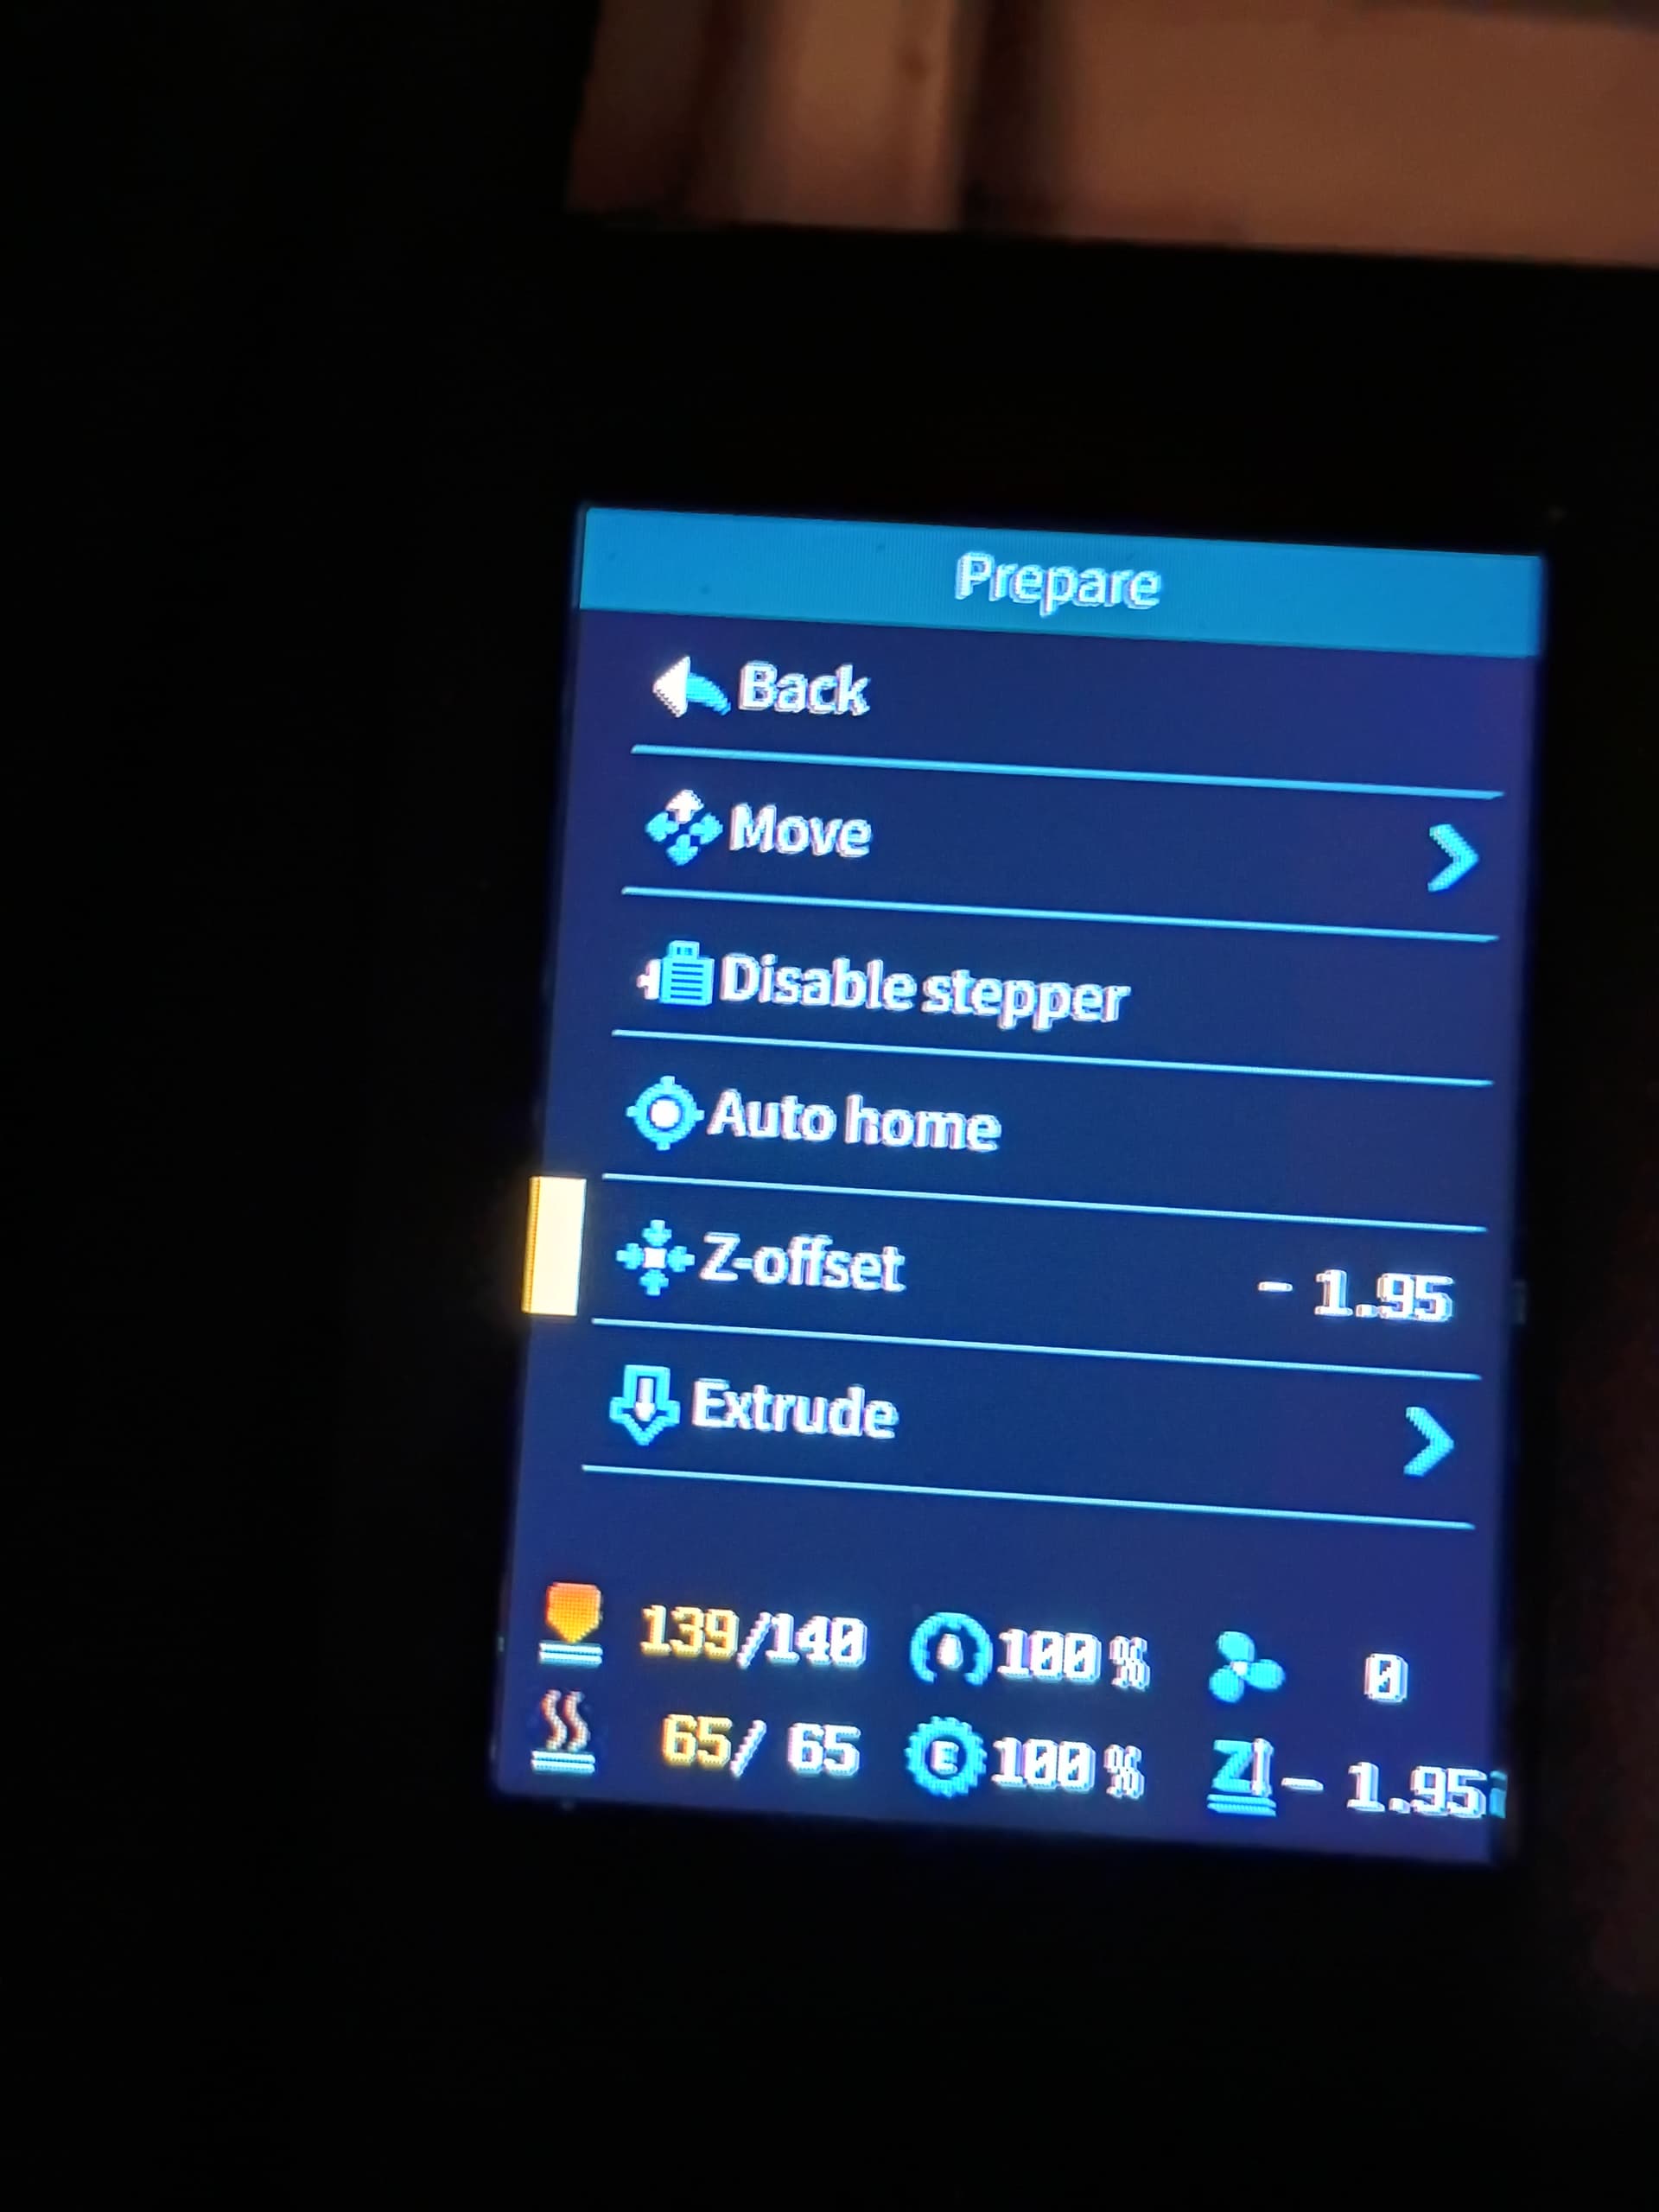
I think the nozzle is too close to the bed. It starts to print, but then the nozzle seems to pull up the first layer. Honestly, the paper method still confuses me a bit. I’m not sure if I’m setting it too low or not. Every time I use the paper method though, the Z value changes, from -1.95 to as much as -2.17, and, is never consistent, so, I’m pretty sure I’m doing something wrong. On mine, every time I auto level it, the rear half of the bed is in the negative and the front half is in the positive, every time. I thought about printing spacers for the rear, but, couldn’t seem to find any small enough. I think I need, at most, a 0.2 or 0.3. This was my last auto level settings. Another thing I noticed, the white that came with the printer prints fine. My issue is with the black, blue and yellow PLA I bought for it.
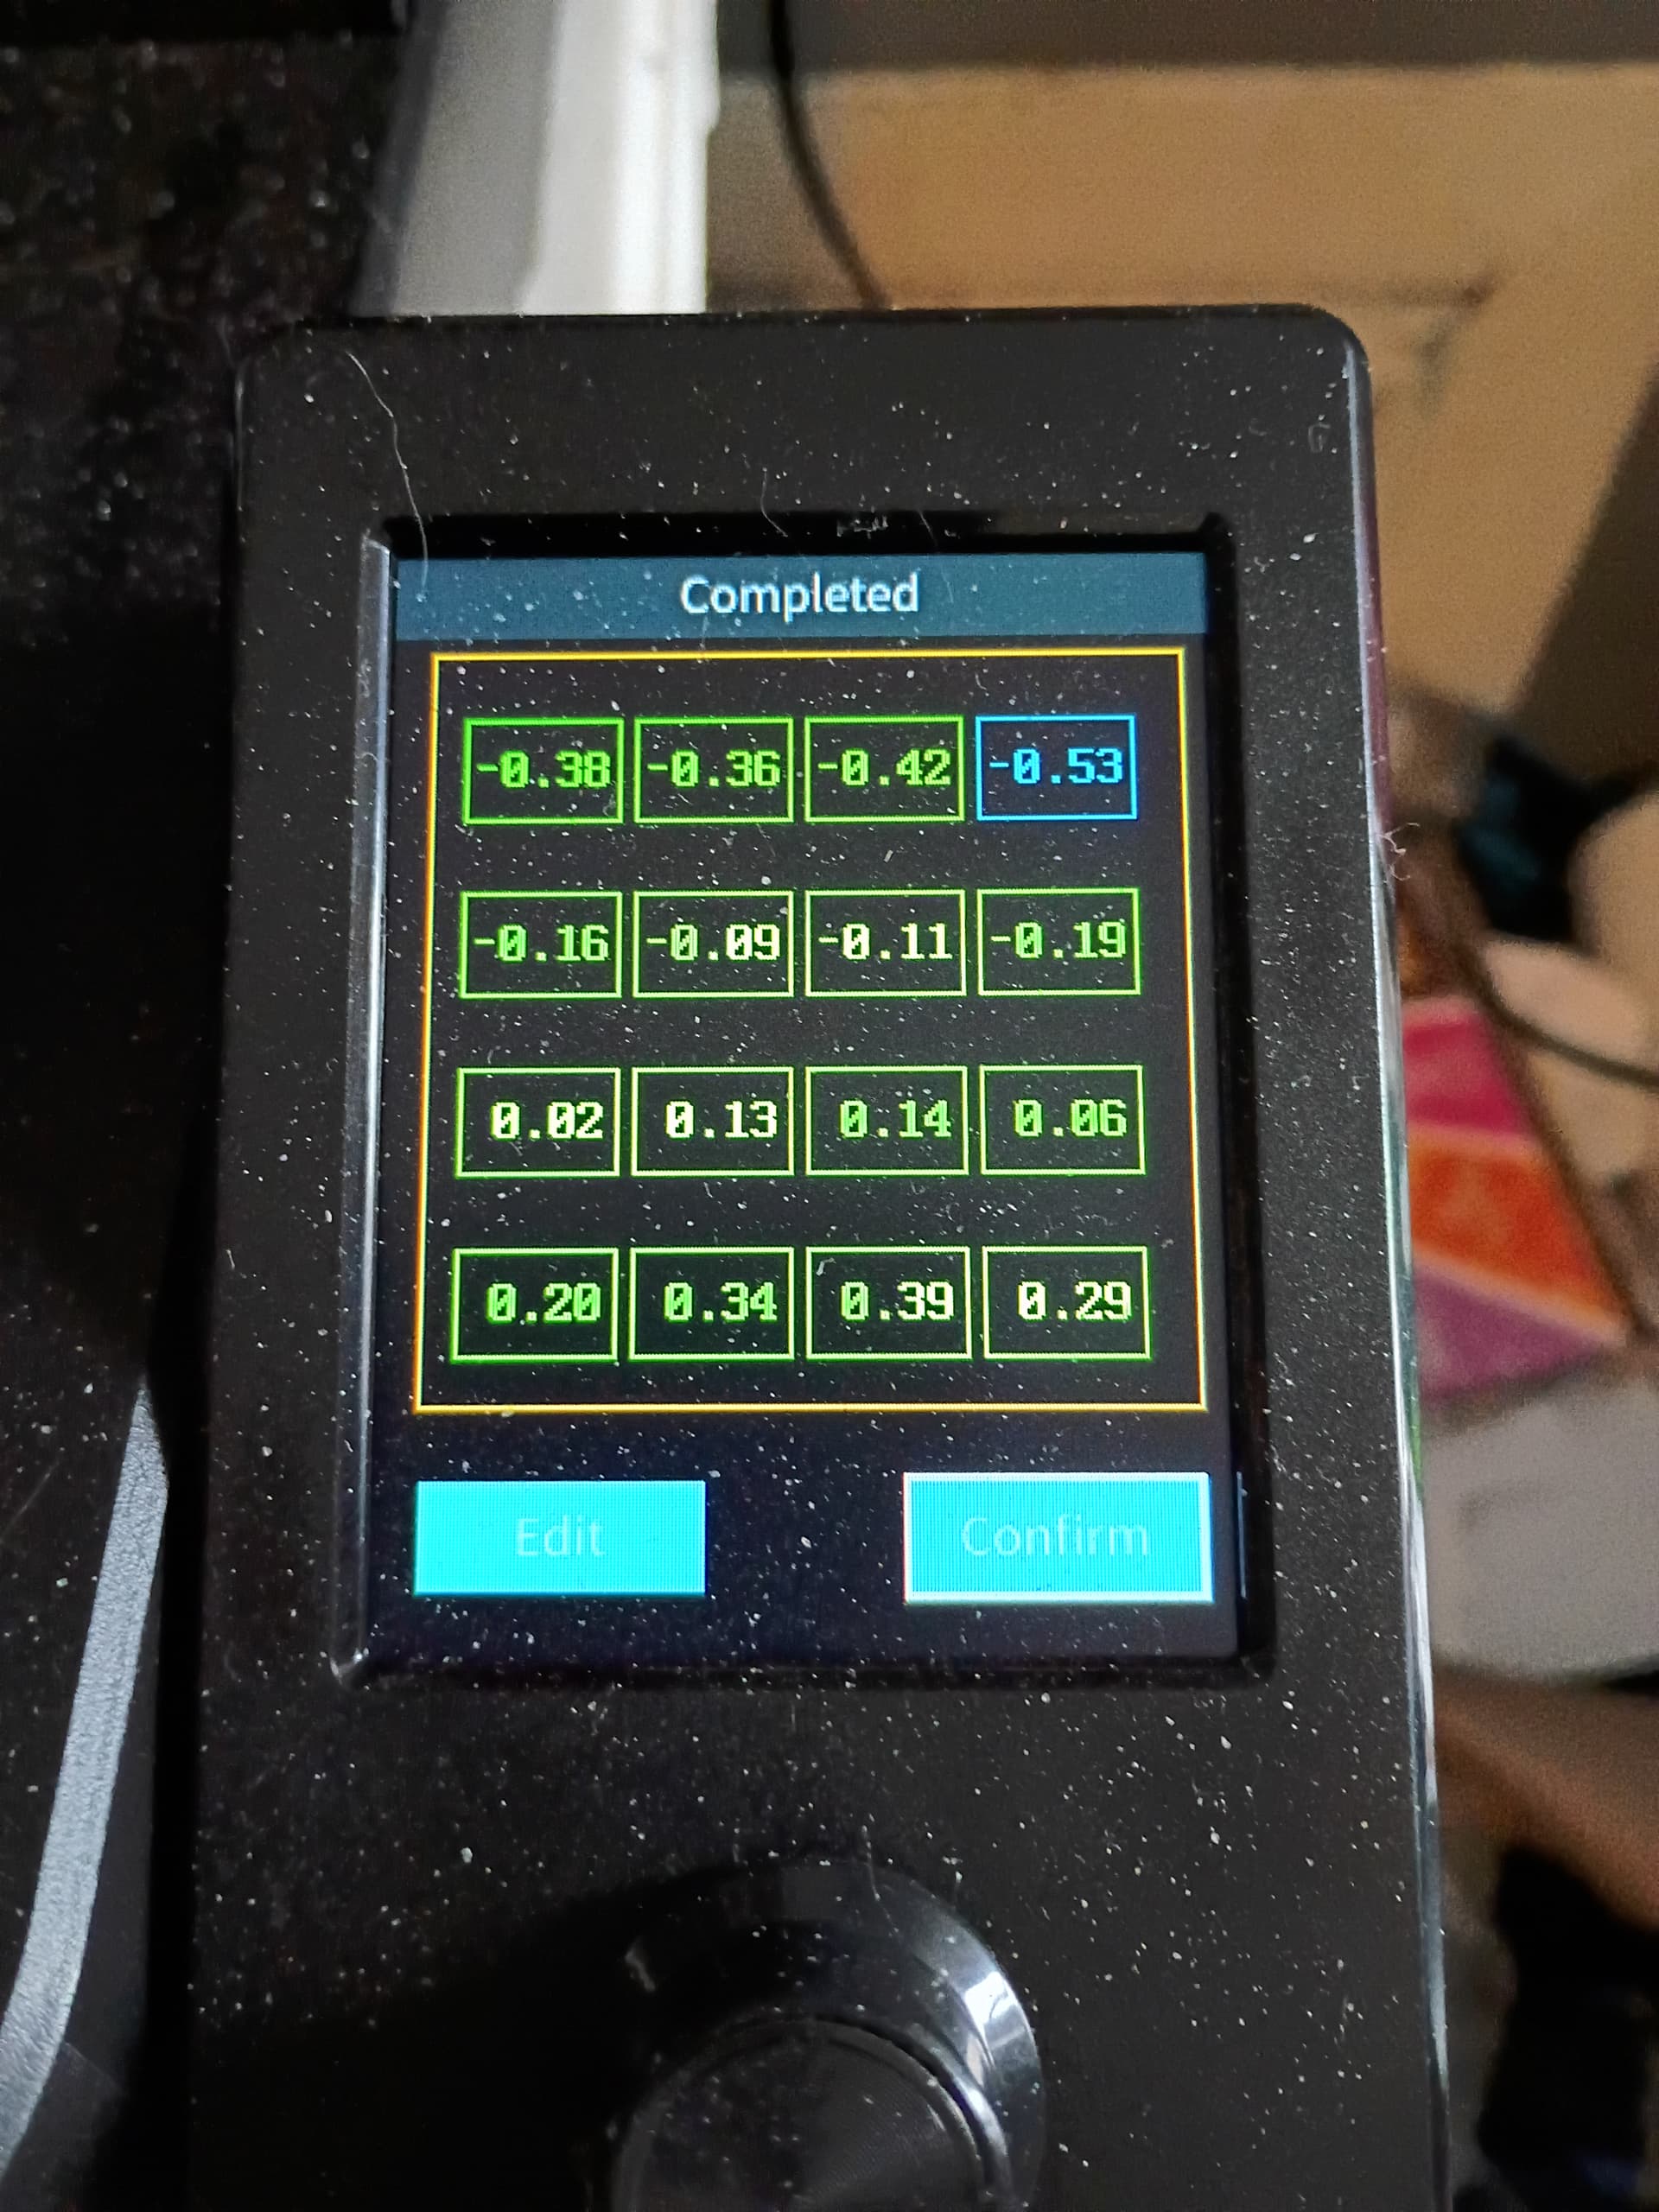
My other question is, I think, a simple one. The negative numbers mean the nozzle is closer to the bed, correct? If so, wouldn’t that mean put the spacers under the screws in the front of the bed?
You are right. The negative means closer to the bed.
Not being familiar with your machine I’ve read where you could put some kind of tape under the build plate where it’s lower and run the calibration to see what changed…
With the bed between 58 and 61 degrees, and the nozzle at 205, verified by an IR temp reader, this is what happens every time I try to print anything. I have washed the magnetic plate with Dawn and hot water, dried it, then used IPA, let the machine self level, again, and this is what I get every time. I remove the filament after every attempt, heat up the nozzle, and remove any leftover filament, and even let it auto extrude, and it’s still the same. I’m starting to get beyond frustrated with it. It’s not clogging the nozzle. It starts to print, then peels the filament off the bed and wraps it around the nozzle.
I would put the nozzle up to 220 or 230°C
I don’t think you need to empty the filament from the nozzle each time. I’ve never done that. Although someone here may have found it’s better to do that. Let us know.. ![]()
I just ran it with the bed at 60, and the nozzle at 210, and let it sit for 15 minutes at those temps, and same exact thing. I thought over 210 was too much for PLA though. At least, that’s what I keep reading.
The last two hours, I have just been wasting filament trying different settings for a simple print, from Z-AXIS (I went from -1.92 to -2.16), adjusting temp for both the nozzle and bed as it goes, to anything else I have read about, and, 14 attempts, all with the same results. Currently, it’s been sitting 15 minutes with the nozzle at 215, and the bed at 60, and the Z-Axis at -2.04, and, didn’t do 10 seconds before it pulled it off the bed. I can’t use hairspray, due to medical issues (on oxygen due to lung cancer), and, frankly, I don’t see what glue and tape would really do, except melt.