There are other’s firmwares that enabled host commands without LCD integration like Queuep’s or ASchmidt’s. Looks like you are having a hard time with this.
So, since the plugin will fail to get the layers after moving the file (maybe later I can patch the plugin to solve this) the percentage will be never updated because Layer progress is a calculated by the current layer *100 divided by Total Layer so if your total layer is None the the math operation will fail. In this case switch the progress to be time based progress or enable M73 info in your slicer and switch to M73 progress reported by the GCODE file.
1 Like
that makes sense, i may give that a try. ok, this is embarrasing and might explain some of my mistakes. to install this firmware, i used one SD card in the side of the printer. while googling to find the firmware versions you mentioned above, i found this page:
Was I supposed to use a macro size card placed into the screen instead of the printer, or both?
admittedly, when i did install the firmware, i was expecting some sort of “installing” process and it really just booted up as normal. when i go into “info” it does show that its running your custom version, but maybe i have missed a huge basic step of loading it on the screen directly?
1 Like
just curious how one would do this, if i end needing to go this way. im assuming, i would use a GCODE post processing script to add M73 lines in Cura, but i would also need to install this plugin to Octoprint?
1 Like
No no, the firmware is for the Printer not for the screen.
Updating the firmware in the printer doesn’t show any progress at all even with the official creality one. You just wait between 10-13 seconds while firmware is flashed and then you see the creality logo booting and that’s it. So you did it correctly.
I’m using OrcaSlicer and Orca do it automatically after disabling one option.
I don’t know about cura case; but if you manage to enable M73 you don’t need anything else just configure the plugin to M73 progress and the rest is managed by it no need to install anything else in octoprint.
1 Like
in your plugin, just disable that toggle? i thought that was for M117 or some other command.
glad to hear my install was ok…
No, if you look at the screen there is two sections.
- First section is to enable either M117 or O9000 depending on your needs. If you want to see LCD updates and so you enable the slicer to send O9000 commands.
- Second section below is to configure what kind of percentage progress you want to see in the LCD. You have 3 options:
- Time based, it will update the percentage progress based on the current time against the total time.
- Layer progress will be current layer against total layer.
- M73 progress will report the time and progress based on the slicer updates.
So you need to configure that section not the first one.
1 Like
Oh, of course. Sorry - I think I have been looking at all these screens too many times and forgetting where certain bits are located.
it would also be nice to just scrub my posts here to save my embarrassment, but, perhaps some of this will helpful to someone else.
Hi @Iroh3d
So far things are working briliiantly.
Can I make a suggestion for future developement.
Currently when you go to tune in the printer menu when a print is active, you can change bed temp, nozzle temp, fan, and z offset.
Is there any chance if it is simple that you can also add in that you can change the flow rate (or e % as it is known on the display) ??? Just a thought.
Have a great day.
Hey guys! First off I wanted to thank you and tell you that you should add a icon where people can tip you for your hard work on you github page or something like that @Iroh3d. I’d be happy to buy you a coffee dealio or tip you in some way for putting this together! It made me ecstatic, lol. The first print I ran, the auto z offset actually worked for the first time ever! hahaha. The entire time ive owned this printer I’ve had to slave over the z offset after a bed level. I started a quick test square immediately after flashing the firmware and leveling the bed, and dude, thats the best surface this printer has ever printed. Lol. AND its supposed to print faster, have linear advance, etc? Too good to be true. I swear, if you add the ability to throw the stock g-sensor from the KE on this thing, we’d have input shaping too if I’m not mistaken. I wish i was proficient enough to code it myself, when I saw that option scrolling the the g code I immediately went “noooo waaaay.” lol. Its $12 bucks on Amazon, I’m pretty sure it would plug straight into one of the available ports on the motherboard, although I’m not positive. Even still, splicer the appropriate connector onto it I guess. Lol. Thats how I build my light bar and added the 4010/dual 5015 fan mod… Seems like it would work in prinicple… Who knows… Aaaaaanyway, lol.
Im a little confused on a couple things. I have the firmware installed and its running great so far, minus a bit of a heart attack when the bed mesh visualizer didn’t work at first. But when I checked the terminal commands I could see it was “grepping” or whatever, lol, for a previous bed mesh that got deleted during the firmware upgrade. So I just leveled the bed from the LCD and now everything works fine since the plugin now has a mesh to retrieve before it creates a new one. Which that bed mesh awesome btw. lol. Sofar the problems I’ve had are likely just like that, caused by my own ineptitude, but stil, I can not for the life of me get the filament runnout sensor to work properly. If I remember correctly, I’ve sent an M412 command in terminal and it works to turn the filament sensor on, or thats the reply I get atleast. I’ve also used the M119 command and gotten back the following,
Send: M119
Recv: Reporting endstop status
Recv: x_min: open
Recv: y_min: open
Recv: z_min: TRIGGERED
Recv: test_axis_known_x_flag = false
Recv: test_axis_known_y_flag = false
Recv: test_axis_known_z_flag = false
Recv: ok
which I think is appropriate, but I could be wrong. I do know the sensor is staying blue either way when it should be red without filament present, so theres that.
Additionally, after printing that 50x50 square and being so pleased, I started an actual print only to discover I can’t seem to get the slightest bit of adhesion now… Is this caused by the speed increases you think? Any idea why I might have gone from consistently printing without problems to not having any adhesion at all suddenly despite showing a .bed mesh variance of only .12? I always ensure its aleast at a .15 variance or better before printing. But thats not helping all the sudden. All I cant think is that I already had the speeds in the new firmware arent allowing consitent extrusion or something? Even though the linear advance is enabled within the firmware now, dont I have to toggle that on in Orca before it does anything? Or is it something thats on by default now that I need to calibrate or turn off?
Hah, sorry for the essy and thank you in advance. Im quite serious about tipping you too, lol. Just hit me with a link!
Live long and prosper🖖
1 Like
So, to save you the trouble, I figured out what was going on with my acceleration settings. I’ve had the “Emit Limits to G-Code” box checked under the advanced motion ability controls for your printer in Orca, which hadnt done a thing all up until I updated the firmware. After the update it started actually adhering to that setting in the slicer, instead of the firmware settings overriding the slicer settings like it had done in the past, So I unchecked that box/made sure the speed setting for my machine were set in Orca to match what I want them to be in the firmware. This allowed me to print at least, but its still not quite dialed in. Even with my bed level variance as close to perfect as onew can get realistically, or at least that I can achieve realistically, I’m still having trouble printing along the right side of the print bed for some reason. Everything else looks immaculate just running the new expanded bed level mesh that you added, Z offset included. But that right side screws it all up and I have to lower the Z offset to print on that side and deal with the little bit of drag it causes on the rest of the bed, or baby sit it and kinda dial it back and forth a bit during the intial layer, then its fine the rest of the way up. Or at least the very short print I did was fine the rest of the way up. I’ll try something that runs a little higher up the Z axis next and let you guys know if I have any additional problems similar to @stguitar or anything of that nature.
If you’d be so kind as to share the speed/acceleration/jerk settings you’re running on your machine @Iroh3d, I’d be very appreciative. Or anyone for that matter. I’d like to see how far I can push it and still have successful prints, but I’m still in the learning/iteration phase I guess, so some guidance from you guy’s experience would be much appreciated.
I still havent quite figured out how to solve the filament runout sensor problem, but I havent looked further into it. I scrolled up and noticed that I may be missing some of the nessecary code in the “Before Print Starts” G-Code section on Octoprint, that sort of thing. It seems the string of G-Code I added was an earlier iteration, but supposedly that iteration functioned, but the GUI gave people problems and was updated as a result. So I’m not sure why it would be successfully pinging the sensor, yet not functioning despite supposedly functioning G-code prefaces or whatever. But it very well could be that it worked on an earlier iteration of the firmware and not on the newest update or something and I need to change said G-code prefaces to fix it. So far, I couldnt use it without printing a filament guide to take some of the tension out of the filament at a certain point just prior the the sensor itself, so I gave it up till I can get that printed. Not as pressing I figure, I’ll worry about it later. Still, if you have any thoughts about what I seem to be missing here, Idn appreciate them greatly.
Thanks in advance guys!
Live long and prosper🖖
1 Like
Hi there.
I have a different settings for PLA, TPU and PETG so to not fill the message with a lot of screenshots, I uploaded my Orca Configs, you can compare it or import it whatever is best for you.
About runout sensor, based on the code of the firmware it works just by sending a HIGH signal to the printer, thats how I made my DIY Runout sensor that is working as expected, you dont need anything else. The Gcode section of Octoprint are to Pause/Resume jobs and Cancel.
So basically my DIY sensor and as @TechieZebra confirmed also the original one send the signal to the printer, and it raise the runout routine which call M600 macro to change the filament. Will be good to know if you are using the official or another variant, my DIY sensor is just 3 pins and it connects to board connector to get 5V, GND and the Signal. Like this image:
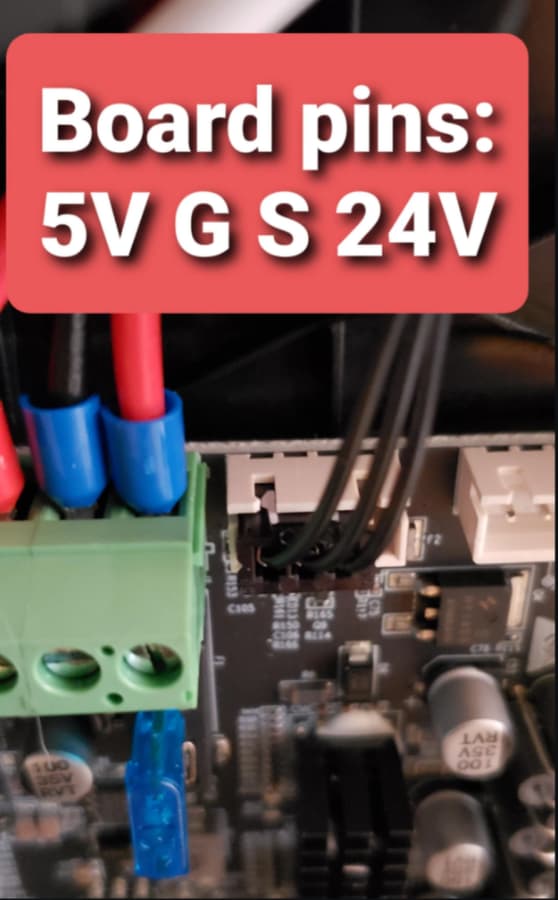
From this Source
You can check the behaviour in this youtube vide which was posted above too.
Hope that helps.
I can take a look on it, the edit routine of Extrusion Flow is not availbale in the original firmware so the main challenge will be to find if the Label for Extrusion/Flow exists at least the icon does, all the words that you see in the tune section aren’t strings but icons, so not sure if I can add an string in the menu, or how it will look since the smallest string font is the 6x12px one and you can see in the UI LEVEL GRID that is not too small as we need.
But lets see…
Thanks, will do!
Speaking of those Pause/Resume G-codes, I’m super glad you mentioned them. Now, I’m not quite sure how it happened, but luckily I was beside the printer when it did. But the filament just retracted or got pulled clean out of the hotend in the middle of a print just a moment ago. Hah. So I pause it quickly from the printer LCD and reload filament, make sure everything is okay. The tension on the filament running to the extruder from my S4 drier currently needs work for sure, so I kind of just ran the bowden tube out of the filament dryer and over to the printer for now till I can print a filament guide, like I mentioned. So it could have gotten bound up and just not had enough tension on it to pull down additional filament. Nevertheless, I catch it immediately, pause, fix it, hit resume on the LCD. I’m thinking, “well that was lucky… I was standing right here the moment it happened!” Hah, But nothing is happening and the hot end temp is going down. I look over at my octoprint dashboard on Orca and find that the printer has sent a “heater time” code to Octoprint and I’ve gotten a notifcation about it.
“Thats cool!”
I think to myself while tapping “reheat.” When its reheated, I get another notification, “Reheat Done: PurgeMore/Resume” I click resume. Another notification “Printer is Paused: Resume/Cancel” so I click resume and man, immediately the nozzle crashes into the print and everything freaks out and binds up. I freak out and frantically hammer the cancel print button from Octoprint. Print with an hour left is toast, big gashes taken out. I really hope that nozzle survived, but somehow I doubt it. Brand new High Flow nozzle too… But as long as the printer is okay, whatever. Its a $20 nozzle. Ill reorder and switch to my backup. hah. Anyway, now that you mention it, I bet that Pause/Resume g-code is what did it… Likely would have resumed fine otherwise, but when I hit resume from Octoprint itself, it sent that string of g-code and the printer traveled to the wrong point likely directed by that g-code.
G91 ; Set to relative positioning
G1 Z-10 F4500 ; Move Z axis back down
G90 ; Set back to absolute positioning
Gotta be it, right? hah.
Also, it looks like your configs might have gotten deleted =/
Also, I forgot to mention, its the official creality filament runout sensor like the one that comes with the KE. I just bought it from Amazon and added it through the available pin on the board. I’m sure youre aware, but they seem to come with prebuilt ports for the light bar, runout sensor, and Sonic Pad already on the printer’s board so you can just buy them and plug and play. I went that direction for the runout sesnor right after I bought the printer. But I decided to DIY my light bar so I could run it through a Tuya device and connect that device to my Alexa. I’m a big Star Trek nerd, so Alexa is renamed “Computer” around my place. And all the rooms are “Captain’s Quaters/Engineering/Shuttle Bay” rather than bedroom/laundry-print cave/garage." Lmao. So between that, an Octoprint plugin or two, and Alexa I can say “Computer, tea, Earl Grey, Hot” and it’ll turn the printer and lights on. Then “Computer, report” give me the name of the current print and the remaining time, etc. I really go out of my way to make a fool of myself. Lol.
Ok try this link for the orca files.
So, I figured something out today that I may or may not have missed in the mass of information in this post. It could be helpful for someone else which is why I am posting.
I downloaded the 10975 (128000) firmware from iroh3d but I have not been able to use it successfully until now. Turns out that the firmware loads absolutely fine but the printer will not auto-evel on first attempt if Octoprint is actually conencted to it as it gives an invalid mesh error and throws an M112 emergency stop message to the printer.
The fix for this is to run the first levelling directly on the printer screen with no serial connection to octoprint. Once it has the initial valid bed mesh it should work fine going forwards.
1 Like
well, I feel really dumb, but this needs to be shared with this thread and especially @Iroh3d given all the great work and support given.
I rolled back to factory settings, and started doing lots of various tests to eliminate my issues as I had admittedly just changed too many things while installing your firmware. I have proven that my layer shifting was 100% my machine setup, and nothing with the firmware. I have now printed successfully with the firmware with known good models that were sliced properly.
I had all sorts of things that an entirely new person to 3d printing might run into and not know it. For one, I had loose belts, loose screws, and had moved the printer to a new room and probably had some strange slice settings. I was also setting up octoprint for the first time ever. its really dumb, but honestly just stuff I had no idea I had to think about as the owner of a 3D printer.
now for feedback on the firmware instead of the noise I have polluted this thread with.
I loaded the firmware up, and the first boot, I did get stuck on the blue loading screen for a while. I gave up, and just power cycled it, and it came right up then. Then, I successfully leveled, and the new grid looks great. I had seen this before, but just sharing my results.
Lastly, swapping to time based time tracking good enough for my stuff, and my display is working better or as expected now. I think before something wasn’t right, but I had lots of weird stuff happening.
I still have the “None” layer calculation, but that makes sense, given my usage of folders. I can live with that too.
I will be trying several other prints and can happily report anything that seems weird. I finally now understand how to eliminate software (firmware vs slicing) and environmental issues better. boy do I feel stupid ![]()
1 Like
Glad to hear that now all is working. About the folders plugin I’m working on a patch to solve that and get the layers. Stay tuned to the release of the Octoprint plugin.
1 Like
Hahahaha, I legit hard the exact same problem and posted about it a couple replies up maybe two days ago. Lol. Scared the hell outta me at first, but I releveled the bed through the LCD and then octoprint worked fine again. Glad you worked it out man! Also, Im pretty sure I was already connected to to Octoprint via the serial port when I ran the bed level from the LCD. So I dont think that matters so much as ensuring that there is a mesh for the Bed Level Visualizer plugin to view before it runs its code. With is seeking a mesh before it begins, it fails if there is no mesh for it to find. Watching the terminal while it happens explains itself in a way.