I have released a new version v0.1.6 should fix the issue with the usage of folders give it a try and let me know if works now.
I was wondering the same thing. I’m new to 3D printing; I’m not new to hardware or engineering. I decided I needed to know.
Here’s a quick guide.
A) Run this in your console - DUMP_TMC STEPPER=stepper_x (adjust for each motor)
B) Look for the version. It will be “version=…”
If you see: “version=0x20” - you’re using the TMC2209
If you see: “version=0x10” - you’re using the TMC2208
Source: TMC2208 TMCStepper: TMC2208_n::IOIN_t Struct Reference
Source: TMC2209
https://teemuatlut.github.io/TMCStepper/struct_t_m_c2209__n_1_1_i_o_i_n__t.html?utm_source=chatgpt.com
You’re essentially reading the IOIN Register for the driver. The headers are in there, too.
Let me know if I can help!
Hi all, github user eduard-sukharev made a beautiful PR to the code creating a very nice grid for the level values. I will check if I can add the Extrusion flow during the weekend and release both, if Extrusion values didnt work as expected I will just push Eduard’s changes.
1 Like
Found a small niggle with plugin v0.1.6.
When I install v0.1.6 clean and not upgraded from a previous vesion it shows as installed in Octoprint but does not appear in the list of plugins to set the options, even after rebooting eberything.
However if I install v0.1.5 first and then upgrade to 0.1.6 it appears fine.
To roll your own firmware for the Ender-3 V3 SE, you’ll need the Marlin firmware source code. Configure the Configuration.h and Configuration_adv.h files for your printer’s specs (e.g., build volume, extruder type, thermistor, and stepper drivers). Use the PlatformIO plugin in VS Code for compiling and flashing.
With all due respect @marryco:

FYI: This is exactly why this thread was started: to get the (at the time) ‘closed source’ deets of the E3V3SE’s Marlin Configuration. Luckily, if you read the above posts, you’ll see Creality eventually did release them (I’d like to think we had a hand in that), and smarter, brighter minds than mine worked hard to unravel that thread and add more features.
They are the superheroes: @Iroh3d, @TechieZebra et al.
I’m sad that my wife bought me a Nebula Smart Kit, because I’m now learning how to do the same thing all over again with Klipper!
BTW: Did you use “AI” to generate that post?
Because - if you did - there was too much “A”, and not enough “I” …
I hope you continue to have a happy new year!
Mikey
1 Like
1 Like
Hello guys.
The Release v1.0.9.7_6 is out now and includes:
-
The Item in the Tune Menu to change the Extrusion/Flow Rate.
-
And also the Grid from Eduard Sukharev from his PR#18


Best Regards!
1 Like
Hi @Iroh3d
Thankyou so much. New firmware installed and running.
Not sure if its a bug, which was minor, I could not relevel the bed when Octo was connected. An error came up that the firmware reported an issue and an emergency stop was sent to printer, however, turning off Octo and re running the levelling worked fine.
Also, this is my grid is there anything i should do to get the levels a litttle better like should i loosen the screws slightly at the rear of the bed to get the numbers to a + reading.

Here’s a weird thought: I’m liking Klipper on the Nebula Pad so far (latest version rooted via https://www.reddit.com/r/Ender3V3SE/comments/1hp8omt/rooted_nebula_pad_firmware_11027/ * GitHub - koen01/nebula_firmware: create custom nebula pad (retail version) firmware) - but (and I know this is crazy) would it be possible to run Octoprint / Marlin on a Nebula pad?
I know I’d have to reflash the firmware - so one could not ‘dual boot’ - but it’s an interesting thought as an academic exercise …
Discuss?
Hi, it’s not a bug. Since the grid has changed it doesn’t match with the old Octoprint values.
To Do a bed level are part of the release instructions to avoid that warning message in octoprint.
For the level improvement you can try to use PLA Shims which for me worked so good. In printables are the STL file for the shims.
Before going that way would be good to know the Arch of your nebula. Seems possible to build an Image with dual boot but will be important to know:
- Size of the system (memory and storage)
- Type of arch. I’m assuming arm right?
- I/O of the system.
Although Octoprint can run in a Linux device it has some special needs about hardware and some limitations too. It will need an USB port for sure and some free memory to run without hiccups.
Just installed your latest release and did first a bed level from the LCD display, with Octoprint connected and had zero issues. Then did one from within Octoprint, and again, no issues.
BTW, the LCD display looks great with the new layout logic for leveling!
1 Like
Hello, thank you for this. Just installed v1.0.9.7_6. But I cant use linear/pressure advance option. How I can enable it? Pressure advance settings not affects on result…
Just runned orca slicer pressure advance test. And looking like there is no changes between layers

Hey @Iroh3d , im a total noob, and i want to run ur new firmware, could you tell me (or add to the readme of your github) what plugins i need for octoprint?
I currently have these plugins (I use octoeverywhere, i just havent cleaned out obico or ngrok yet)
Print Scheduler
SkipTo
Obico
Ngrok
Dashboard
OctoEverywhere
octoapp
I would prefer to use the by layer instead of time btw
oh, and I use creality print and upload gcode to octoprint. Also i use octoapp on my phone
The readme is in the GitHub page. GitHub - navaismo/OctoPrint-E3v3seprintjobdetails: Octoprint Plugin to send Custom 'O9000' Commands to the modified firmware on E3V3SE to display printer job on LCD Follow the instructions.
Creality Print is not within the supported files tested, most probably the Total Layer count may fail and so the progress based on Layer.
If fails, to make a patch I’ll need a file from creality print software.
I haven’t used the feature, it’s in the firmware provided by the PR of Queuep user. If I recall correctly you need to make the PA test that make lines and numbers I the bed then choose the best for you and then in the slicer you need to disable some option which I don’t recall and use the number you chose to use it a K factor.
But better check Queuep’s page or reddit post he has instructions there on how to use it.
Before you can use pressure advance you need to set things up and calibrate for it.
In OrcaSlicer (what I use), you can find the option for your filament here:

Than run a least this calibration test:
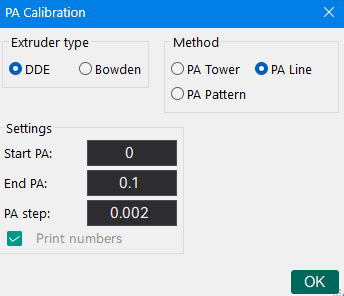
See Calibration · SoftFever/OrcaSlicer Wiki · GitHub for more info
Hi @Iroh3d
Not sure if its a glitch or its my setup.
What I have discovered is if you start a print, and cancel it for some reason like it doesnt stick down nicely, when you restart the print, the display on the printer does not update to show the printing, it stays on the default E3V3 printer display with the 4 icons.
The only way to get it to display again is by turning printer off, then back on and then restart the print.
Have a great day.
I’ve actually had a couple similar sounding bugs myself. Believe I paused a print initially on the LCD, made a change in Octoprint (i.e. canceled an object that was failing) and then tried to restart within Octoprint. Technically, if I remember correctly, I was actually doing all this through my phone using Octopod via Octoeverywhere. Nevertheless, the print refused to resume no matter where I tried to do it from after that. Tried Octopod to my recollection, and it heated up and then beeped like it was resuming a print after a filament change, but didnt do anything. So I tried from the LCD, first time I tried it seemed to give me the normal dialogue boxes for resuming I feel like, but did not resume. Tried again after a few minutes, and after that any time I’d try the LCD it just acted like it thought a print was in process and instead gave me diaglogue boxes more akin to :are you sure you want to pause the print?" rather than “would you like to resume the print?” Went to the Octoprint window in Orca and tried, same no response. Personally I assumed it was more a failure in the long chain of plugins and whatnot I have running in tandem at any given time. But I have experienced other “bugs” from the LCD of which I’ve added pictures of for @Iroh3d to take a look at.
Not sure if you’d prefer I opened a github issue instead, but I figured I’d just provide some basic feedback. Nothing is broken by any means for me thus far, but every now and again my LCD does seem to lag behind or something. When I send a print job, it will initiate, but only partly. As shown in this photo.

Initially the Tune/Pause/Stop buttons were not visible either. But upon turning the knob, they appear. If from there you click into “Tune” and then back out, it immediately fixes itself and you have:

Thought Id bring it to your attention. I also saw the update when it dropped on Github! Sadly i havent taken a look at it yet as Im still playing with the previous version and honestly just didnt realize how much quality of life the new additions added honestly. lol. I’ll definitely be checking it out asap. I’m off to try setting up pressure advance at the moment!