Mine is giving the error now. Its on the first try. I can hit resume and then resume again it goes past it and I get a bed level.
On the display its 2521 error.
So i can’t tell which sensor is giving me the issue.
09:49:35
// [RAISE_ERROR]{‘code’: ‘key522’, ‘msg’: ‘PR_ERR_CODE_PRES_NOT_BE_SENSED: The pressure data in channel={0} cannot be properly sensed.’, ‘values’: [3]}
09:49:35
!! {‘code’: ‘key522’, ‘msg’: ‘PR_ERR_CODE_PRES_NOT_BE_SENSED: The pressure data in channel={0} cannot be properly sensed.’, ‘values’: [3]}
09:49:35
!! {‘code’: ‘key522’, ‘msg’: ‘PR_ERR_CODE_PRES_NOT_BE_SENSED: The pressure data in channel={0} cannot be properly sensed.’, ‘values’: [3]}
They are sending me new load cells aka strain gauges. I can’t tell which one is the bad one. I was looking at the other posts and it wasn’t clear. The bed wont home so its probably the first one.
That’s awesome! Hope that clears the error!
I’d still love to know the resistance values of both what you have and the new ones when they get there.
Might help out other following this issue.
Please keep us posted!
Mine is just as unlevel on top of being unlevel. 1.562… the bend is .541mm. Creality told me the leveling sensors would handle upto 2mm. 1.562 is 1/16". No leveling sensors that i know of can compensate for that.
Does anyone know where I can buy the sensors to have on hand? Link? The error messege starting appearing on one of my K1 Max’s so i need to get new sensors and have a few on hand in case it happens to one of the other ones.
Gonna touch on a few points here, first off, Greets qwerty! Hope you find all the answers you need here (Printer related). I’ll start a new thread on positive affirmations later this week!
The sensors are based in the four corners and yes, the note I received from the engineering dept states 3mm max variation can be compensated for. Pretty outstanding I’d have to say!
Make sure that nothing extra is touching the area near them, they are incredibly sensitive, as I found out. When the machine does the self-level, it will hit the 4 corners, if that data is out of spec, it will do the 6x6 test.
These are Hx711 sensors, to the best of my knowledge (Feel free to educate me if I’m wrong) during a deep dive into the klipper dev rooms.
There is a lot of things that can influence the data from these, but prone to failure, they are not. Used because of their reliability.
***My Issue with this is not resolved, but…after 8-9 factory resets (some using earlier fw, kinda random, I just wanted to scramble it’s brain, lol) the results are very positive! I’m now printing again! Here’s 2 Layers of Transparent PETG it’s cloudy for a reason so don’t focus on the clarity.
This is a MASSIVE success, mind you this is the 3rd attempt. Ik some of my settings are a bit off, but I figured I’d try the hardest filament to print well (I’ve never printed w Clear PETG before) to see what happens.
Overture PETG, 250c bed 80c, 16% humidity, 120mm/s, Model fan @ 20%, 1st layer @ 44mm/s fan @ 10%, (During print: Flow @ +10%, Z-offset @ -0.010 -2nd layer -0.005)
Hi,
I’m now on 1.3.3.8 fw and rooted, and still have this 2529 error only when I start a new print in the same session (I mean after finishing a print, the bed goes down, wait for the bed low temperature, pull the print out and then restart a new print). When the bed goes up for homing, it stops and down, and after some up and down it gave the error.
Sometimes, before launching a new print, I set Z homing, sometime, it goes well, sometime it failed with this error 2529.
What I can do to start a new print is to power OFF, wait for temperature decrease and power ON, and then it can do Z homing.
I don’t know if it’s related to the bed sensors, but I don’t understand how do you fix it ? just reset to factory several times ?
If anybody else is experiencing the strain gauge problems then there are many for sale on ebay and amazon. Just type HX711 strain gauge in google. You can get a set of 4 plus an interface circuit board with the HX711 interface chip (not needed) for less than 10 euros/us dollars. The K1/K1-MAX has an interface board under the hot bed, so use that rather than the one supplied with the kit. It can be important to replace strain gauges at the same position and angle as the one being replaced. Mark round the old one, peel it off, clean with Isopropanol, dry, and stick the new one in the same place and direction. Echoing what was said above, it is highly unusual for these to fail. If they give wrong or varying readings, then they may have come unstuck. Nominal resistance of the gauges I have used is 350 ohms at room temperature and no applied strain. Don’t forget to re-calibrate the flatness after any work like this.
The hesitation when the printing cycle tries to home Z can often be down to sticking or drag on the vertical leadscrews and guide rods. Clean them well with Isopropanol and re-grease with a light grease, and then run them up and down through the whole movement. Be careful not to get solvent or grease on any belts. Also check the leadscrew nuts, which should be free to move in the horizontal plane, with very little backlash in the vertical direction.
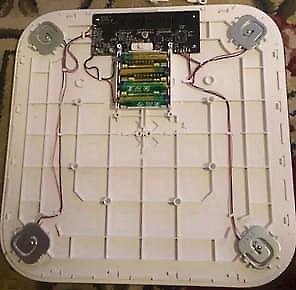
Firstly, the gauges used on the Creality beds are NOT the common three wire devices on Amazon and ebay. I was misled by the picture of an inverted bathroom scale above
The K1/K1-MAX devices are in fact a full load cell at each corner. Each load cell has four strain gauges in it wired in a bridge, and has four wires rather than the common three wires. They are also located and held in place by screws so should not be as critical in placing as the bare strain gauge I am used to.
Why people are having these fail is beyond me, they are one of the most reliable components I can think of. Maybe dodgy wiring or plugs?. Could be worth just unplugging each one and plugging it back in a few times. Also try wiggling the wire about to see if there are any bad crimps at the plugs.
I buy a New K1C. Same error by the firts Time. Error 2529.
The heat bed wan’t to lift the nozzle. They push is up.
Hetbead stucks now.
It’s a shame for the first Time, but I hope there is a solution.
Inread the topic but the anwswers/methodes arra not the same. A proper solution exist for this?
I own the K1 Max which I bought a little over a month ago and I slowly was getting error 2529. It was happening randomly, sometimes not showing any errors after a full day of printing, but tonight it won’t go away. I tried the self test, power cycling, and tried to home Z, but the error is non stop now. Anyone have any tips or hacks for me to try? This is so upsetting.
I’m getting the same error code of 2521 and I need to find out how much strain gauges are and the board cuz it’s only been 5 months since I purchased this printer and shudnt be having problems already
My key 2529 (and 2522) error codes were caused by a bad solder connection on the main load cell circuit board connector (the 5-pin connector, next to the blue LED). If you are not EXTREMELY careful in removing all of the glue on these connectors BEFORE trying to unplug them, you will destroy the circuit board, and or the connectors. All of these connectors are just surface mount components, so they will just peel off of the circuit board easier than they unplug. You should also try to hold the connector header down onto the circuit board, while you pull up on the connector. If you are not experienced in working with this small of a connector, and don’t have a soldering iron made for surface mount components, I don’t even recommend trying to do this kind of repair.
YOU HAVE BEEN WARNED!!!
Anyway, if you are still brave enough to proceed, you will need a 1.8mm triangle bit to remove the mounting screws from this board (a TA-1.8 screwdriver bit, I believe). You can buy a complete set fairly cheap, and they also come in handy for working on toys and other electronics that use triangle bits.
A magnifier is also required to inspect all of the solder connections properly (at least for my eyes).
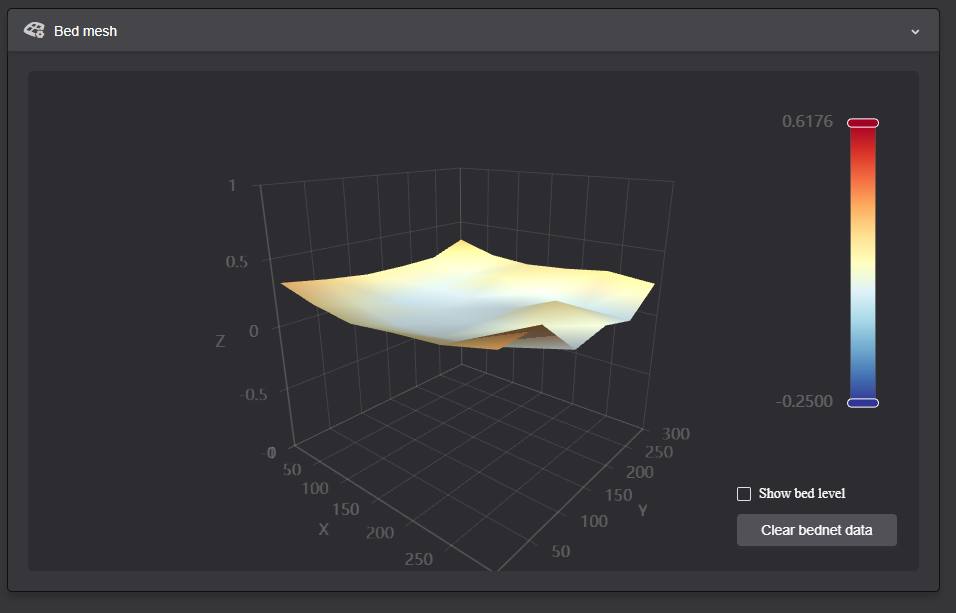
After repairing the connector, and re-calibrating the level sensors, my bed mesh graph is now flat to within .2mm…
I just bought 2, Ender 3 V3 Plus printers.
For the first time tonight, one of them threw that exact same error **2529 ** Leveling sensor chip abnormality, sensor damage or environmental impact
Is this a common thing with Ender 3 V3 machines whether K1 Max or Plus?
As you know about a bad solder joint on the motherboard, I’m wondering if this is a quality control issue that could be plaguing several models?
I’ve learned that their quality control is VERY POOR.
ON my 1st machine, there was a bad connector for the top limit switch. The problem was that the female pin’s locking piece was bent down inside it, rather than slightly up to create the lock. So the male pin couldn’t slip in. The male pin was also bent!
That tells me that whomever packed this up at the factory, KNEW this issue was there and just passed it on! NOT GOOD.
The 2nd machine threw a motherboard FAN error. I took the bottom off, carefully so as to not unplug the fan, but it already was unplugged. OR at least, not plugged in tightly.
I reseated it and all is fine.
But now I’m concerned about that 2529 error.
It could be the bed sensors or just a solder joint issue.
I’m hoping that the error is just a one-off.
If it happens again, I’ll contact Creality and see how their support works.
Who knows, maybe they’ll send me new bed sensors and a new motherboard. That would be good.
Anyway, please let me know if you’ve heard anything through the grapevine on this Plus machine having this (or other) issue(s).